

Creating a brand new mannequin on an EdgeTX radio transmitter on your FPV drone is less complicated than you suppose. Whereas many brand-new radios include a preconfigured profile for quadcopters, studying how one can arrange a brand new mannequin from scratch is extremely helpful. On this information, I’ll stroll you thru the method step-by-step.


The interface and steps could differ barely between radios with monochrome shows and people with shade screens, so I’ve supplied directions and screenshots for each varieties.
On the lookout for a brand new EdgeTX radio? Take a look at our suggestions: https://oscarliang.com/radio-transmitter/
Checking Default Channel Order
Earlier than creating a brand new mannequin, it’s vital to make sure your radio’s channel order is ready up appropriately.
| B&W Radios | Colour Display screen Radios |
|
|
 |
 |
By default, the default channel order ought to be AETR, you shouldn’t change it except you already know what you’re doing. AETR stands for Aileron, Elevator, Throttle and Rudder, it principally means:
- CH1 is Aileron (Roll)
- CH2 is Elevator (Pitch)
- CH3 is Throttle
- CH4 is Rudder (Yaw)
Accessing the Mannequin Choice Display screen
| B&W Radios | Colour Display screen Radios |
| Press the “Mannequin” (or MDL) button to enter the mannequin choice display. | Press and maintain the MDL button for 1 second. |
 |
 |
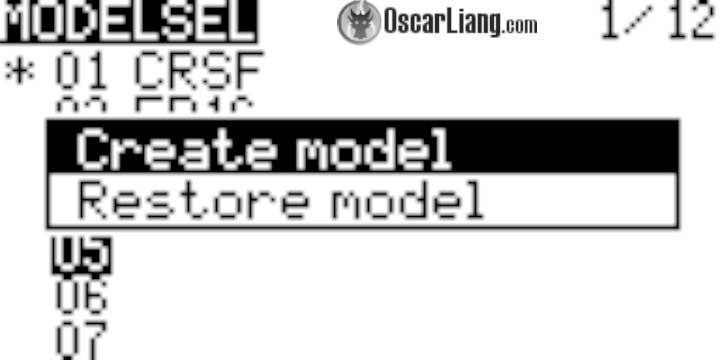
Making a New Mannequin
| B&W Radios | Colour Display screen Radios |
|
|
 |
 |
| x |  |
In case your radio doesn’t supply a mannequin setup wizard, it’s not an issue, the radio will create a generic mannequin profile. You may set it up from scratch following the directions beneath.
Set Mannequin Identify
| B&W Radios | Colour Display screen Radios |
|
|
 |
 |
Professional Tip: you could create separate profiles for your entire FPV drones. Nonetheless, in case you have many drones like I do, that’s lots of work and might be tough to take care of. As FPV drone pilots, we don’t usually want to alter mannequin settings, subsequently I have a tendency to only create mannequin profiles for the completely different radio hyperlinks I exploit. For instance, I’ve one profile for ExpressLRS, one for Crossfire and one other for Frsky. Every of those profile is sure to a number of fashions which might be utilizing the identical radio hyperlink.
That is simply my suggestion, it’s completely as much as you the way you handle your mannequin profiles, there is no such thing as a mistaken or proper manner.
I’ll simply name this mannequin “ELRS” which stands for ExpressLRS.
Need to use your personal {custom} mannequin photographs? Take a look at this information: https://oscarliang.com/custom-splash-background-model-images/
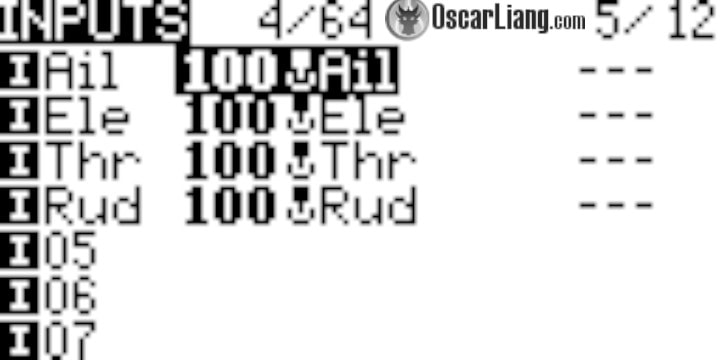
Checking Inputs
There are two pages you want to configure for channels: Inputs and Mixes.
The Inputs web page is mechanically arrange by the system, however it’s a good suggestion to double-check. This web page can be utilized to change uncooked management inputs earlier than being mapped to completely different channels within the Mixes web page – akin to including expo or adjusting weight on the uncooked enter values, however that is sometimes utilized by fixed-wing pilots who don’t use a flight controller. You may study extra in regards to the objective of the Inputs display right here: https://oscarliang.com/inputs-mixes-outputs/#Inputs-The place-Management-Begins.
When you solely fly multirotors, you’ll be able to normally skip this display, as there’s no want to alter something.
| B&W Radios | Colour Display screen Radios |
|
|
 |
 |
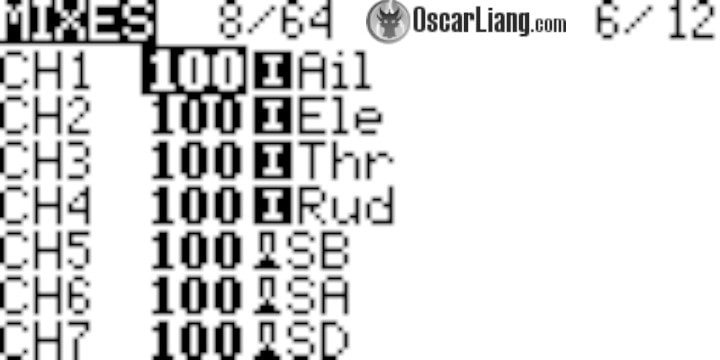
Configuring Mixes
Within the Mixes web page, you’ll be able to map inputs to channels. Radio techniques usually have 8 to 16 channels obtainable, for instance, ExpressLRS helps as much as 16 channels. The primary 4 channels (CH1 to CH4) are at all times used for the stick controls, and the remaining channels are for switches, generally known as Auxiliary channels (AUX).
| B&W Radios | Colour Display screen Radios |
|
|
 |
 |
The channels are setup mechanically by the radio primarily based on the default channel order (as we confirmed earlier in step 1), so usually you don’t want to alter something right here. Nonetheless, it’s a good suggestion to double-check to keep away from any surprises. In case your default channel order is AETR, the Mixes ought to present:
- CH1 Aileron (Roll)
- CH2 Elevator (Pitch)
- CH3 Throttle
- CH4 Rudder (Yaw)
To study extra about channel order, what it’s, and how one can change it manually, you’ll be able to observe this information: https://oscarliang.com/channel-map/
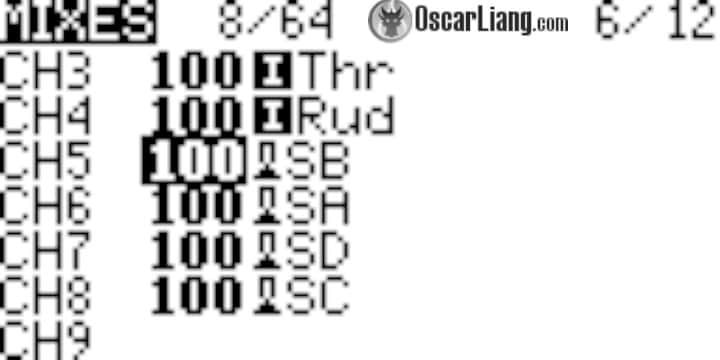
Swap Configuration
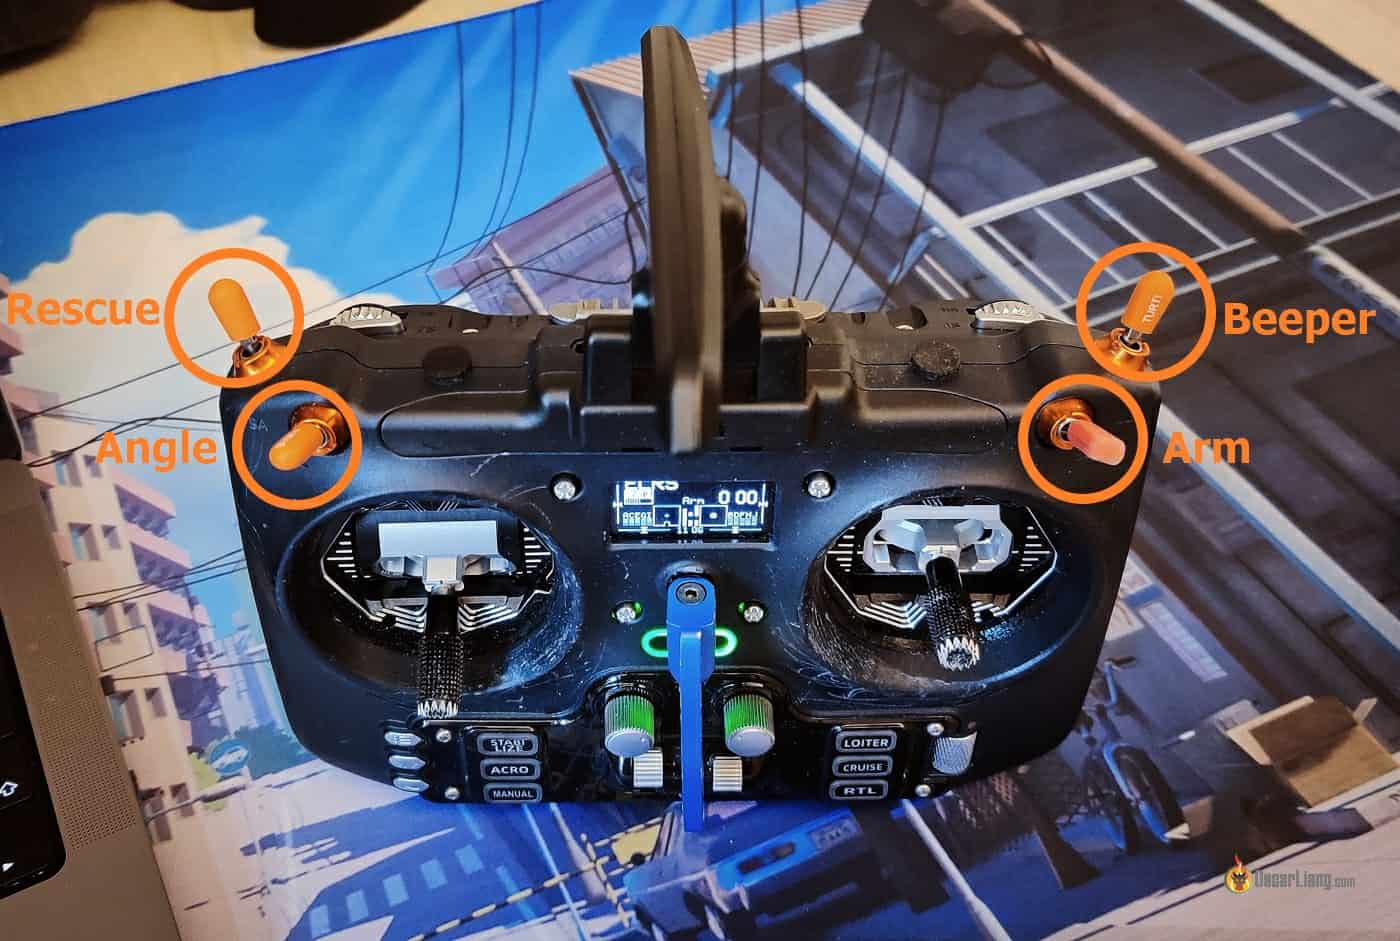
You will want to configure switches for arming the drone, flight modes, and beeper.
| B&W Radios | Colour Display screen Radios |
|
|
 |
 |
That is how I usually use my switches:
- For Arming: Any 2-position change
- For Angle/Horizon Mode: Any 3-position change
- For Beeper: Any 2-position change
- For extra options, akin to turtle mode or return to residence: Any 3-position change
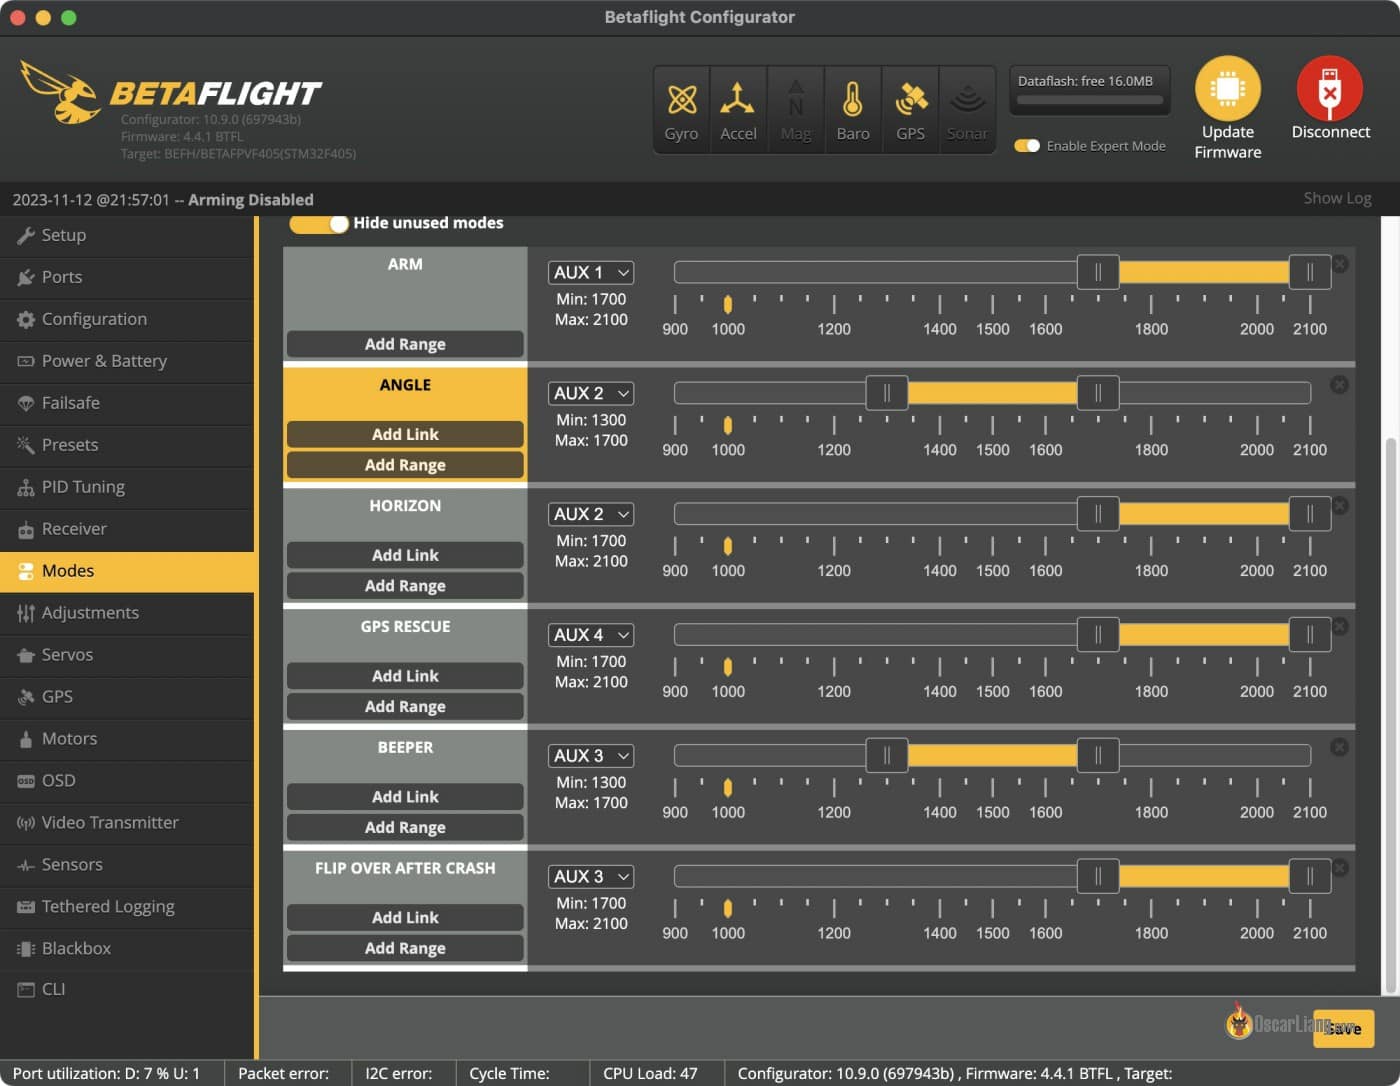
Now, go to the Modes tab in Betaflight Configurator, and assign the AUX channels to the features you wish to use. Be aware that:
- AUX 1 is CH5
- AUX 2 is CH6
- AUX 3 is CH7
- AUX 4 is CH8
- and so forth…
You may study extra about Betaflight Modes and how one can set it up right here: https://oscarliang.com/betaflight-modes/
Binding to ExpressLRS Receiver
| B&W Radios | Colour Display screen Radios |
|
|
 |
 |
Now you’ll be able to bind the drone to your radio following this information: https://oscarliang.com/bind-expresslrs-receivers/
Telemetry Setup
Telemetry is helpful for monitoring important flight knowledge, akin to battery voltage and GPS coordinate (in case you have a GPS module put in).
Trendy radio hyperlinks akin to Crossfire or ExpressLRS they each assist Telemetry.
To set it up, go to Betaflight Configurator, Receiver tab, and allow the Telemetry output choice.

| B&W Radios | Colour Display screen Radios |
|
|
 |
 |
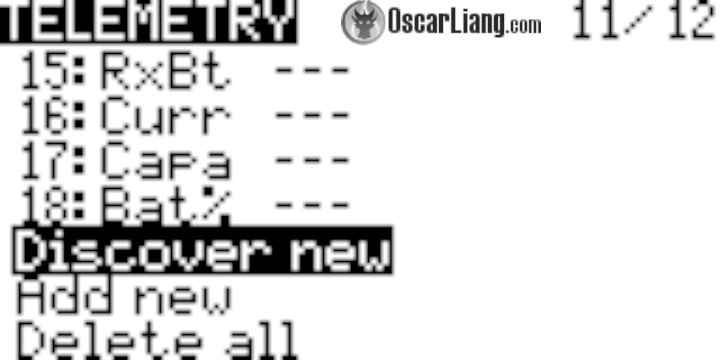
| When telemetry is working, the sensors ought to be updating quickly, with an Asterisk on the finish flashing. | When telemetry is working, the sensors ought to populate, with an black dot flashing, indicating the worth being up to date. |
 |
 |
Finalizing Mannequin Setup
| B&W Radios | Colour Display screen Radios |
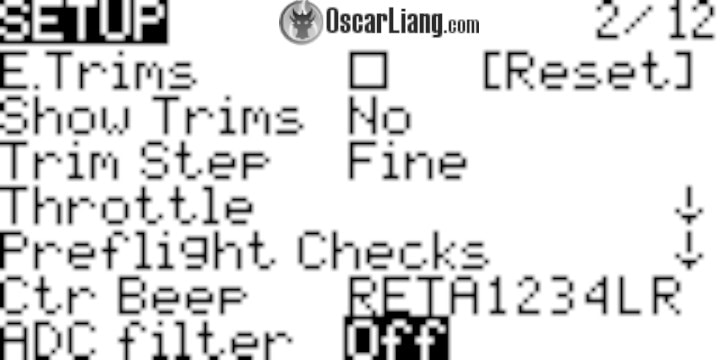
| In Mannequin Setup, flip ADC Filter to OFF to cut back latency and keep away from interference with PID tuning. | In Mannequin Setup, go to Others, flip ADC Filter to OFF to cut back latency and keep away from interference with PID tuning. |
 |
 |
ADC filter is simply wanted for fastened wings with out a flight controller, it might easy out RC instructions and scale back jitter actions in servos. Nonetheless, it might introduce extra latency to your controls, which isn’t ultimate for multirotors, Betaflight has its personal built-in RC smoothing anyway, so ADC filtering isn’t wanted and ought to be turned off. You possibly can additionally depart the choice at World (default worth) and handle it from {Hardware} web page in Radio settings.
Listed here are another non-compulsory options that I usually configure in my mannequin.
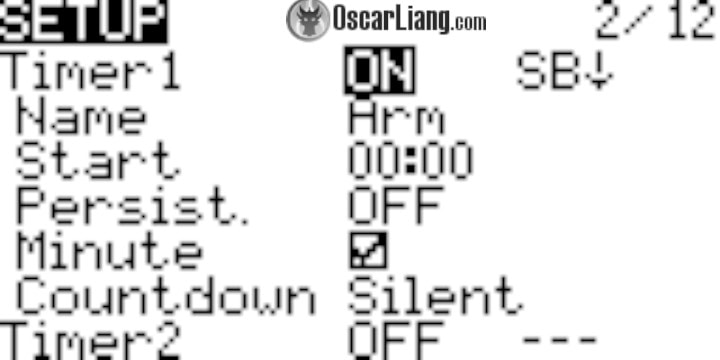
Arm Timer – the radio says the time each minute. Timer 1 begins when the arm change is activated. It helps me preserve observe how lengthy I’ve been flying for.
 |
 |
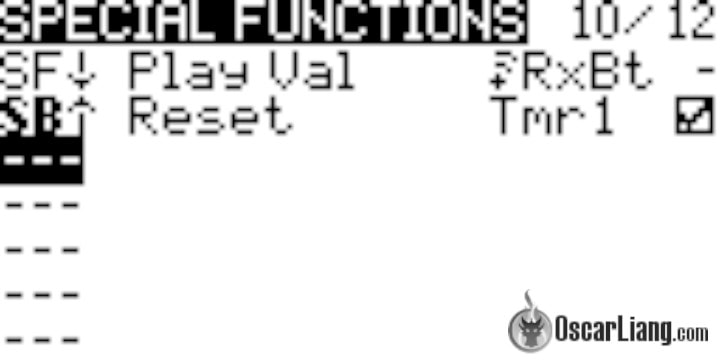
Listed here are the particular features I’ve. One perform is for studying battery voltage out loud utilizing a momentary change. The opposite perform is for resetting timer 1 when the arm change is deactivated.
 |
 |
Earlier than your first flight, completely check all controls in Betaflight Receiver tab, with out plugging within the LiPo battery. Confirm that the management route, arming change and different auxiliary features work as meant.

It’s vital to make sure yaw, roll and pitch sticks at middle place are precisely 1500, and all these channels, in addition to throttle, can attain not less than 1000 and 2000 at their finish factors. Slightly decrease than 1000, and better than 2000 is okay (e.g. for the bottom, 988, and for the best, 1012, are each acceptable. In any other case, you aren’t utilizing the complete vary of your controls, and it is best to repair it within the Outputs web page on the radio by following this information: https://oscarliang.com/adjust-tx-channel-mid-end-point/
Backup Mannequin Profiles
As soon as you’re pleased with how your new mannequin profile is setup, it is best to again it up.
Following directions right here to backup and restore fashions and radio settings: https://oscarliang.com/backup-restore-models-radio-settings-edgetx/
Conclusion
Congratulations! You’ve efficiently arrange a brand new multirotor profile in your EdgeTX radio. The setup might be not probably the most intuitive for newcomers, however it’s a robust radio system, the deeper you study this technique the extra you’ll be able to obtain. All the time guarantee your configurations align together with your particular gear and desires. Protected flying!
Edit Historical past
- Nov 2023 – Information created
- Apr 2026 – Up to date directions, added screenshots for shade display radios