

In case you construct notebooks for recurring duties corresponding to every day buyer evaluation, weekly report technology, or information high quality checks in Amazon SageMaker Unified Studio, you’ve doubtless wished to run them robotically on a schedule. Till now, there wasn’t a local method to do that. Groups needed to handle orchestration individually, though the interactive pocket book expertise was already in place. Now, pocket book scheduling is obtainable, so you’ll be able to configure your manufacturing workloads to run robotically with minimal guide intervention.
On this publish, we stroll you thru the brand new scheduling and orchestrating capabilities for notebooks in Amazon SageMaker Unified Studio. You’ll discover ways to:
- Set off on-demand background runs, corresponding to a mannequin re-training job, with out ready at your desk.
- Create recurring schedules for duties corresponding to nightly information freshness checks or weekly enterprise evaluations.
- Parameterize notebooks so a single template can generate studies throughout completely different AWS Areas or buyer segments.
- Orchestrate multi-notebook workflows the place one pocket book’s output feeds into the subsequent. For instance, an extract, rework, and cargo (ETL) pipeline adopted by a abstract dashboard refresh.
- Debug failed runs with AI-assisted troubleshooting.
Pattern use case overview
On this walkthrough, you’ll tackle the position of a logistics analyst who displays delivery efficiency throughout carriers. The pocket book hundreds delivery information from the ShippingLogs.csv dataset, identifies late deliveries, and generates a efficiency abstract. You need to run this pocket book each morning with out guide intervention, reuse it throughout completely different carriers, and know when one thing goes improper.
You’ll begin by operating a pocket book within the background and viewing the outcomes. Subsequent, you’ll create a recurring schedule for every day runs, then parameterize the pocket book to generate studies for various carriers. Additionally, you will orchestrate the pocket book in a multi-step workflow and debug a failed run utilizing AI-assisted troubleshooting.
Conditions
Earlier than you start, you want:
- An Amazon SageMaker Unified Studio challenge with Notebooks enabled. See Arrange IAM-based domains for permission necessities.
- A pattern dataset. We use the
ShippingLogs.csvdataset, which accommodates delivery information together with estimated and precise supply occasions, carriers, and origins. You may obtain it from the Workshop Studio (the file is calledShippingLogs.csvon the linked web page).
Establishing the pocket book
Begin by creating a brand new pocket book in your SageMaker Unified Studio challenge. In case you haven’t already, add the ShippingLogs.csv file below the Shared tab within the Information panel.
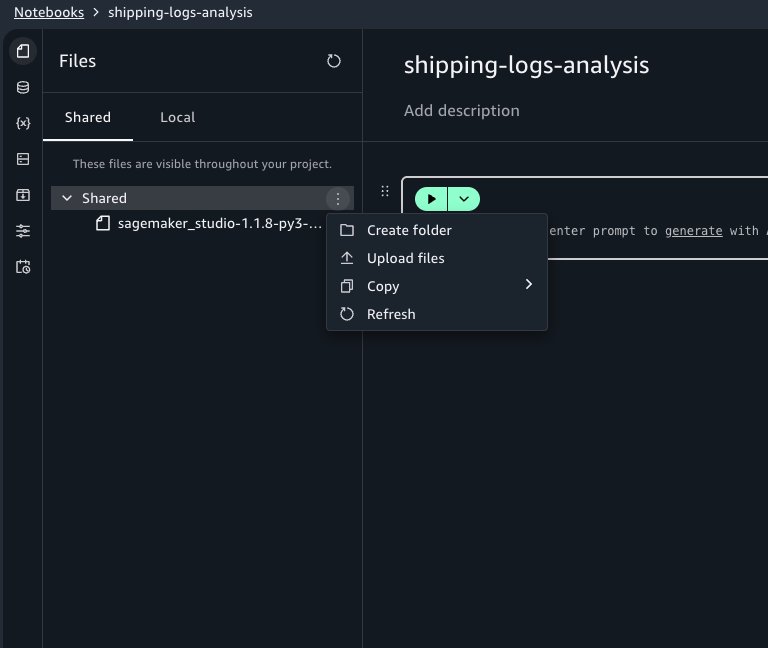
Within the first cell, we load and discover the dataset. To reference the file in code, choose the file within the Shared tab and replica the Amazon Easy Storage Service (Amazon S3) URI proven within the file particulars. Alternatively, you’ll be able to reference it with this code:
The dataset accommodates columns together with Service, ActualShippingDays, ExpectedShippingDays, ShippingOrigin, ShippingPriority, and OnTimeDelivery. Add a second cell to investigate delivery efficiency for a single provider:
With the pocket book working interactively, you’re able to automate it.
Working a pocket book asynchronously
To set off an asynchronous run, open your pocket book. Within the pocket book header, select the menu on the Run all button, after which select Run in background.
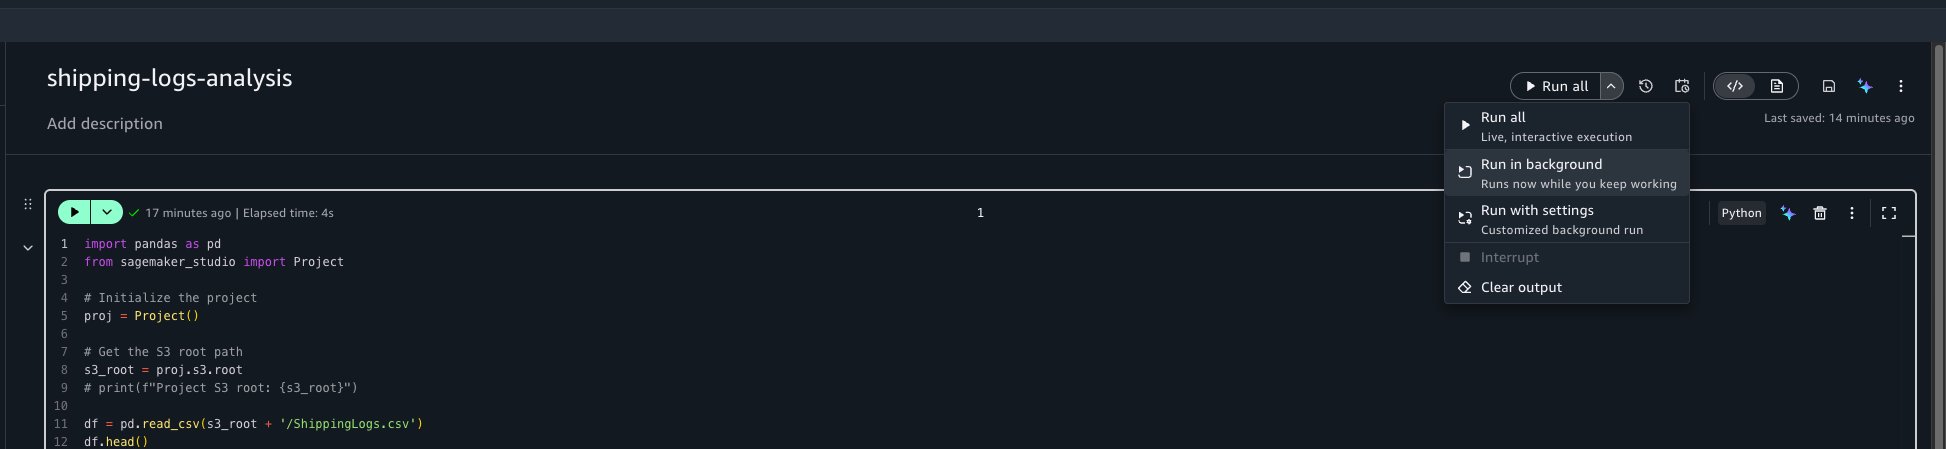
This captures a snapshot of the pocket book in its present state and begins a run on a separate devoted compute. You may proceed engaged on different duties or shut the browser completely. Your interactive session isn’t affected.
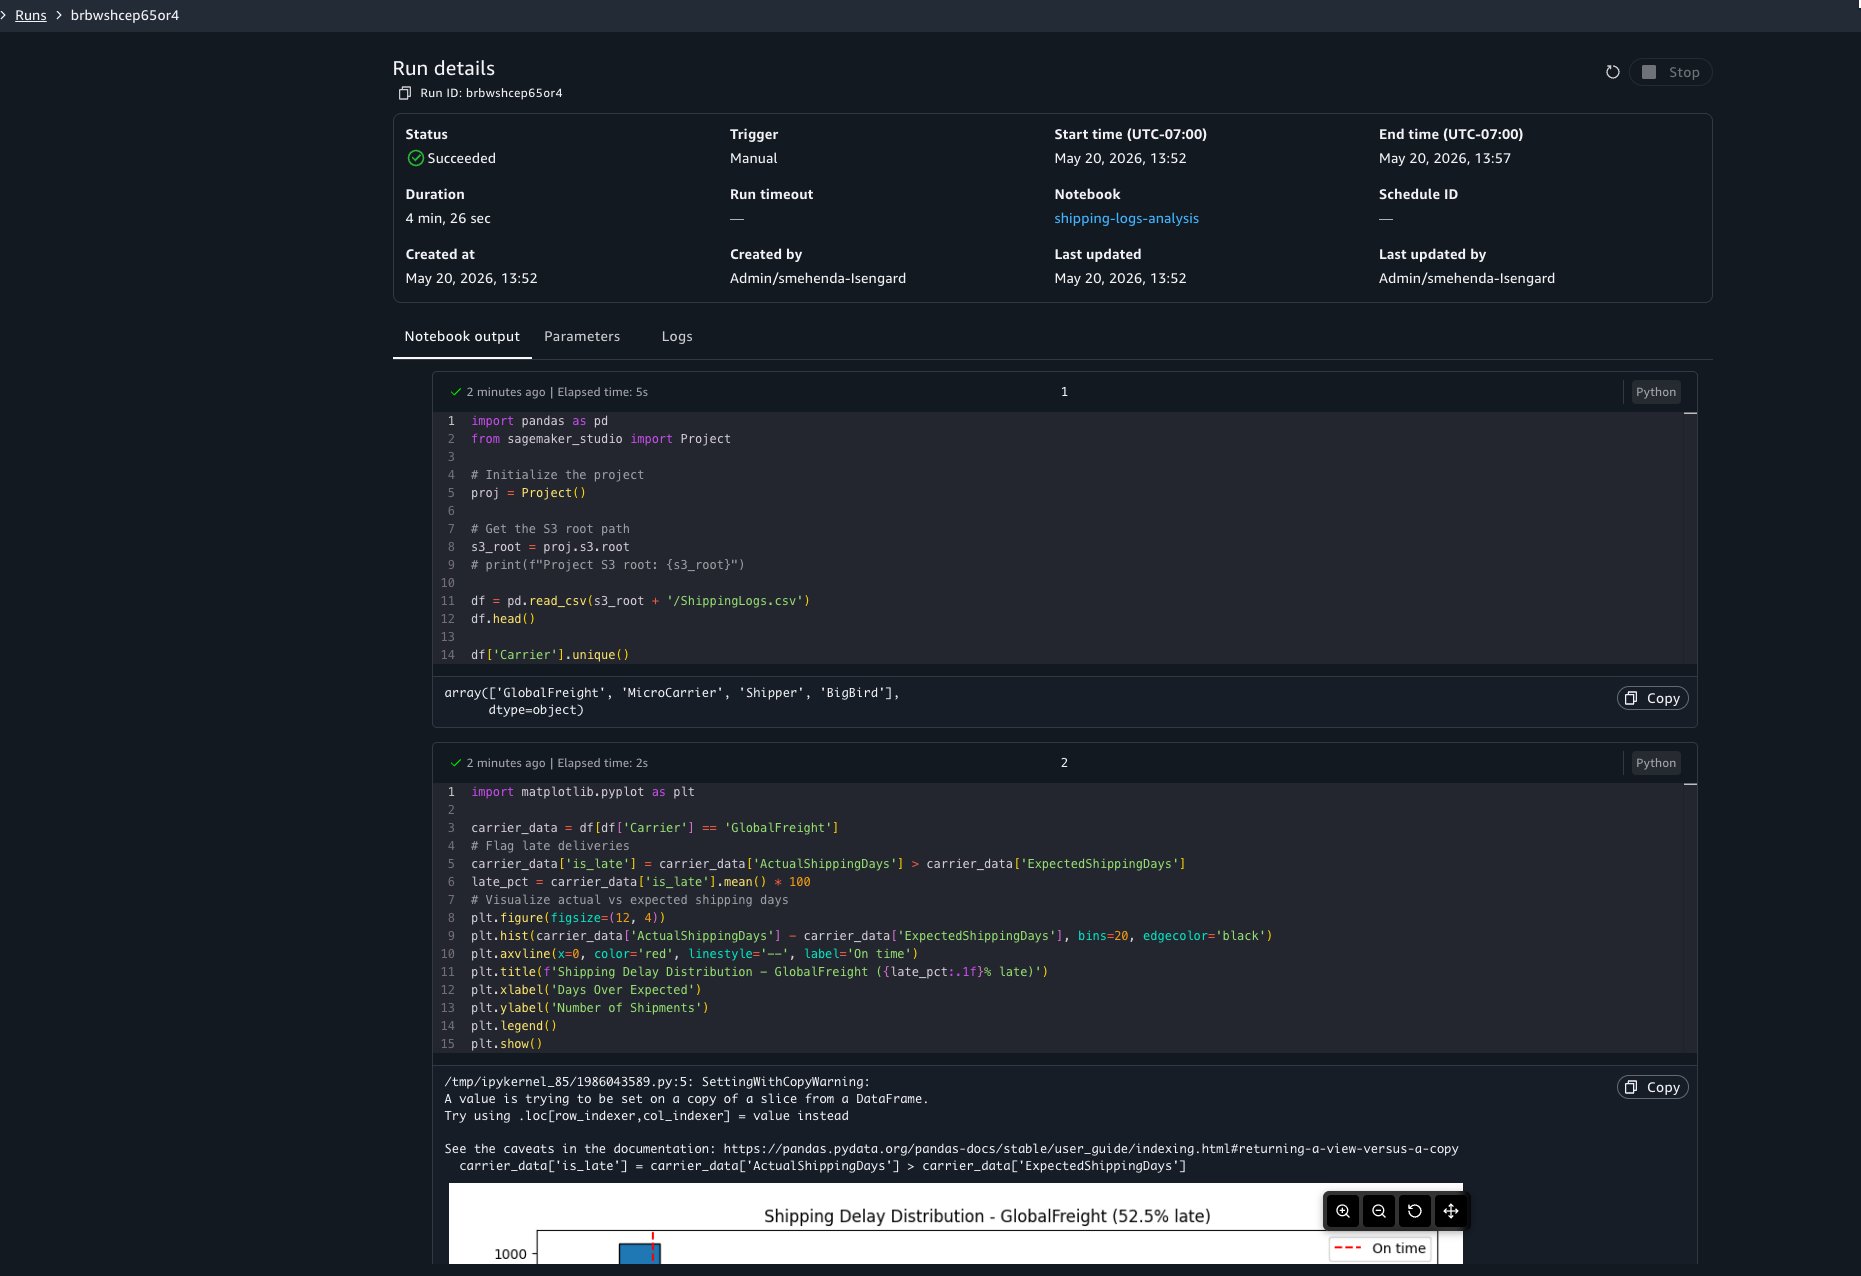
You will notice a notification on the backside of your display confirming that the run began. To examine the standing of your run, select View Run within the notification. This opens a view displaying each background and scheduled run with its standing, length, and a hyperlink to view the total output.

You may select to view the run particulars at any level to view outcomes as cells run. The run particulars embrace three tabs:
- Output: The pocket book in read-only mode with cell outcomes rendered, together with dataframe outputs, visualizations, and print statements.
- Parameters: The parameter values used for this run.
- Logs: Run logs for debugging.
You may also entry previous runs by deciding on the View Runs possibility within the pocket book header.

Stopping an in-progress run
If you could cancel a run, open the run, and select Cease. The run terminates, and its standing updates to replicate the cancellation.

What to find out about background runs
Compute: Every background run makes use of its personal devoted compute, separate out of your interactive session. Your interactive work isn’t interrupted.
Packages: The packages that you simply set up via the pocket book’s bundle supervisor might be obtainable in your background runs. Whenever you use !pip set up in code cells, the asynchronous run installs these packages as nicely.
Native recordsdata: Background runs can’t entry recordsdata saved regionally in your pocket book atmosphere. Reference information out of your challenge’s shared storage (Amazon S3) or related information sources as a substitute.
Startup time: Count on a couple of minutes of startup time whereas compute is provisioned and your atmosphere is ready.
Making a recurring schedule
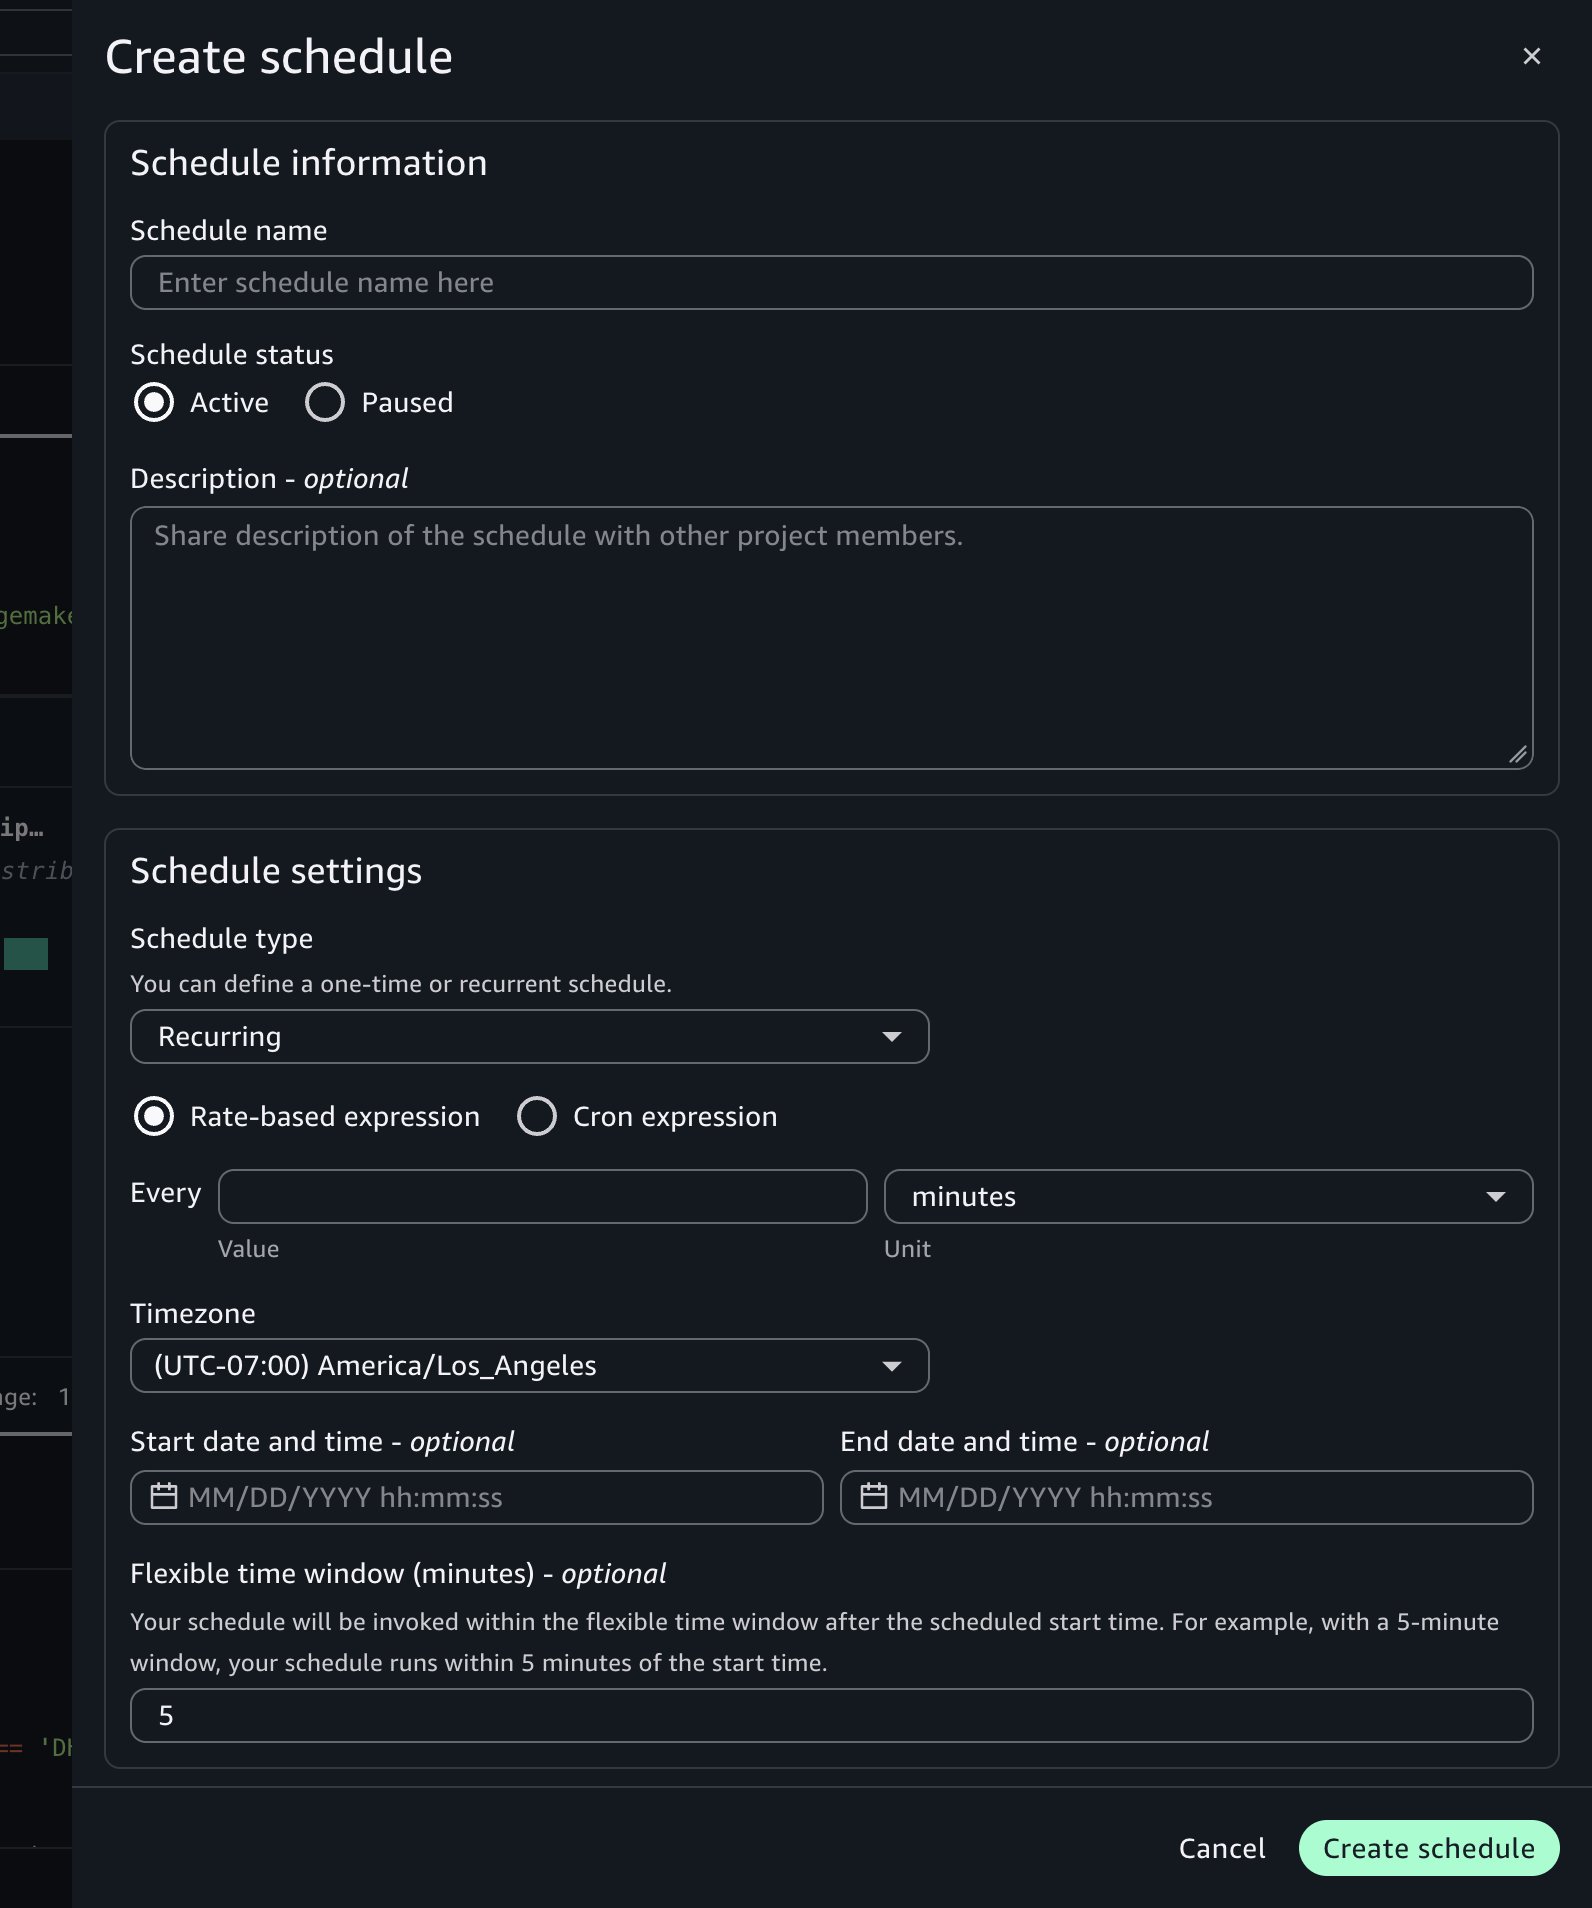
Now that you simply’ve confirmed asynchronous runs work appropriately, you’ll be able to automate the pocket book on a schedule. Select the schedule icon within the pocket book header to open the schedule creation type.

Configure the next settings:
- Schedule title: Enter a descriptive title, corresponding to Each day Transport Report.
- Schedule kind: Select Recurring for repeated runs or One-time for a single future run.
- Frequency: Outline how typically the pocket book runs utilizing a charge (for instance, each in the future) or a cron expression. Set the time zone and the beginning and finish dates for the schedule. For instance, set the schedule to run day-after-day at 7:00 AM UTC beginning tomorrow.
- Versatile time window (elective): The variety of minutes after the scheduled begin time inside which the run could be invoked. For instance, with a 5-minute window, the pocket book runs inside 5 minutes of the beginning time.
- Superior settings:
- Compute Occasion: Maintain the present settings or override with a special occasion kind for the asynchronous run to make use of.
- Timeout: Set a most run length to assist stop notebooks from operating indefinitely. If left clean, it defaults to 60 minutes.
Select Create.
The schedule seems within the Schedules tab of the exercise panel. SageMaker Unified Studio creates an Amazon EventBridge Scheduler schedule for every schedule you configure.
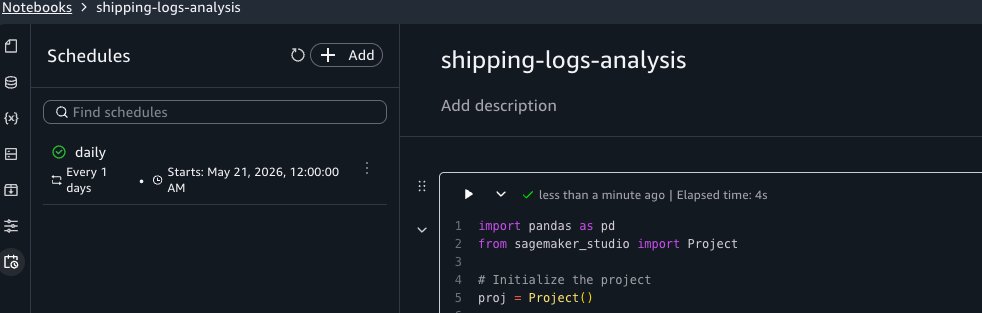
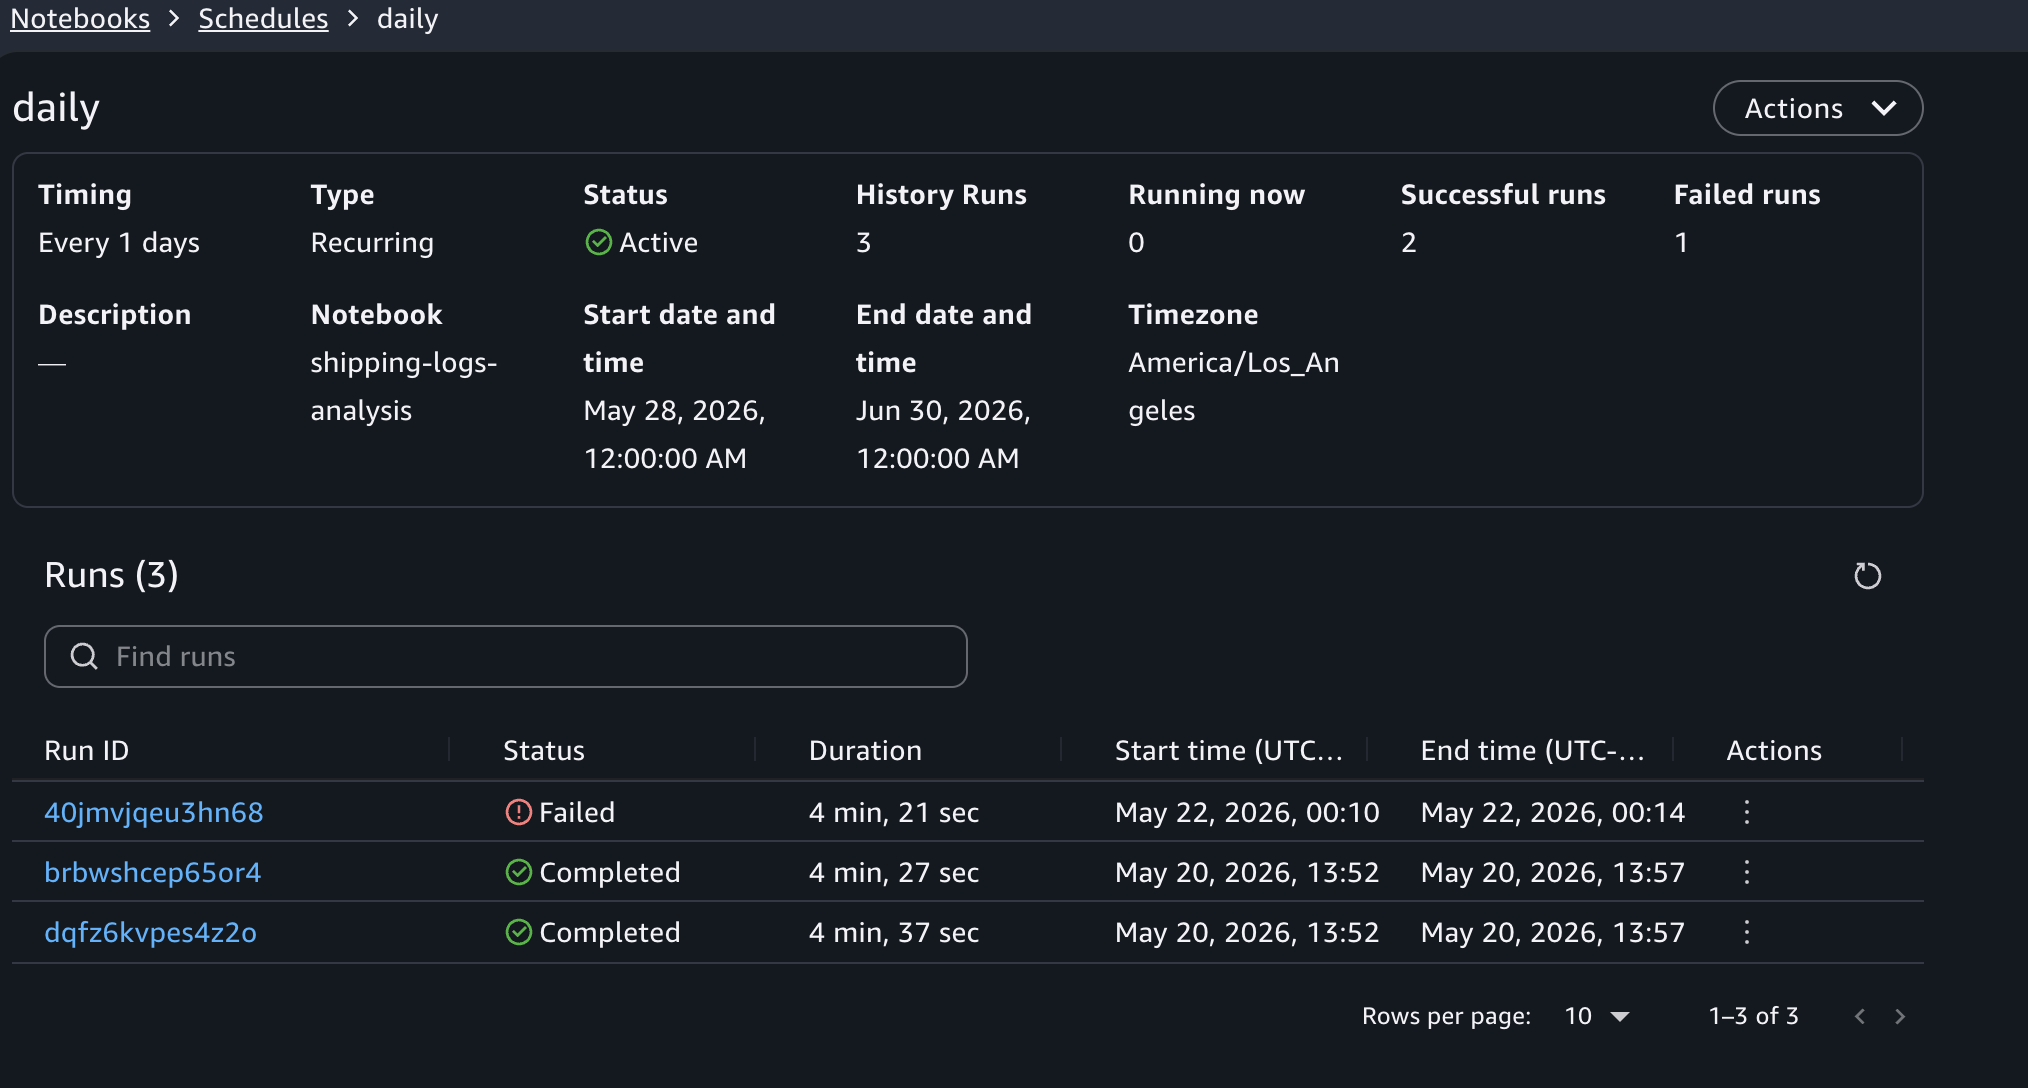
Viewing schedule run historical past
To view previous runs for a schedule, select the schedule title within the Schedules exercise panel. This opens the schedule particulars view, the place you’ll be able to see the record of runs triggered by that schedule, the length of every run, and a hyperlink to open the pocket book output for a person run.
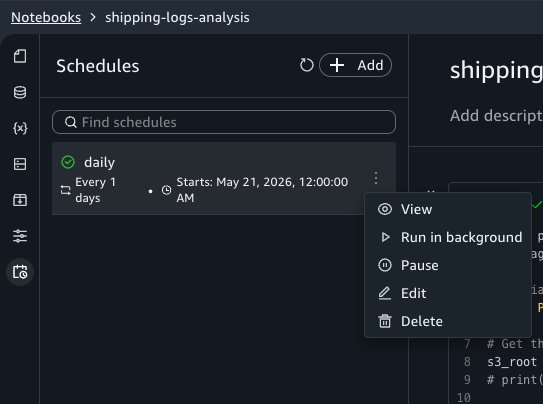
Modifying and deleting schedules
To change a schedule, select Edit subsequent to it within the Schedules panel. You may change the frequency, occasion kind, timeout, and different configuration fields. To pause or resume a schedule, select Pause or Resume from the identical menu. To take away a schedule, select Delete from that menu. Deleting a schedule stops future runs however preserves historic run outputs in Amazon S3 for auditing functions.
Parameterizing notebooks
With parameters, you’ll be able to reuse a single pocket book throughout completely different inputs with out duplicating code. For instance, you’ll be able to run the identical delivery efficiency report for every provider by passing a special provider title to every run.
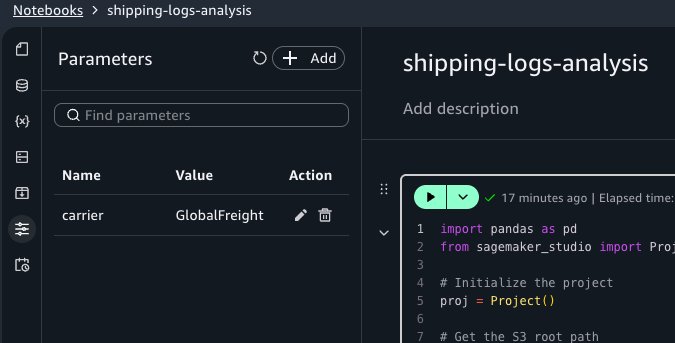
Defining parameters
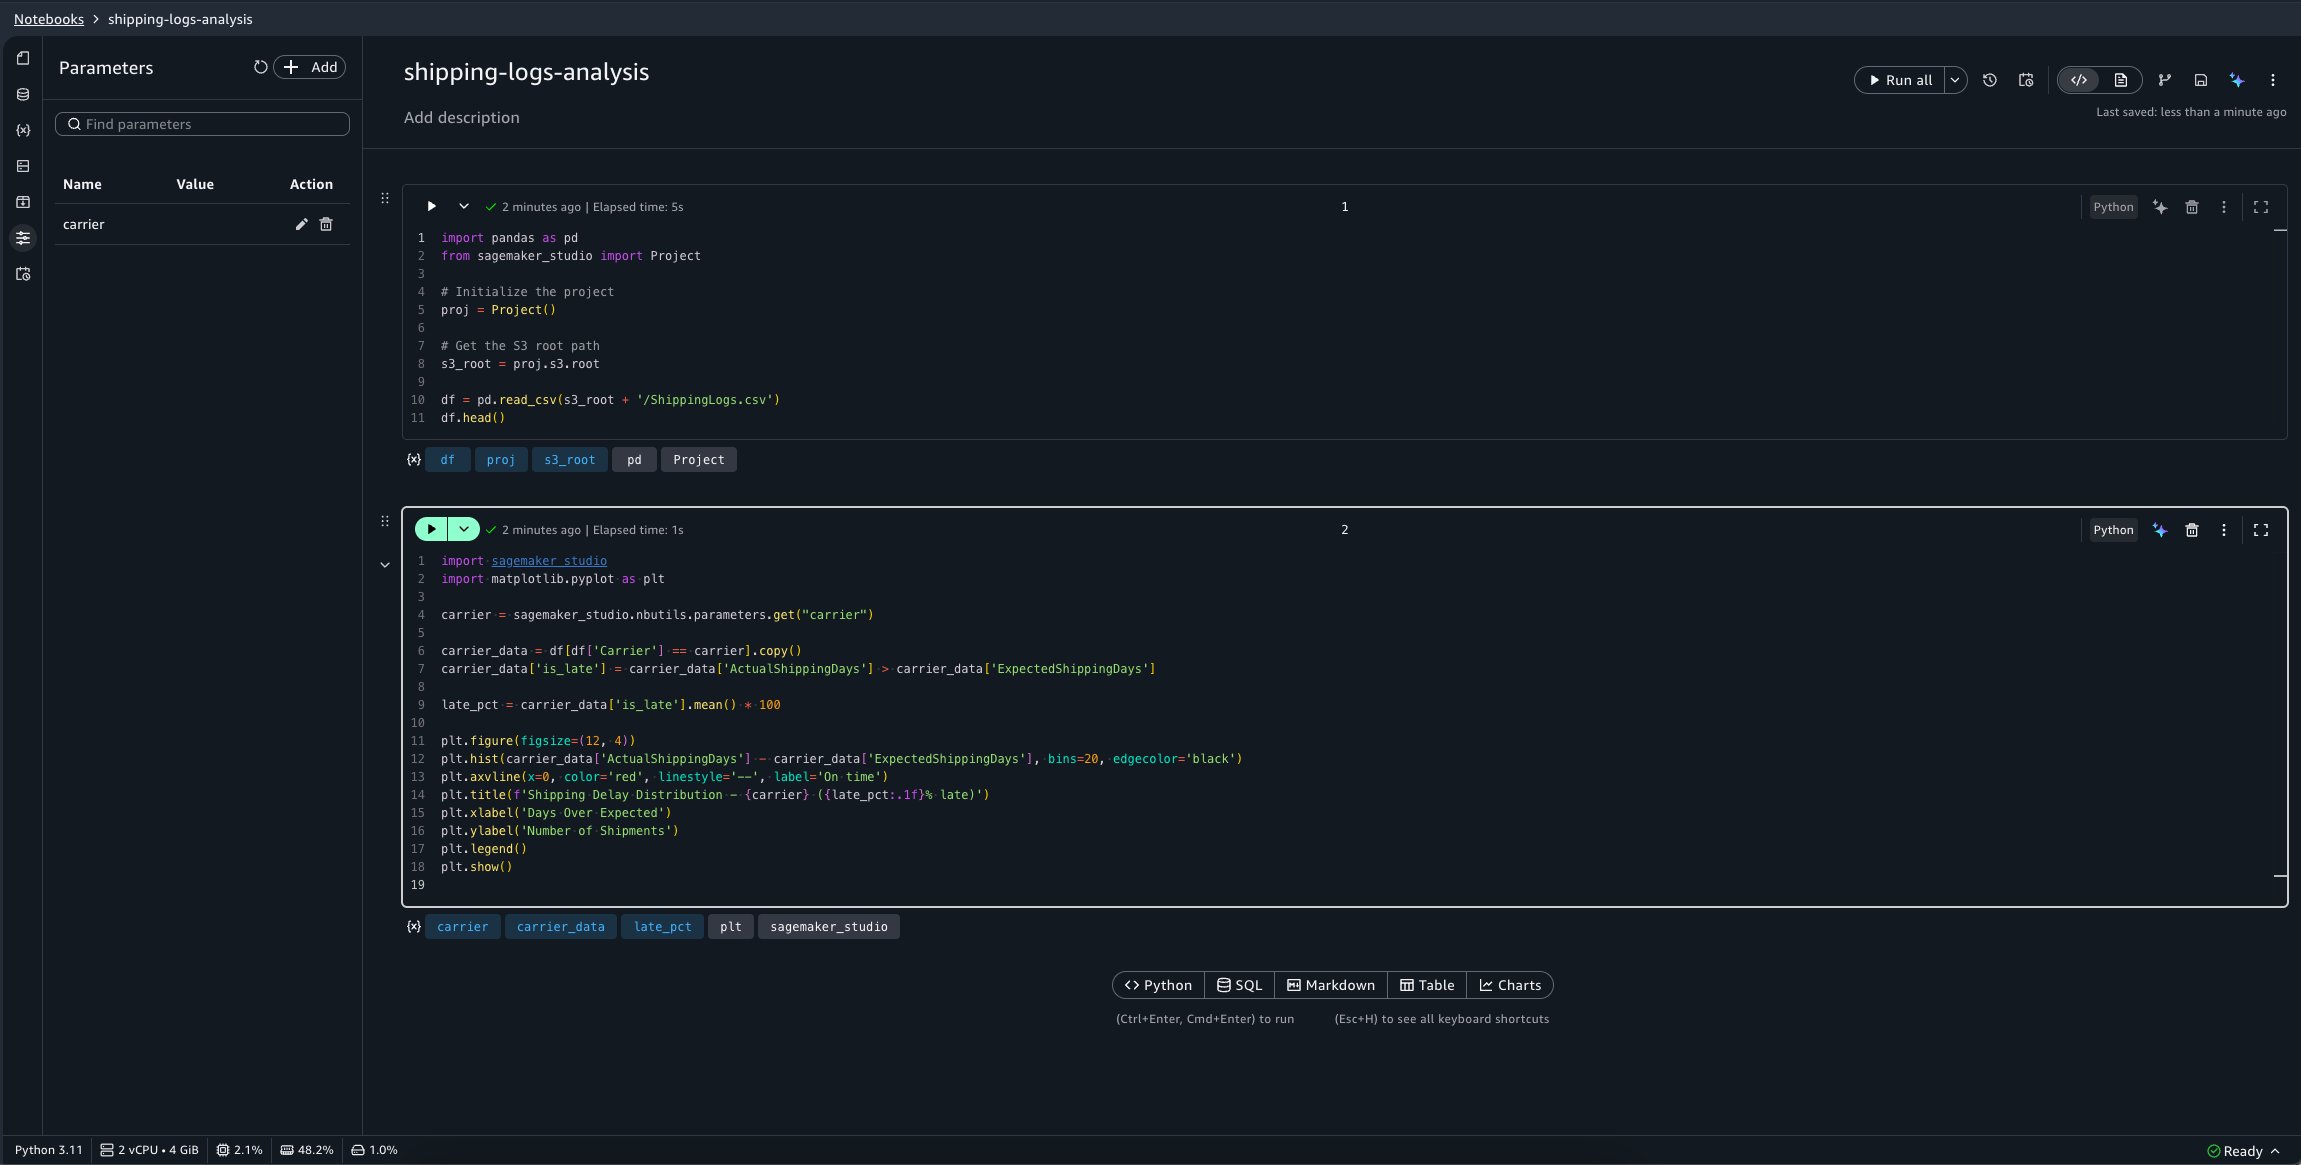
Open the Parameters exercise panel and select Add. Set the parameter title to provider and the default worth to GlobalFreight.
Utilizing parameters in code
In your pocket book, substitute the second cell with the next code. This retrieves the provider parameter worth utilizing the SageMaker Unified Studio Python SDK as a substitute of the hardcoded worth:
Creating schedules with completely different parameter values
Now create three schedules for a similar pocket book, every focusing on a special provider:
- “daily-shipping-gf” with
provider=GlobalFreight. - “daily-shipping-mc” with
provider=MicroCarrier. - “daily-shipping-shipper” with
provider=Shipper.
Whenever you view a historic run, a separate Parameters tab within the run output shows the parameter values that have been energetic for that run.
You may also override parameter values when triggering an on-demand background run. Select the menu on the Run all button, then select Run with settings. You may maintain the defaults or present customized values for that run.
Orchestrating with Workflows
To mix notebooks right into a multi-step pipeline, corresponding to operating an information calculation pocket book earlier than the delivery log pocket book, you should use the Pocket book Operator within the Workflows instrument to orchestrate them.
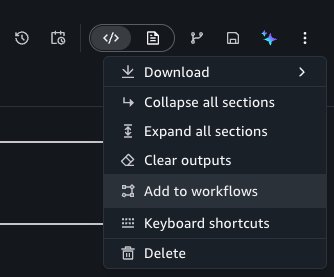
To do that, select the Add to workflows button below the choices menu of the pocket book header.
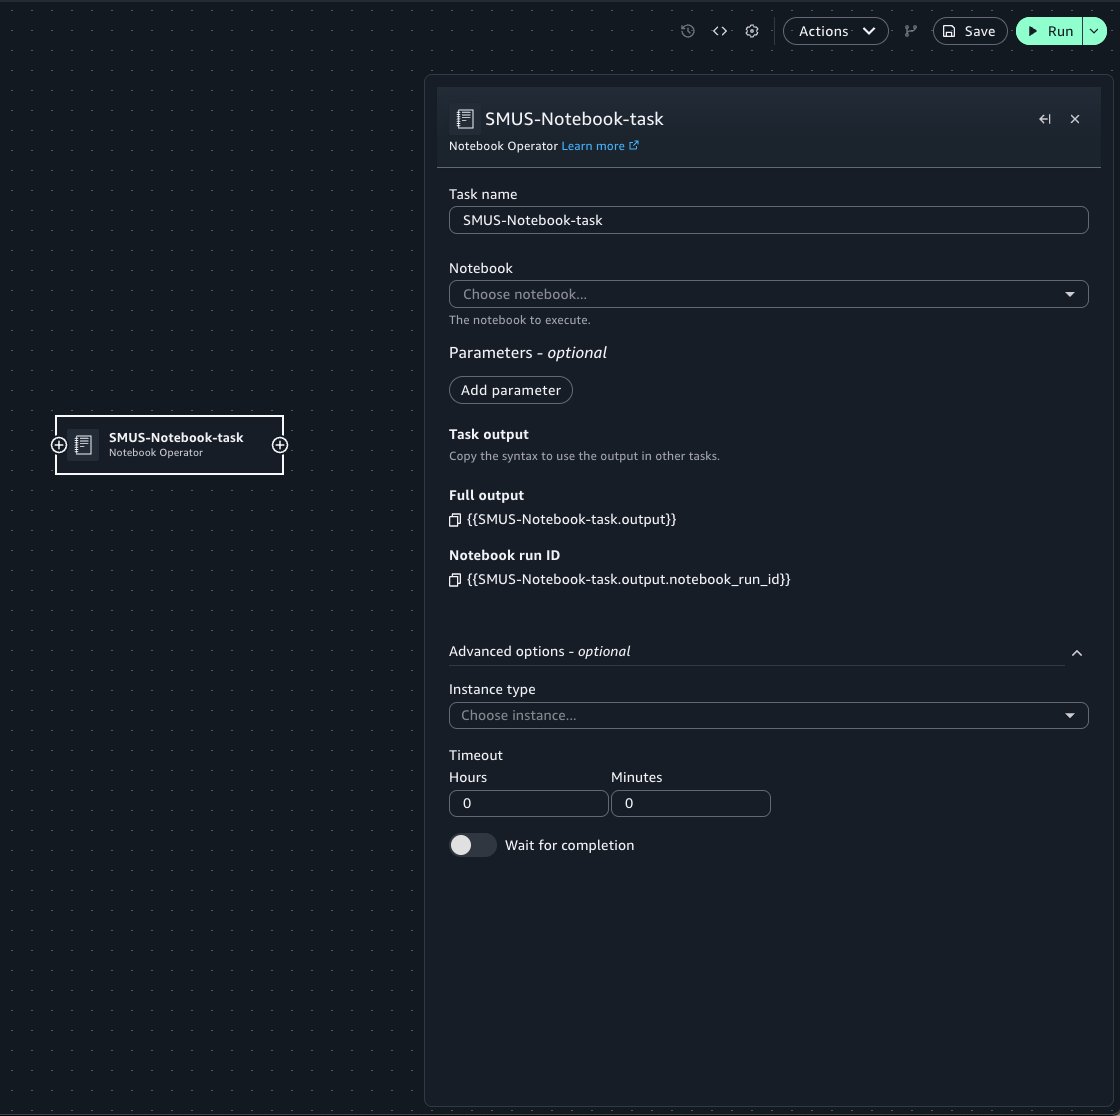
This takes you to the Workflows instrument, including a brand new Pocket book Operator process with prefilled properties out of your pocket book. When configuring the Operator process:
- Choose the goal pocket book from the pocket book menu.
- Use the Parameters widget to move pocket book parameters into the run of the pocket book.
- Specify elective arguments such because the compute occasion and timeout configuration for the run.
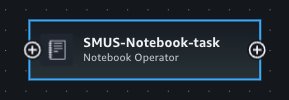
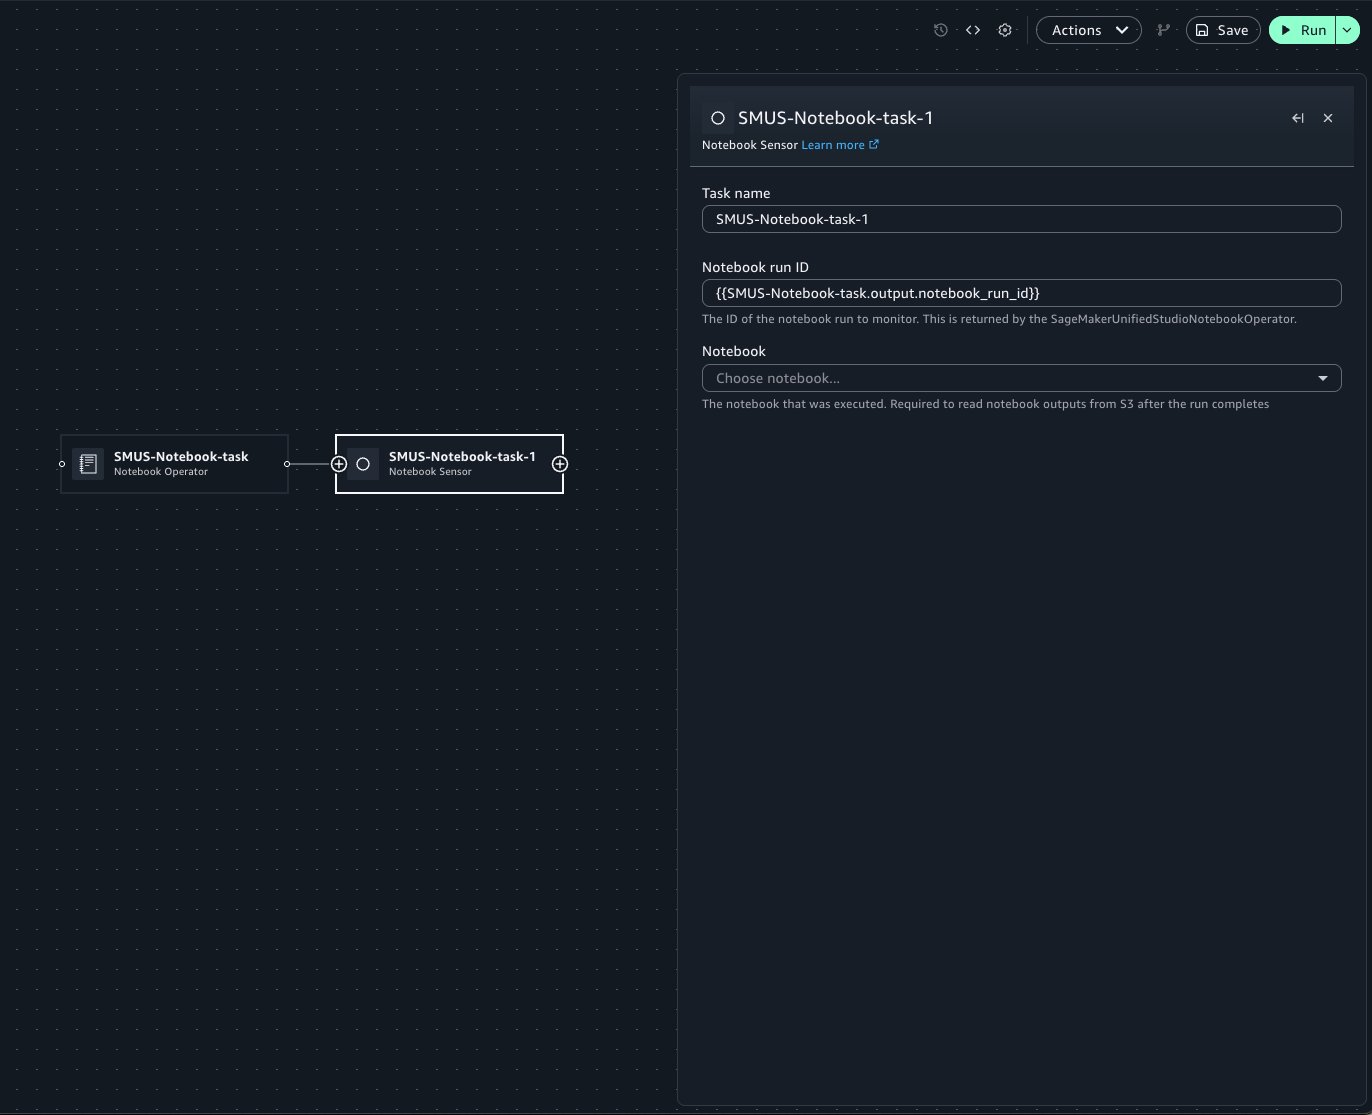
Workflows additionally helps polling for the standing of a pocket book run for a specific pocket book utilizing Pocket book Sensor. In Workflows, you’ll be able to add a brand new Sensor process by hovering on the sting of the prevailing Operator process, the place a plus (+) button is displayed.
You may then seek for and add the Pocket book Sensor to the canvas.
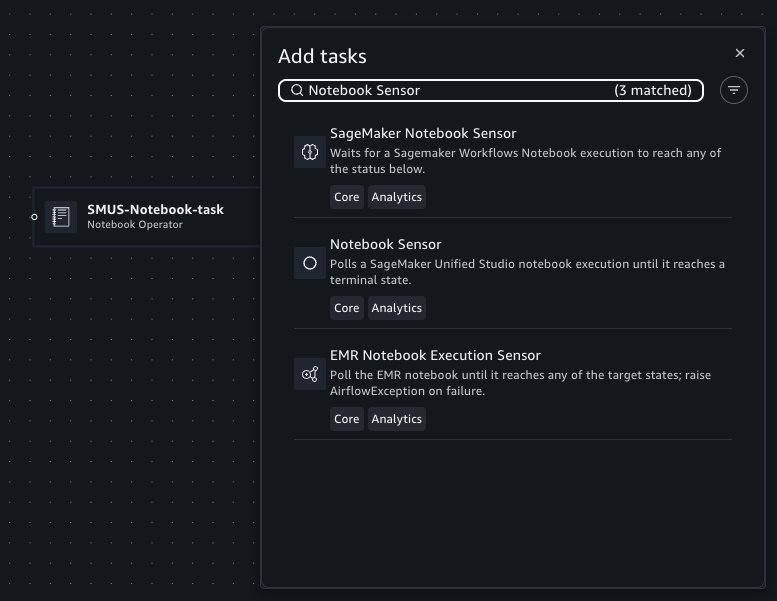
When configuring the Sensor process, specify the pocket book run ID inside the textual content discipline. The Operator’s type discipline accommodates Jinja templating to retrieve the pocket book run. If the Sensor is used inside the identical workflow because the Operator, this template could be copied to make use of inside a Sensor to ballot the pocket book run. Choose the goal pocket book from the pocket book menu.
Inside Workflows, you’ll be able to configure pocket book runs to emit outputs and use these outputs as inputs for subsequent pocket book runs.
Constructing off of the earlier delivery log pocket book instance, we are going to move the provider parameter from an upstream pocket book’s output. Your shipping-logs-analysis pocket book must be already arrange.
As a result of the pocket book is dependent upon the provider parameter, you’ll be able to specify it within the Parameters panel.
Now, outline a second pocket book, calculate-best-carrier, which performs a calculation to find out our greatest provider to make use of for delivery:
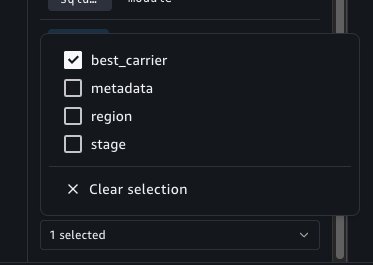
To configure the calculate-best-carrier pocket book’s outputs, you’ll be able to select the Variables panel. A brand new selector is obtainable on the backside of this panel which lets you choose variables to mark as outputs.
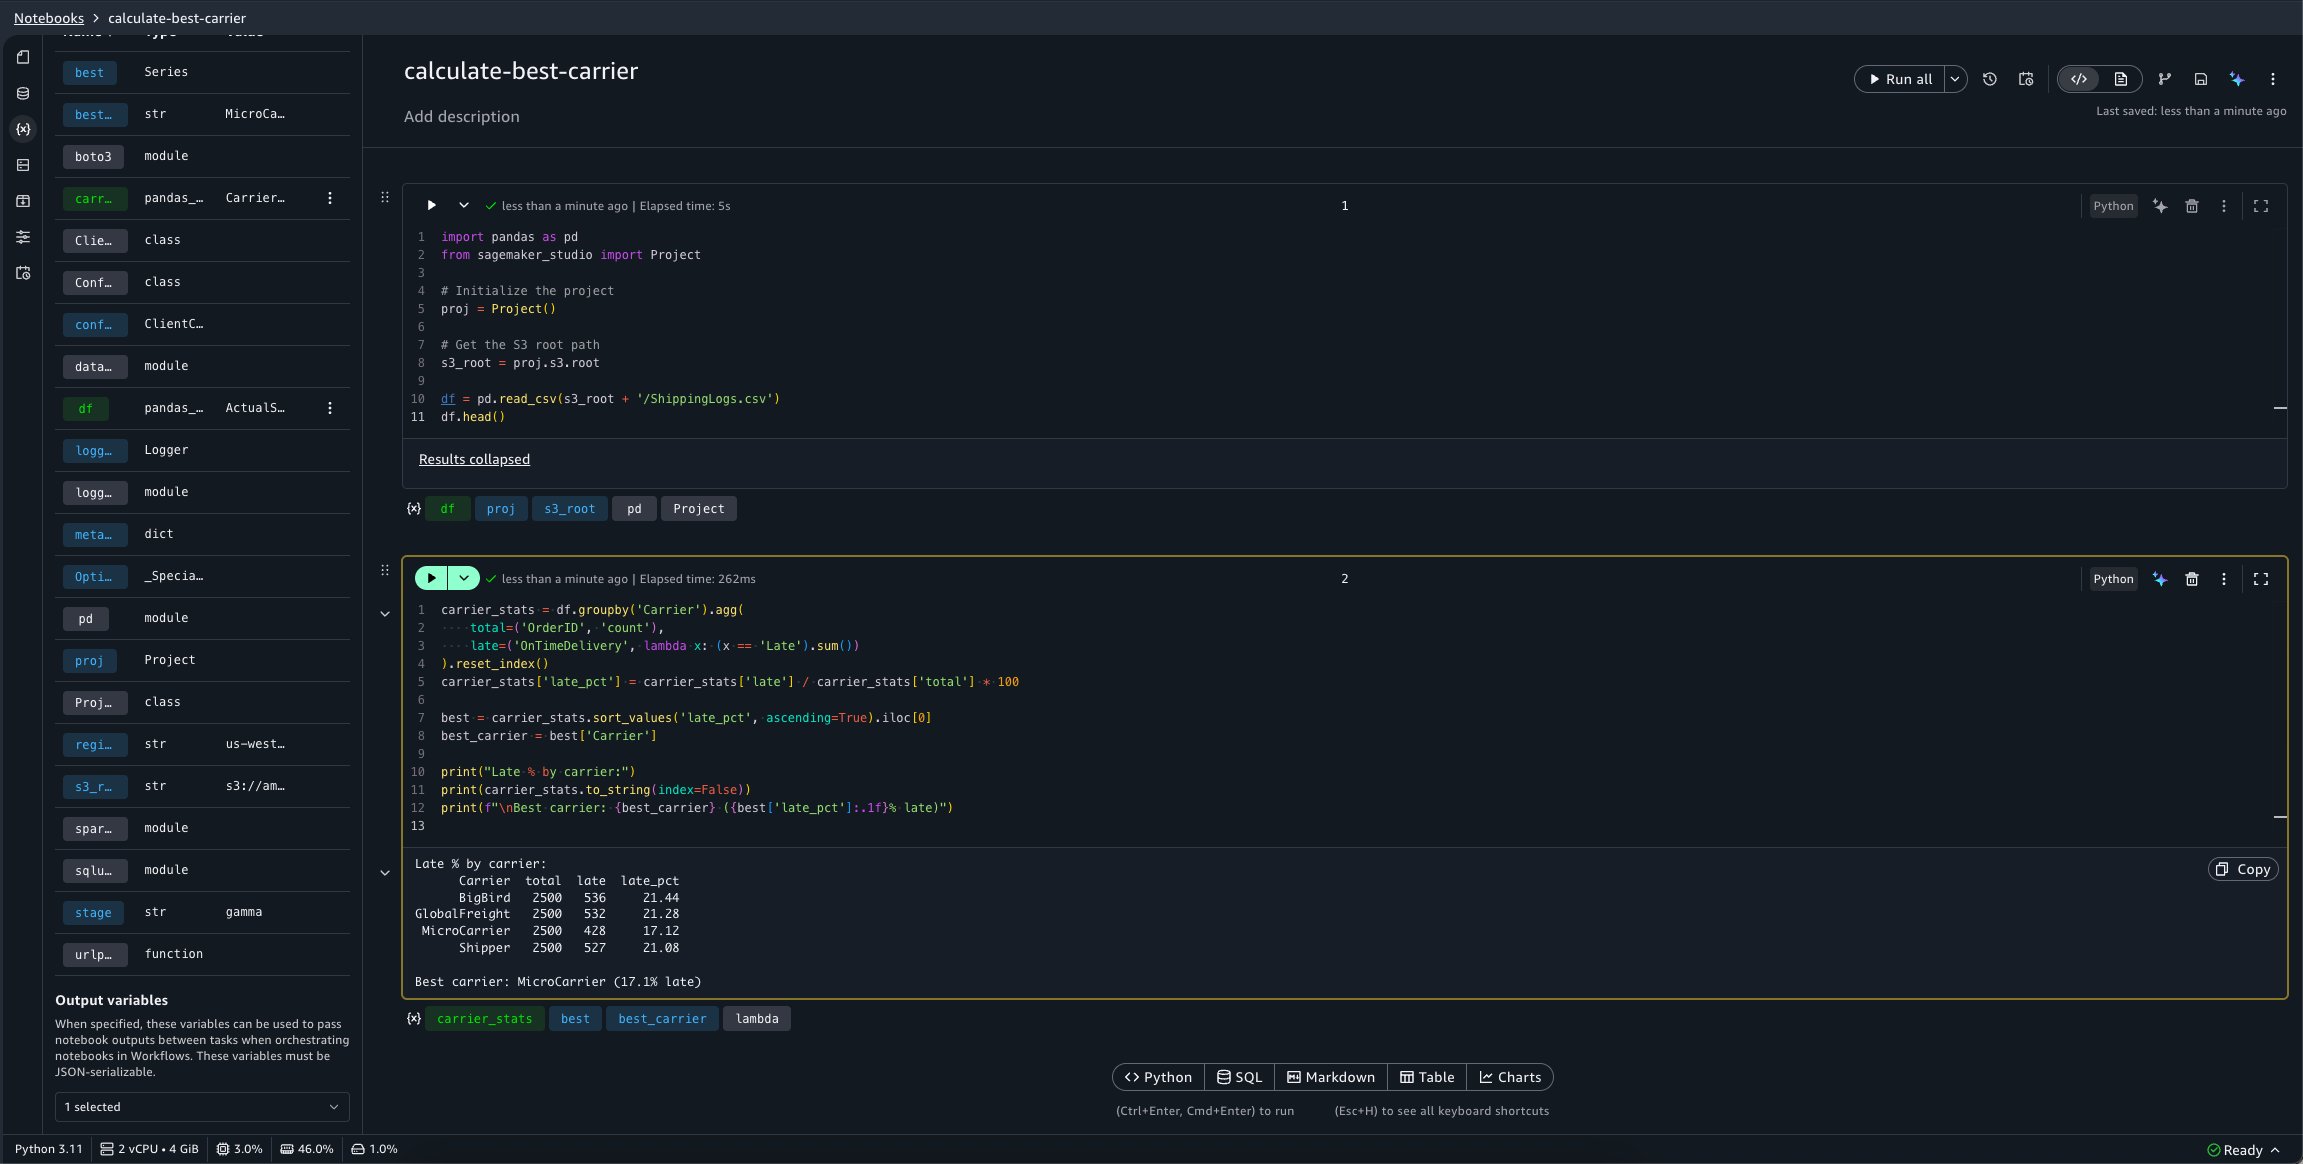
We would like this pocket book to emit the best_carrier variable.
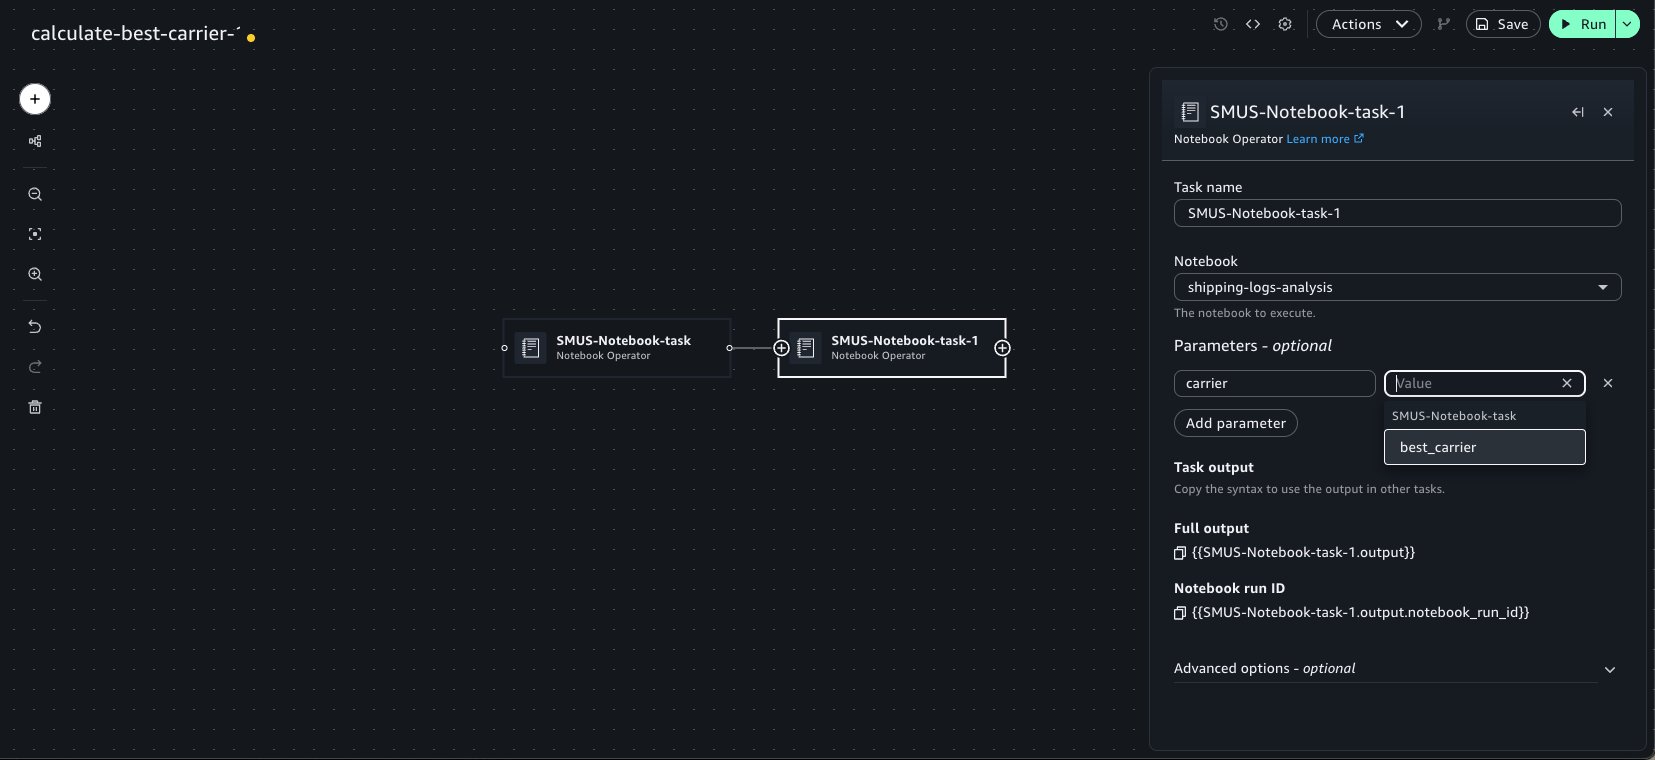
Now, use the Add to workflows button as beforehand demonstrated to shortly add this pocket book inside a workflow. Chain a second Pocket book Operator that factors to our shipping-logs-analysis pocket book. As a result of we specified a parameter dependency on provider for this pocket book, it’s obtainable as an possibility within the Parameters widget menu.
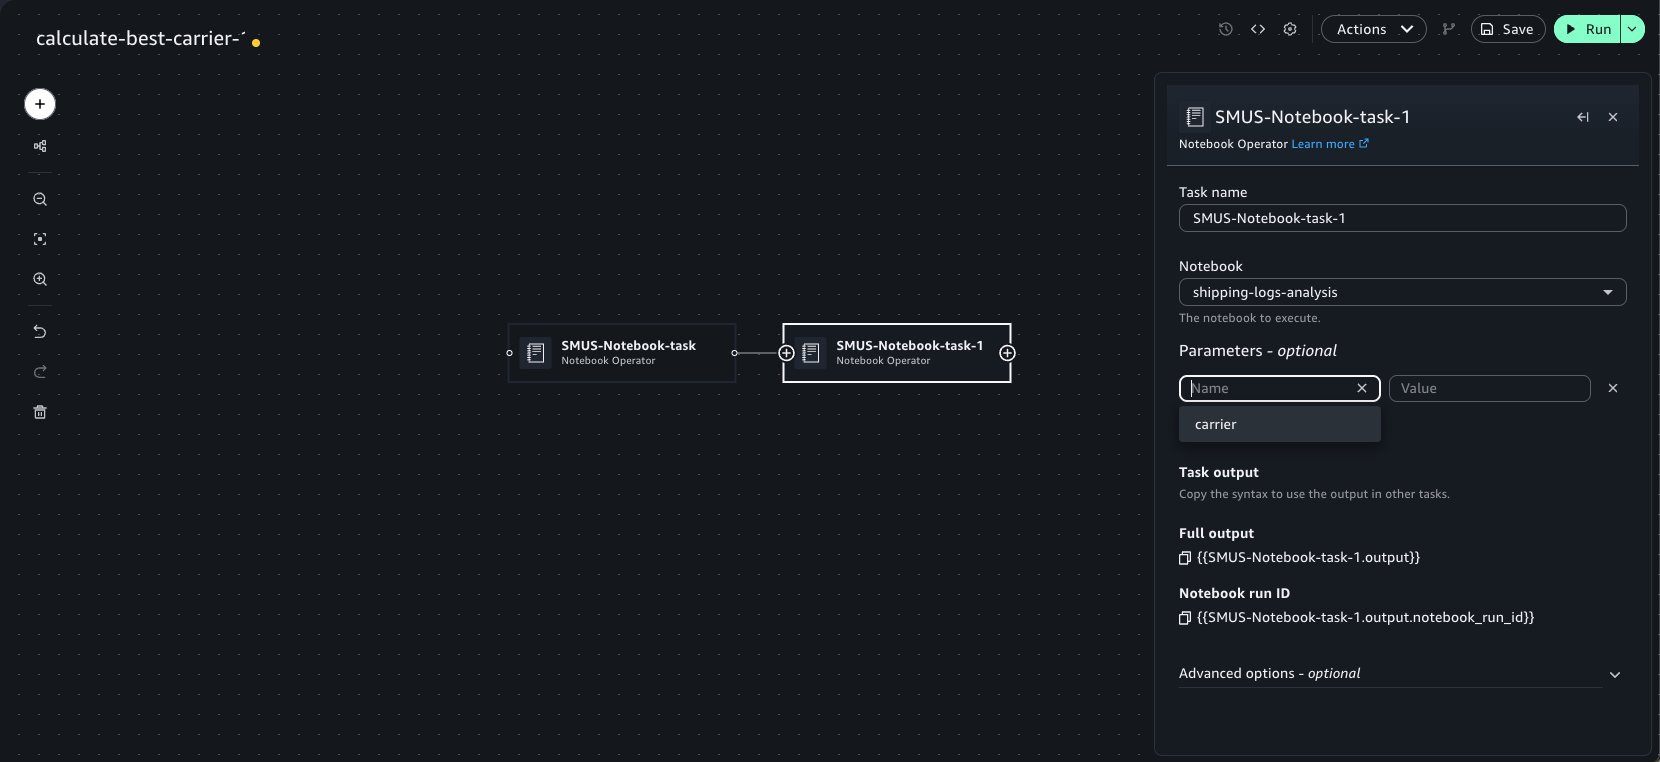
Once they’re chained, the pocket book duties detect the outputs set in upstream pocket book runs. These outputs could be chosen as keys inside the Parameters widget of the Operator to move into the run. This may be carried out recursively for an arbitrary variety of Operator duties. We are able to choose the emitted best_carrier output from the calculate-best-carrier pocket book.
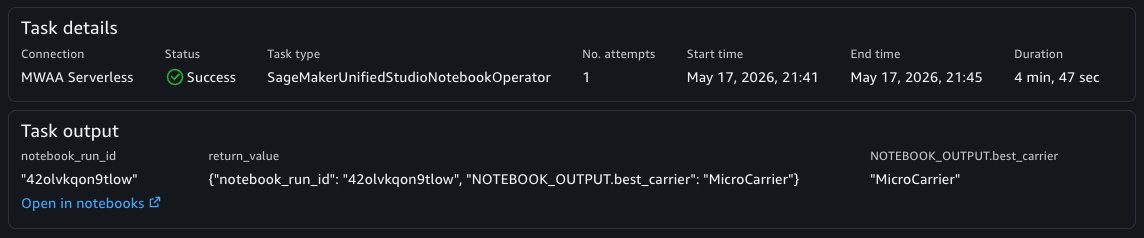
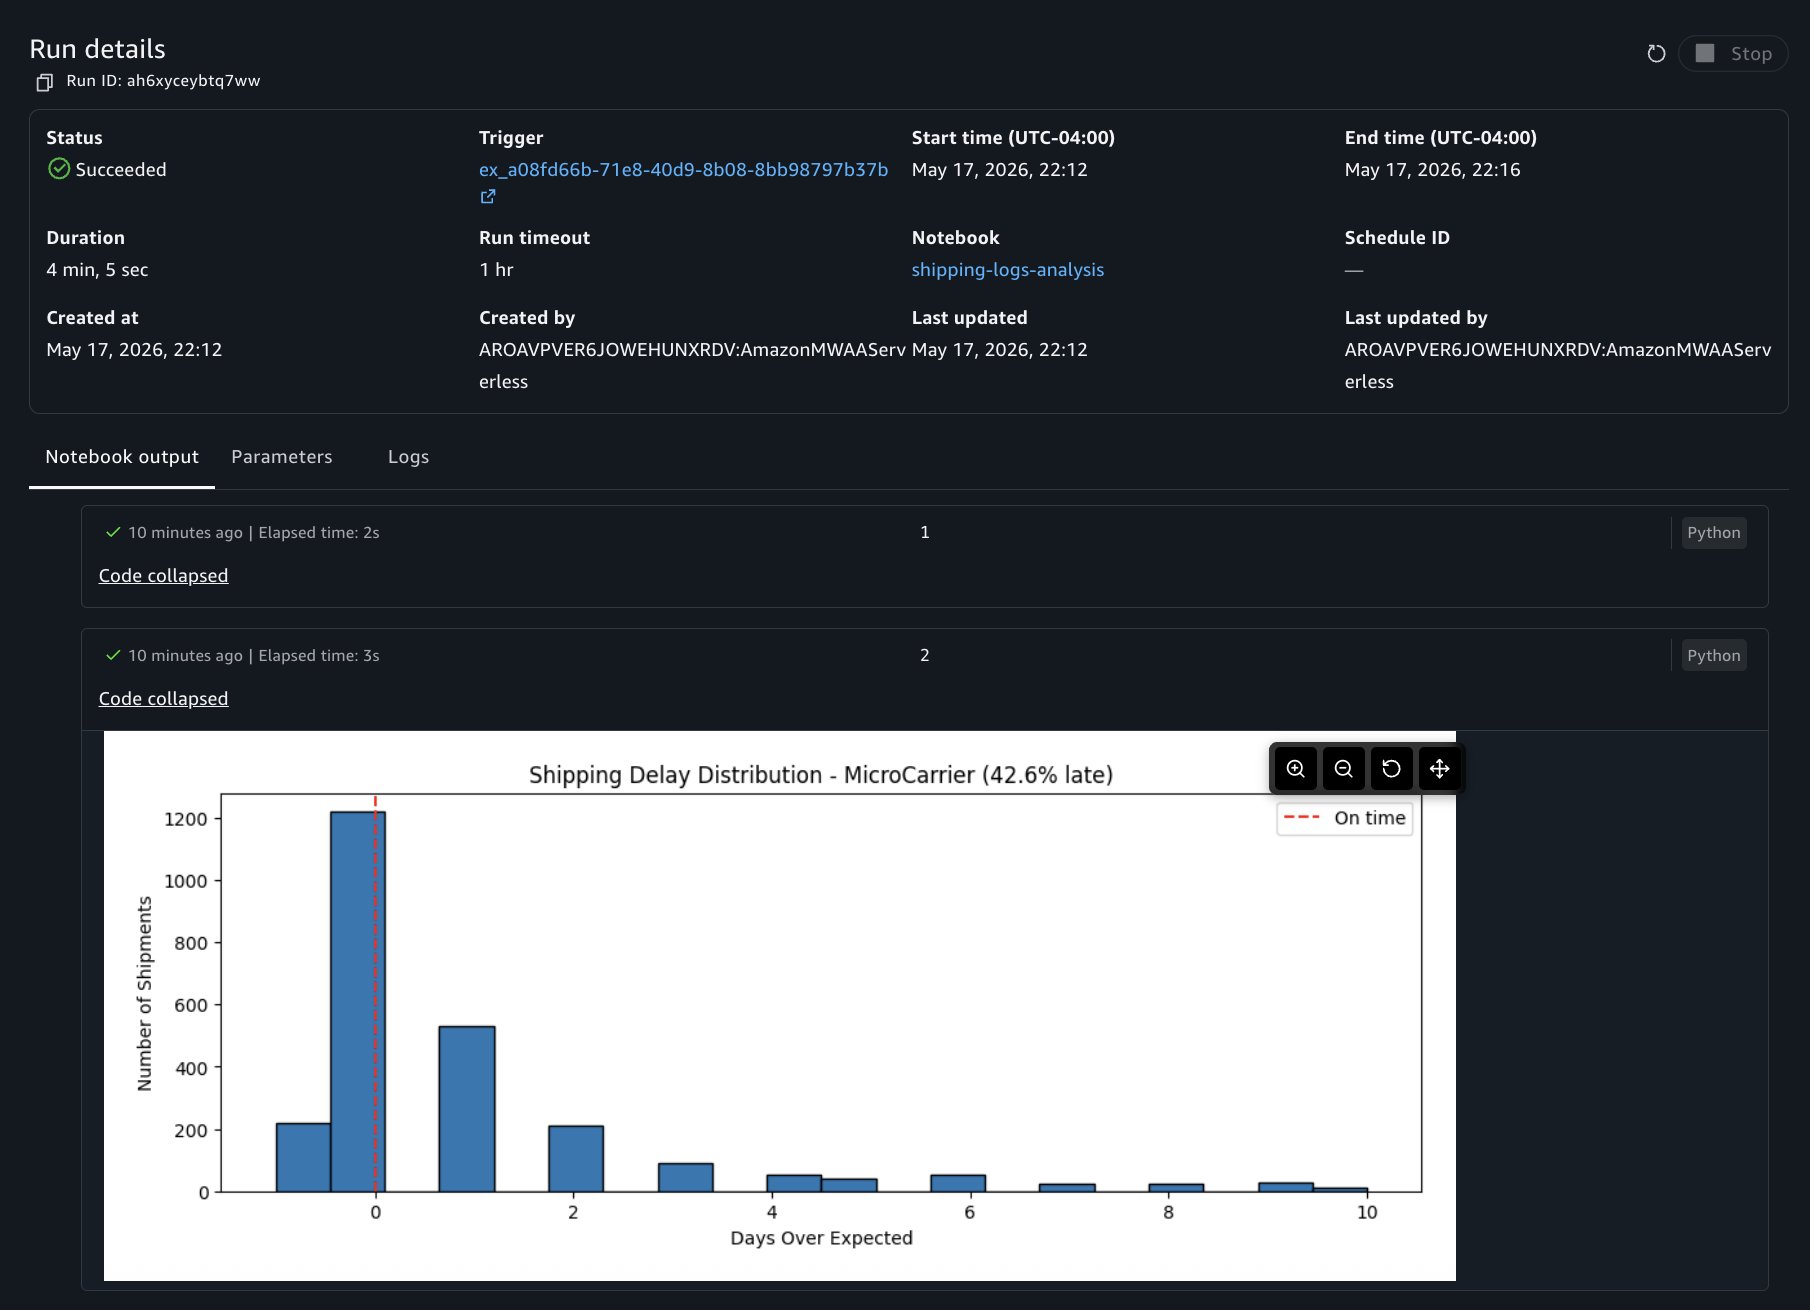
Now you can select the Save button on the highest left of the visible canvas and the Run button to begin the workflow. When the workflow is accomplished, the required pocket book outputs can be found within the Process Output panel and the pocket book run end result could be considered within the Notebooks instrument.
In the same method, the Pocket book Sensor will even emit the pocket book outputs from a specific pocket book’s run which can be utilized inside different duties. That is helpful while you need to retrieve outputs from a pocket book run in one other workflow.
Debugging a failed run with AI help
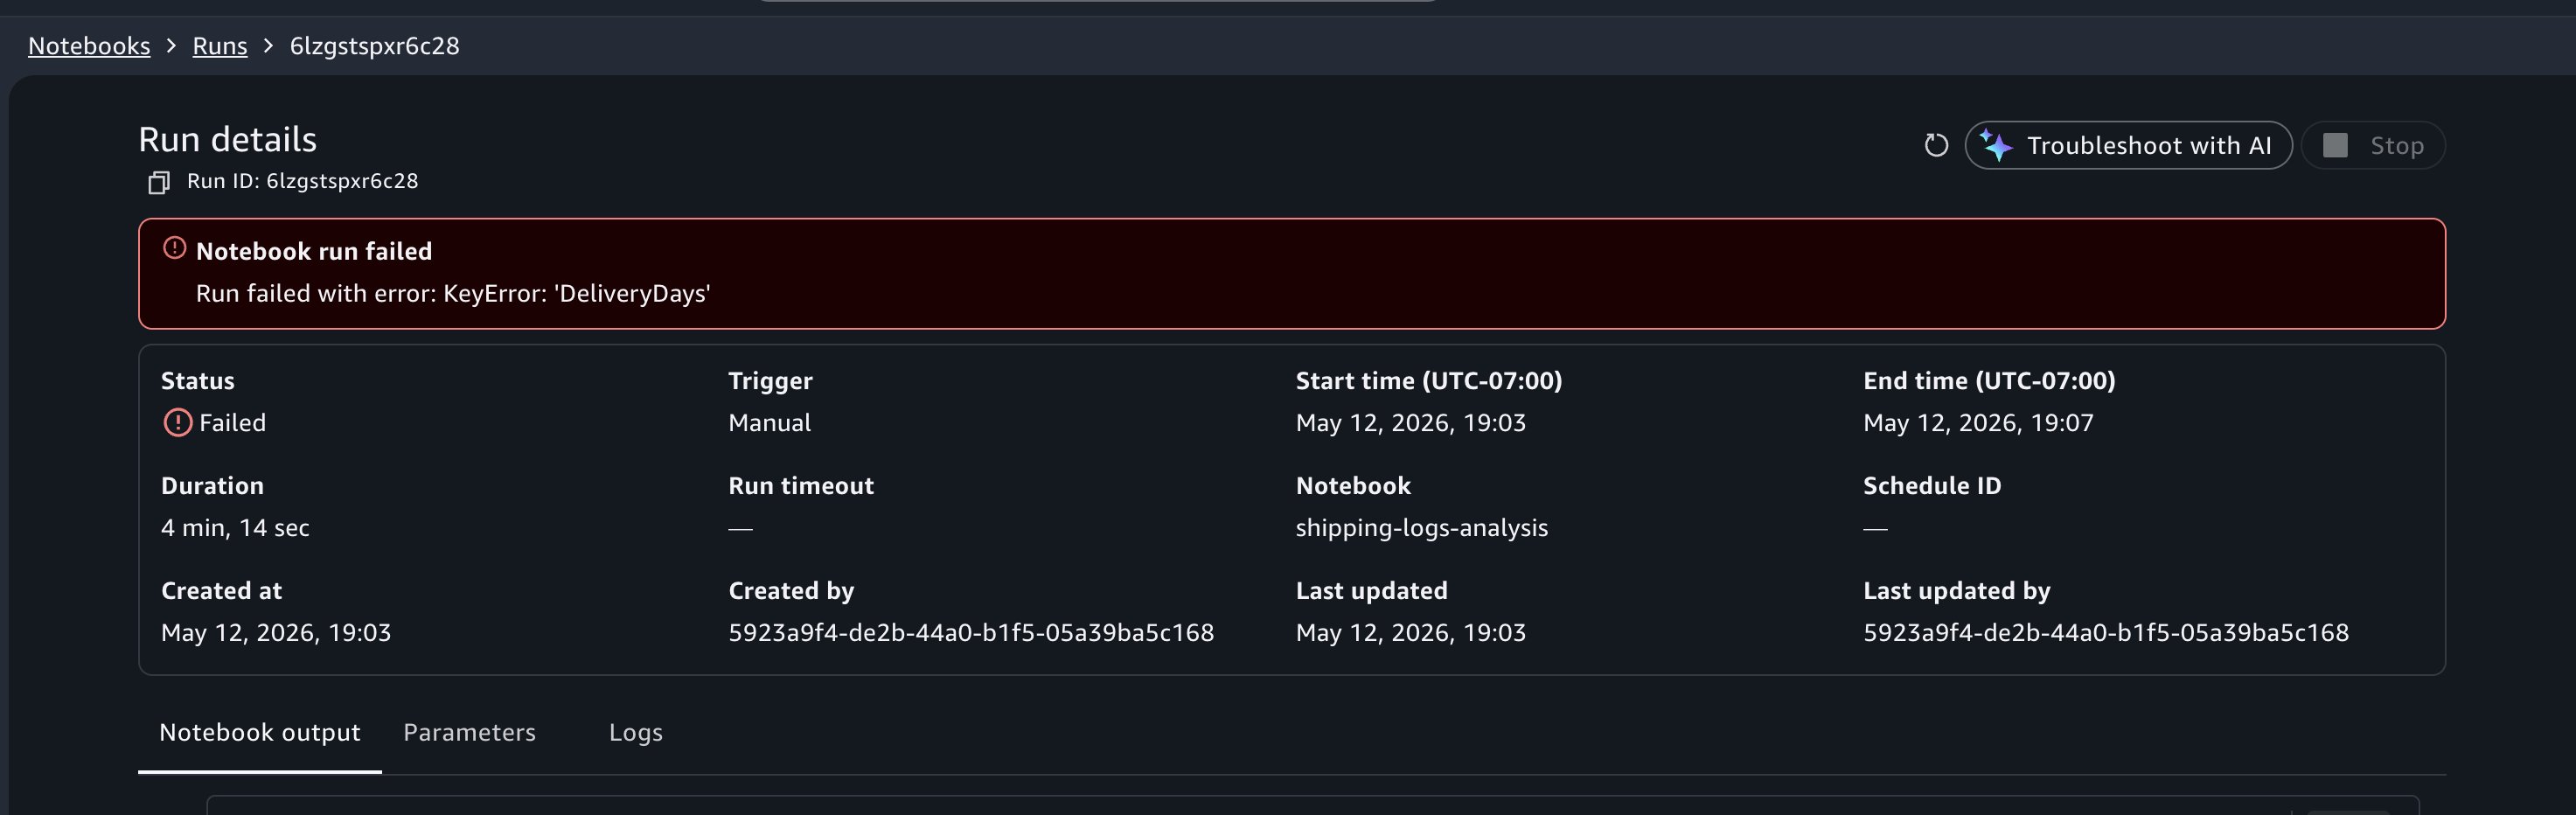
When viewing your previous runs, you discover {that a} run from earlier as we speak has a Failed standing. Select the failed run to open the pocket book output in read-only mode.
On this instance, suppose you incorrectly referred to column title ActualShippingDays as DeliveryDays. The run would fail with a KeyError: 'DeliveryDays' within the cell that computes late deliveries.
On the high of the failed run output, select Troubleshoot with AI. Selecting the Troubleshoot with AI button lands you within the pocket book with the Agent chat panel open.
The information agent analyzes the cell outputs, identifies the cell that errored, explains the foundation trigger, and suggests a repair. On this case, it identifies that the column DeliveryDays doesn’t exist within the dataframe and suggests updating the code reference. You may evaluate the change, then confirm the repair by selecting Run in background from the Run all menu to set off a take a look at run earlier than the subsequent scheduled run.

Observe: You may also use the Knowledge Agent to create schedules and begin pocket book runs utilizing pure language, with out having to navigate.
Cleansing up
To keep away from incurring future costs, delete the assets that you simply created on this walkthrough:
- Delete any schedules that you simply created from the Schedules panel in your pocket book.
- Delete take a look at notebooks in the event you don’t want them.
- Navigate to the Workflows web page and delete any workflows that you simply created throughout this walkthrough.
- Your challenge’s Amazon S3 storage retains historic run outputs till you manually take away them.
Conclusion
On this publish, we confirmed the best way to run notebooks within the background in Amazon SageMaker Unified Studio utilizing background runs, schedules, parameterization, workflow orchestration, and AI-assisted debugging. Utilizing a delivery logistics dataset, we demonstrated how a single pocket book could be parameterized to generate efficiency studies for various carriers on impartial schedules, all with out duplicating code or managing in depth infrastructure.
To get began, open a pocket book in your SageMaker Unified Studio challenge, select the menu on the Run all button within the pocket book header, and select Run in background. For extra superior use circumstances, discover workflows in Amazon SageMaker Unified Studio to construct multi-step information pipelines, or evaluate the Amazon SageMaker Unified Studio Consumer Information for extra configuration choices.
Be taught extra:
In case you have suggestions or questions, attain out on AWS re:Submit for Amazon SageMaker Unified Studio.
Concerning the authors