

Discover ways to construct and host your very first backend software utilizing Vapor 4 and the temporary historical past of server facet Swift.
Transient historical past of my backend profession
For me, it began with PHP. It was my first actual programming language (HTML & CSS doesn’t rely). I all the time cherished to work on backend initiatives, I’ve written my very first modular backend framework with one in all my good pal in the course of the college years. It was a tremendous expertise, I realized a lot from it.
Quick ahead a decade. The backend ecosystem have modified so much throughout this time. The time period “full-stack” developer was born alongside with node.js and other people slowly began to show their backs on PHP. I actually don’t thoughts that, however nonetheless PHP was revolutionary in some methods. It was straightforward to study, OOP (from PHP5) and for some motive it obtained actual fashionable. Typically I actually miss these instances… #entropy
Node.js alternatively was a extremely good step ahead the appropriate path. It introduced JavaScript to the backend, so builders might write each the frontend and the backend code in the identical programming language. The V8 engine with and the event-loop was extraordinarily environment friendly in comparison with PHP’s strategy.
The issue with the node ecosystem is npm and JavaScript itself. We’ve seen the rise and fall of io.js, ayo additionally there’s CoffeScript, TypeScript, oh did I discussed Babel already? I imply it’s fantastic, evolution is an effective factor, the ECMAScript requirements tries to maintain all the pieces underneath management, however right here’s the true deal:
JavaScript is rotten at it’s core.
Don’t get me improper, up to now I cherished JS. It was superb to see such a dynamic “purposeful” programming language. I’ve written numerous JavaScript (each frontend and node.js) code however these days I solely see that nothing of the problems have been actually mounted (solely patched) from the previous 10 years. Haters gona hate. I don’t care. 🤷♂️
Now what? Ought to I exploit Go, Ruby, Python or old-school C on the server facet? Properly I’ve tried all of them. Each Ruby, Go and Python is somewhat bit more durable to study, since they’ve a “unusual” syntax in comparison with JS or PHP. C alternatively is a low-level language, so you need to cope with pointers so much. Consider me: that’s not the way you need to spend your time. What about Java? Netty appears cool, however I’m not an enormous fan of the language in any respect.
So I used to be becoming bored with the server facet, that’s why I left it and began to work as an iOS developer. I needed to write Goal-C code earlier than the ARC instances. Basis and UIKit was model new for me, anyway after a couple of years Apple launched Swift. Most people reacted like this:
Swift is rather like (kind secure) JavaScript
The state of server facet Swift in 2020
Apple open sourced the Swift programming language in the long run of 2015. This occasion began all the pieces. A lot of server facet frameworks had been born that point. Sadly Swift was fairly a younger language and it modified so much. ABI stability was only a dream and the buggy Basis framework on linux was fairly a nasty surroundings to develop a secure backend software. Lengthy story quick, most of them are useless by now, besides: Vapor. 💀
Let’s have a silent minute for all the opposite frameworks (some are nonetheless alive):
I belive that the reason for this drawback was that again within the days everybody needed to implement it’s personal answer for server facet networking (low stage, socket base) together with safety and encryption options (for SSL/TLS based mostly safe transport) plus HTTP and websocket service assist. That’s numerous work already.
The Swift Server Work Group was shaped (finish of 2016) to create a cross platform, transportable, low stage native server facet API framework to behave as a fundamental constructing block for server facet initiatives. The SSWG was transferring ahead slowly (they simply launched one proof of idea model in 2017), however then instantly in 2018 Apple launched SwiftNIO. Wait, what? Bastards. They secretly developed SwiftNIO and it modified all the pieces. It was like Netty, however written in 100% Swift. NIO is a extremely low stage asynchronous event-driven software framework designed for top efficiency (non-blocking IO) & scalability for servers and shoppers.
It looks like Apple has some actual plans for SwiftNIO. Perhaps they simply need to exchange all of the Java based mostly inner system on a long run. Who is aware of, however one factor is for certain:
SwiftNIO is right here to remain.
SwiftNIO added assist for the HTTP/2 protocol in early 2019, Vapor was the primary framework that used NIO underneath the hood. Excellent, Vapor and Kitura had been the preferred Swift frameworks, however Excellent slowly pale away and IBM introduced that they gained’t work anymore on Kitura from 2020. Vapor remains to be doing nice, it has an ideal group (~18k GitHub stars), so we are able to solely hope for one of the best.
I began to work with Kitura up to now, however I migrated away because the improvement of Kitura was already too sluggish for me. Vapor alternatively grew to become extraordinarily fashionable and surprisingly well-designed. Vapor 3 was an enormous step into the appropriate path and belief me: Vapor 4 is superb! It’s your only option to create backend apps utilizing Swift. In fact you should utilize SwiftNIO, however if you’re on the lookout for a excessive stage framework as an alternative of a low stage instrument, possibly Vapor is your ONLY possibility. Is that this dangerous? I don’t suppose so.
Sorry concerning the lengthy intro, nevertheless it was fairly a journey. As you possibly can see so much occurred in the course of the previous few years, Swift is now a mature language, SwiftNIO arrived, Vapor is healthier than ever. Some individuals suppose that server facet Swift is useless, due to the previous occasions and now IBM additionally left the get together. Vapor additionally introduced that they’ll shut down Vapor Cloud a internet hosting service for Vapor functions. IMHO because of this now they’ll focus extra time & sources on the core constructing blocks.
I consider that that is only the start of the server facet Swift period.
Ought to I exploit SwiftNIO or Vapor?
SwiftNIO is a low stage framework that depends on non-blocking IO. Community operations are non-blocking from the processing thread perspective. All of the blocking operations are delegated to extra channels, these set off occasions on community operations. Yep, because of this for those who select NIO you need to cope with all of the low stage stuff by your self. That is superb if you realize so much about networking applied sciences. 🤓
The aim of SwiftNIO is being a quick, secure and scalable underlying toolkit for constructing excessive efficiency net frameworks like Kitura, Vapor and different community service (not simply HTTP) suppliers.
With NIO you possibly can construct much more, you can also make database connectors like postgres-nio, push notification providers (APNSwift), mainly you possibly can assist any sort of community protocols.
Then again, if you’re planning to construct a REST API or an analogous backend in your current (or future) cellular software please, don’t use SwiftNIO immediately except you might have a superior understanding of community layers, occasion loops, pipelines, channels, futures and plenty of extra… 😳
Vapor is an internet framework for Swift written on prime of SwiftNIO. It provides you a straightforward to make use of basis in your subsequent web site, API, or cloud based mostly service mission. In case you are new to the server facet, I’d extremely suggest to get acquainted with Vapor as an alternative of NIO. Vapor is far more straightforward to study, you don’t must make your palms soiled with low stage parts, as an alternative you possibly can give attention to constructing your app.
The right way to get began with Vapor?
To start with, you don’t want further instruments to begin with Vapor. You probably have a PC or a mac you can begin utilizing the framework proper forward. You simply want a working Swift set up in your gadget.
You may seize the API template mission from Vapor’s GitHub repository. Nevertheless I’d like to point out you the Vapor toolbox, which is a extremely handy helper instrument for managing your initiatives.
Vapor’s command line interface offers shortcuts and help for frequent duties.
It’s out there each for macOS and Linux, you possibly can merely set up it by means of brew or apt-get. 📦
# macOS
brew set up vapor/faucet/vapor

# Linux
eval $(curl -sL https://apt.vapor.sh)
sudo apt-get replace
sudo apt-get set up vapor
Now you’re prepared to make use of the vapor command. Let’s create a model new mission.
vapor new myProject
cd myProject
vapor replace -y
The vapor replace -y command is nearly equal with swift package deal generate-xcodeproj. It’ll replace the required dependencies and it’ll generate an Xcode mission file. Ranging from Xcode 11 you possibly can double click on on the Package deal.swift file as properly. This implies you don’t must run something from the command line, since SPM is now built-in into Xcode, the app can load all of the dependencies for you.
The main distinction between the 2 approaches is that for those who geneate an
.xcodeprojfile, your dependencies are going to be linked dynamically, however if you’re utilizing thePackage deal.swiftfile the system will use static linking. Don’t fear an excessive amount of about this, except you’re utilizing a package deal with a reserved system identify, like Ink by John Sundell. If that’s the case, you need to go together with static linking.
You may also use vapor construct to construct your mission and vapor run to execute it. This comes helpful for those who don’t need to fiddle with makefiles or work together immediately with the Swift Package deal Supervisor instrument. You may enter vapor --help if you wish to study extra concerning the Vapor toolbox.
The structure of a Vapor software
Let’s study the mission template. I’ll rapidly stroll you thru all the pieces.
Run
All the mission is separated into two main targets.. The primary one is App and the second is known as Run. You’ll discover the supply code for each goal contained in the Sources listing. The Run executable goal is the start of all the pieces. It’ll load your App library (goal) and fires up the Vapor backend server with correct configs and environmental variables. It incorporates only one single most important.swift file that you would be able to run. 🏃
App
This one is the place you place your precise backend software code. It’s a library package deal by default which you’ll be able to import contained in the Run executable goal. There are some prime stage features that you need to outline, these are going to be underneath the App namespace. e.g. app(_:), configure(_:), routes(_:). Underneath the App goal you’ll discover three main information. The app.swift file is liable for returning the configured software occasion itself. It makes use of an surroundings object as an enter so you possibly can run the app in prod, dev or take a look at mode (that is on of the explanation why Vapor apps have a devoted run goal). Additionally if you wish to carry out some preliminary actions earlier than your server begins, it is best to put these right here, since there isn’t any boot.swift file anymore.
Config
Within the configure.swift file you possibly can customise your software. That is the place it is best to register all the assorted providers, use middlewares, set the router object, and so forth. For instance if you wish to use a database connection, a static file internet hosting service or a template engine that is the place the place you possibly can set it up.
Companies is a dependency injection (additionally referred to as inversion of management) framework for Vapor. The providers framework lets you register, configure, and initialize something you may want in your software.
Companies are the “low-level” parts in Vapor. Because of this many of the underlying parts are written as a service. The router is a service, middleware system works as a service, database connections are providers, even the HTTP server engine is carried out as a service.
That is extremely helpful, as a result of you possibly can configure or exchange something inside your configuration file, there are only some hardcoded parts, however all the pieces is customizable. In Vapor 4 there’s a model new dependency injection API based mostly on Swift extensions. Letting the compiler do the arduous work is all the time good, plus this fashion providers are less difficult to find, because the kind system is aware of all the pieces. 😉
Routes
The routes.swift file is the place you possibly can add the precise routes in your router. However first, what’s routing? If you happen to don’t know what’s HTTP, please cease right here and begin studying about networks first. Sorry.😅
Routing refers to how an software’s endpoints reply to consumer requests.
That is already well-explained within the expressjs docs. Let’s say that routing is the subsystem that connects your code with the API endpoints. You may outline these connections contained in the routes perform. For instance when you’ve got a Cat class with a returnAllKittens methodology you possibly can hook that as much as the GET /cats endpoint by declaring a route. Now for those who ship a GET HTTP request to the /cats endpoint, the return all kitten methodology might be referred to as and also you’ll see numerous pleased kittens. 🐱🐱🐱
Controllers
Controllers are code group instruments. With the assistance of them you possibly can group associated API endpoints collectively. Within the pattern mission there’s a Todo controller which is accountable of CRUD operations on Todo fashions. The router connects the endpoints through the use of this controller, and the controller will question (create, request, replace, delete) the suitable fashions utilizing the out there database connection.
Fashions
Vapor has a neat database abstraction instrument (an ORM framework) referred to as Fluent. Fashions symbolize database entries normally associated to this Fluent library. Within the pattern mission the Todo class defines the identify of the database scheme as a static property. Additionally every area within the desk has a corresponding property within the entity. These properties are marked with a particular factor referred to as Property Wrappers. By means of them you possibly can customise the identify and the habits of the db columns. Personally I really like this new strategy! ❤️
Migrations
Identical to fashions, migrations have modified so much by means of time. In Vapor 4 you might have much more energy to customise the way you need to migrate from one database scheme to a different. For instance if you could introduce a brand new area in your mannequin, you possibly can alter your database based on your wants through the use of migrator features. Similar factor applies for different scheme alteration strategies. I’m actually proud of this new strategy, Fluent matured so much and this new idea jogs my memory to my previous PHP framework. 👍
Checks
I used to be lacking this from Vapor 3, however lastly Vapor 4 features a new testing framework referred to as XCTVapor. This framework makes simpler to check your software with only a few strains of code. If you happen to take a look at the Checks folder you’ll some fundamental take a look at situations for the Todo software. It’s a superb place to begin. ✅
Ideas & tips for utilizing to Vapor 4
Let’s write some server facet Swift code, we could? Properly, let me present you some greatest practices that I realized in the course of the creation of this web site. Sure, that’s proper, this website is made with Swift and Vapor 4. 😎
Customized working listing in Xcode
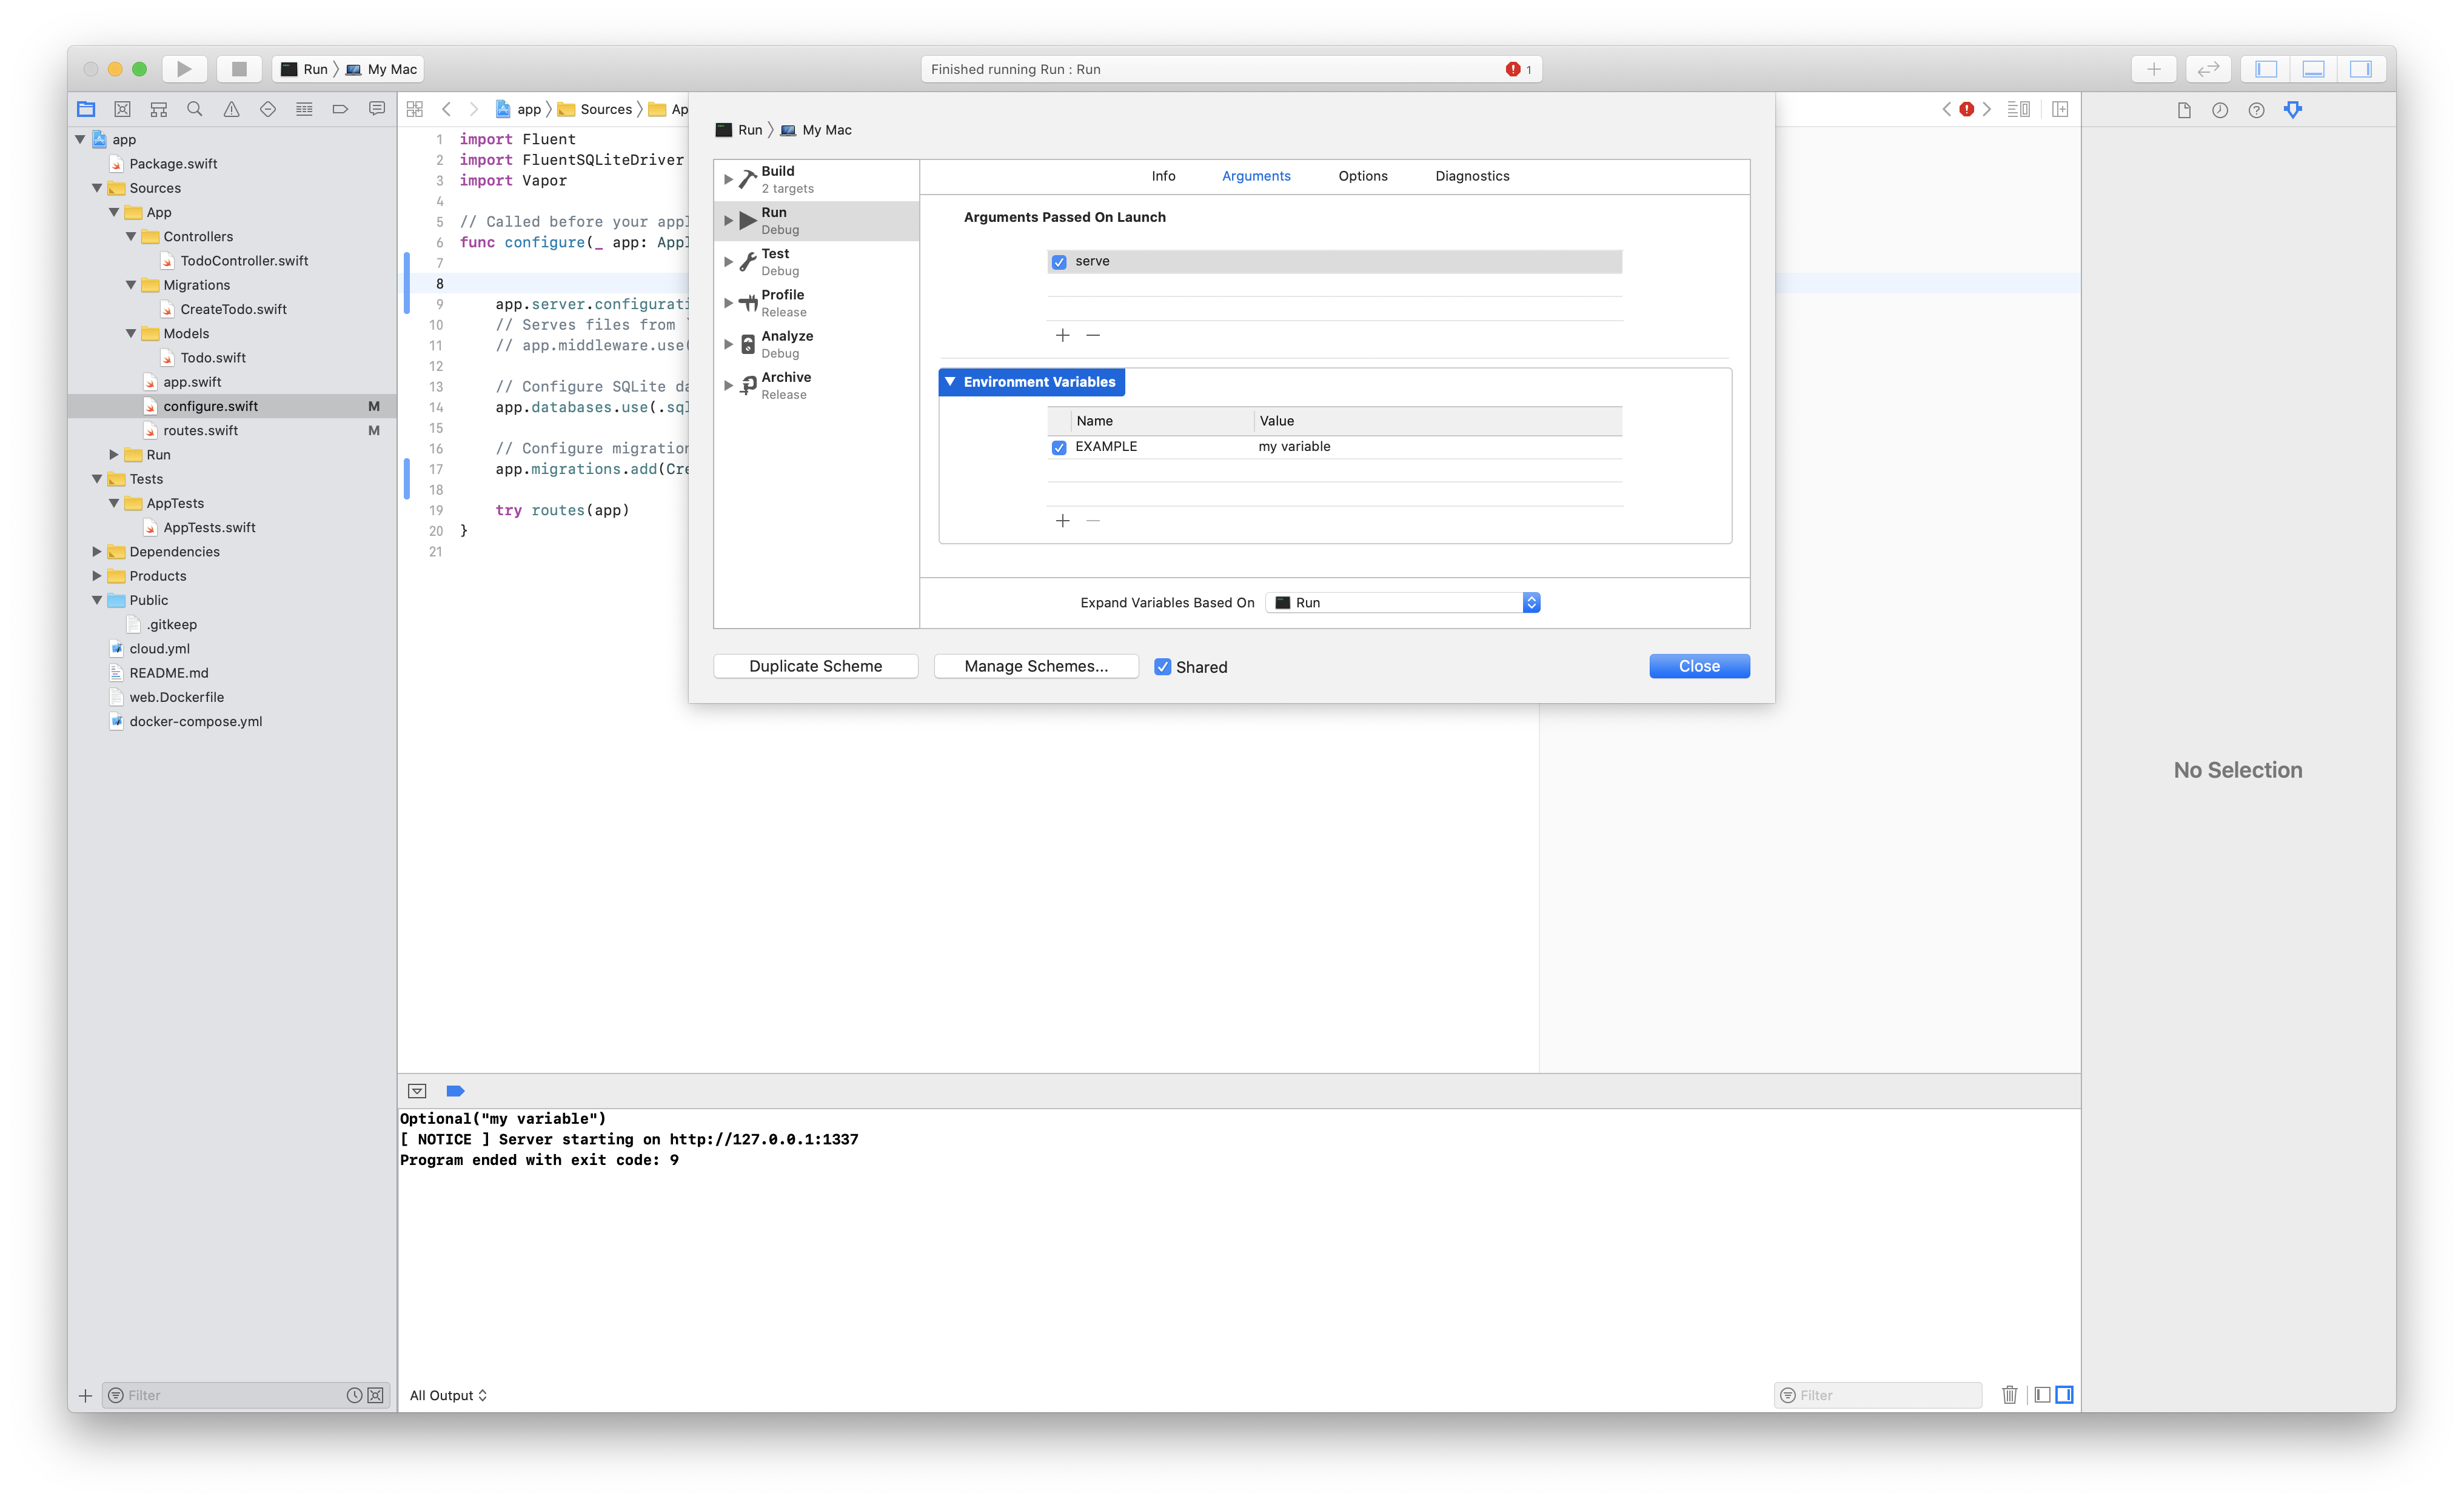
If you happen to run your mission by means of Xcode, you may need to setup a customized working listing, in any other case your software will search for property from a cursed place referred to as DerivedData. This may trigger some points if you’re utilizing a templating engine or the general public file middleware with the default config, because the system gained’t discover correct routes. With the intention to repair this you simply click on your goal identify subsequent to the cease button and choose the Edit Scheme… menu merchandise. Choose Run and click on on the Choices tab.

Right here is the authentic difficulty on GitHub.
Utilizing system supplied directories
There are a couple of built-in directories out there by means of the applying object.
func configure(_ app: Utility) throws {

    print(app.listing.workingDirectory)
    print(app.listing.publicDirectory)
    print(app.listing.resourcesDirectory)
    print(app.listing.viewsDirectory)
    //...
}
Utilizing the surroundings
You may cross your secrets and techniques to a Vapor software through the use of surroundings variables. You may also verify the present env for run modes like dev, prod, take a look at, however one of the best factor is that Vapor 4 helps .env information! 🎉
func configure(_ app: Utility) throws {
    let variable = Atmosphere.get("EXAMPLE") ?? "undefined"
    print(variable)
    print(app.surroundings.identify)
    print(app.surroundings.arguments)
    print(app.surroundings.commandInput)

    if app.surroundings.isRelease {
        print("manufacturing mode")
    }

    //...
}
Okay, however how the hell can I run the app in manufacturing mode? Additionally how do I present the EXAMPLE variable? Don’t fear, it’s really fairly easy. You should use the command line like this:
export EXAMPLE="good day"; swift run Run serve --env manufacturing
This manner the applying will run in manufacturing mode and the EXAMPLE variable may have the good day worth. Excellent news is for those who don’t wish to export variables you possibly can retailer them in a .env file similar to this:
EXAMPLE="good day"
Simply put this file to the basis folder of your mission, it’s additionally fairly a superb apply merely .gitignore it. Now you possibly can run with the identical command or use the vapor toolbox:
swift run Run serve --env manufacturing
# NOTE: toolbox command is just not accepting env within the present beta
vapor construct && vapor run serve --env manufacturing
You may also set customized surroundings variables and launch arguments for those who edit your scheme in Xcode. It’s referred to as Arguments proper subsequent to the Choices tab contained in the scheme editor popup.
Change port quantity and hostname
The simplest method to change port quantity and hostname is to override the HTTP server config:
func configure(_ app: Utility) throws {
    app.http.server.configuration.hostname = "127.0.0.1"
    app.http.server.configuration.port = 8081
    //...
}
Alternatively you possibly can run Vapor with the next instructions:
swift run Run serve --hostname api.instance.com --port 8081
This manner you don’t must hardcode something, however you possibly can run your software with a customized config.
Router parameters
Routing in Vapor 4 modified somewhat bit, however for the nice. You may identify your router parameters. If you wish to have a route with a param, it is best to outline one thing like this /good day/:world. So on this instance the world is a dynamic parameter key that you should utilize to entry the underlying worth by means of the request.
app.get("good day", ":world") { req -> String in
    let param = req.parameters.get("world") ?? "default"
    //let quantity = req.parameters.get("world", as: Int.self)
    return "Hiya, (param.capitalized)!"
}
Sort casting can also be supported, you possibly can present the kind as a second parameter for the .get() methodology.
Dynamic routes and customized HTTP responses
Responding to all of the routes is just not that onerous, there are two built-in choices out there. You should use the * string or the .something path part case. Additionally there’s the ** route which is equal with the .catchall part if you could deal with a number of route ranges like: /a/b/c.
Returning a customized HTTP Response can also be simple, however let me present you a fast instance:
app.routes.get(.catchall) { req -> Response in
    .init(standing: .okay,
          model: req.model,
          headers: ["Content-Type": "text/xml; charset=utf-8"],
          physique: .init(string: ""))
}
Customized JSON encoding / decoding technique
I don’t like to make use of de default JSON encoder / decoder, since they arrive with an “ugly” technique for dates. Haven’t any worries, in Vapor 4 you possibly can customise actually all the pieces. The ContentConfiguration object is what you’re on the lookout for. You may set new methods for all of the urls and media sorts.
let jsonEncoder = JSONEncoder()
jsonEncoder.dateEncodingStrategy = .secondsSince1970
ContentConfiguration.international.use(encoder: jsonEncoder, for: .json)
Any more each single JSON object will use this encoder technique. Downside solved. 🙃
The right way to return customized content material sorts?
Properly, the reply is easy. You simply have to evolve to the Content material protocol. If you happen to achieve this you possibly can merely return your personal objects within the response handler. Now for those who verify the /cats API endpoint, the entire three cats might be there ready simply so that you can feed them (encoded utilizing the worldwide JSON encoder by default).
struct Cat: Content material {
    let identify: String
    let emoji: String
}

func routes(_ app: Utility) throws {
    app.get("cats") { req -> [Cat] in
        return [
            .init(name: "Lucky", emoji: "🐱"),
            .init(name: "Biscuit", emoji: "🍪"),
            .init(name: "Peanut", emoji: "🥜"),
        ]
    }
}
Codable routing is superb, it signifies that you don’t must mess with handbook encoding / decoding. 😻
The right way to deploy & host your Swift server?
Writing your backend server is only one a part of the entire story. If you wish to make it out there for everybody else you need to deploy it to the cloud. Because of this you want a internet hosting supplier. Since Vapor Cloud is shutting down you need to discover different internet hosting options. In case you are on the lookout for FREE options, Heroku is one in all your greatest probability. There’s a migration information from Vapor Cloud to Heroku.
Then again, I favor AWS, because it has all the pieces {that a} backend developer or a devops man can dream about. You need to observe that for those who select AWS, you should utilize a T2.nano occasion fully FREE for 1 yr. You may fireplace up your occasion in about 10 minutes together with your account registration and by the top of the method you’ll have a working Linux machine on Amazon. 💪
Working the server eternally
Whats subsequent? Your Swift software server must run always. By default if a crash occurs it’ll cease operating. That ain’t good, since you gained’t be capable of serve shoppers anymore. That is the primary motive why we have to daemonize the app first. Daemons can run always, in the event that they cease they’ll be mechanically re-spawned, so if a crash occurs the app will begin once more from scratch. 👹
Underneath Linux you possibly can create a systemctl upstart proces to run an software as a daemon. There’s a nice tutorial about the right way to setup upstart script and respawn course of. I’ll simply make a fast walkthrough about what it is best to do. First, create a brand new file underneath /lib/systemd/system/todo.service with the next contents.
[Unit]
Description=Todo server daemon

[Service]
Person=ubuntu
Group=ubuntu
WorkingDirectory=/path/to/my/server/
ExecStart=/path/to/my/run/script
Restart=all the time

[Install]
WantedBy=multi-user.goal
In fact it is best to present your personal configuration (path, person, group and exec command). The ExecStart parameter may be swift run Run, however please watch out you might need to make use of your full path of your swift set up (which swift). If you find yourself prepared with the service file you need to give some permissions after which it is best to reload the daemons. Lastly it is best to allow your service and begin it. 👻
chmod +x /lib/systemd/system/todo.service
systemctl daemon-reload
systemctl allow todo.service
systemctl begin todo
systemctl standing todo
Any more you should utilize sudo service todo begin|cease|restart to handle your backend server.
Reverse proxy utilizing nginx
I normally put my servers behind a proxy. Nginx can be utilized as net server, reverse proxy, load balancer and HTTP cache. You may set up it by operating the sudo apt-get set up nginx command. Perhaps the toughest half is to setup a correct nginx configuration in your Vapor software server with HTTP2 and SSL assist. A really fundamental HTTP nginx configuration ought to look one thing like this.
server {
    hear 80;
    server_name mytododomain.com;

    location / {
        proxy_pass              http://localhost:8080;
        proxy_set_header        Host $host;
        proxy_set_header        X-Actual-IP $remote_addr;
        proxy_set_header        X-Forwarded-For $proxy_add_x_forwarded_for;
        proxy_set_header        X-Forwarded-Proto $scheme;
        proxy_read_timeout      90;
    }
}
You need to put this configuration file contained in the /and so forth/nginx/sites-available/mytododomain.com folder. This setup merely proxies the incoming site visitors from the area to the native port by means of pure HTTP with out the S-ecurity. Symlink the file through the use of ln -svf [source] [target] into the sites-enabled folder and run the next command to reload nginx configurations: sudo service reload nginx. Alternatively you possibly can restart nginx sudo service nginx restart. If you happen to tousled someting you possibly can all the time use sudo nginx -t.
The right way to assist HTTPS?
Bear in mind HTTP is a cleartext protocol, so mainly everybody can learn your community site visitors. Apple says all knowledge is delicate – they’re rattling proper about that – and utilizing a safe channel gives you advantages like encryption, confidentiality, integrity, authentication and id. If you’d like a correct server you need to use HTTPS. 🔒
HTTP + SSL = HTTPS ❤️ ATS
With the intention to assist safe HTTP connections, first you’ll want an SSL certificates. Letsencrypt can provide you one for FREE. You simply have to put in certbot. You may request a brand new certificates and setup SSL mechanically in your nginx websites through the use of certbot. Observe the directions and luxuriate in your safe API service written in Swift language.
sudo apt-get replace
sudo apt-get set up software-properties-common
sudo add-apt-repository ppa:certbot/certbot
sudo apt-get replace
sudo apt-get set up python-certbot-nginx

sudo certbot --nginx
Don’t overlook to arrange a cron job to resume your certificates periodically sudo certbot renew --dry-run.
You may verify the energy of your server configuration at ssllabs.com. They’re going to measure how safe is your server. By default letsencrypt gives you an A outcome, which is completely fantastic, however you possibly can intention for an A+ grade in order for you. I don’t need to get into the main points now. 🤫
App Transport Safety (ATS) was launched to make iOS apps safer. It enforces builders to speak solely by means of safe HTTPS channels to your backend server. You may all the time disable ATS, however as an alternative of that it is best to attempt to resolve the underlying points. The very first thing that you are able to do is to allow CFNetwork Diagnostic Logging inside your iOS software. Now your community requests will log extra info to the console. You may also verify your server connection from terminal with the nscurl or openssl instructions.
nscurl --ats-diagnostics http://instance.com/api/endpoint
openssl s_client -connect instance.com:443
That’s all people. 🐰
Constructing, operating, internet hosting your personal Swift software on the server requires loads of work. In case you are new to the subject it may be difficult to seek out correct sources, since Vapor tutorials are principally for model 3. I actually hope that on this article I coated all the pieces that noone else did. Vapor 4 goes to be an ideal launch, I can’t wait to work with the ultimate model. I additionally hope that increasingly Server facet Swift functions might be born.