

Overview
Revopoint’s MetroX scanner represents a shift within the firm’s portfolio into the realm {of professional}, metrology-capable 3D scanning.
In contrast to earlier scanners within the POP sequence, MetroX makes use of a number of blue laser strains to seize high-fidelity level cloud knowledge, even on problematic surfaces like shiny black plastic or uncoated steel (though some spray could be wanted often).
The addition of full-field scanning mode additionally brings a degree of flexibility usually seen in dearer programs, letting customers seize geometry throughout bigger objects in a single go.
The scanner boasts a single-frame accuracy of 0.03 mm, and a volumetric accuracy of 0.03 mm + 0.1 mm × L (m), placing it within the ballpark of what’s thought of metrology-grade by many industrial customers. It does this at a fraction of the value usually related to high-accuracy scanning programs.
It’s powered fully through USB (no battery), and whereas that makes it much less versatile in subject use in comparison with the POP 3 Plus, the tradeoff is a way more steady energy and knowledge hyperlink. These are important for capturing correct and repeatable scan knowledge.
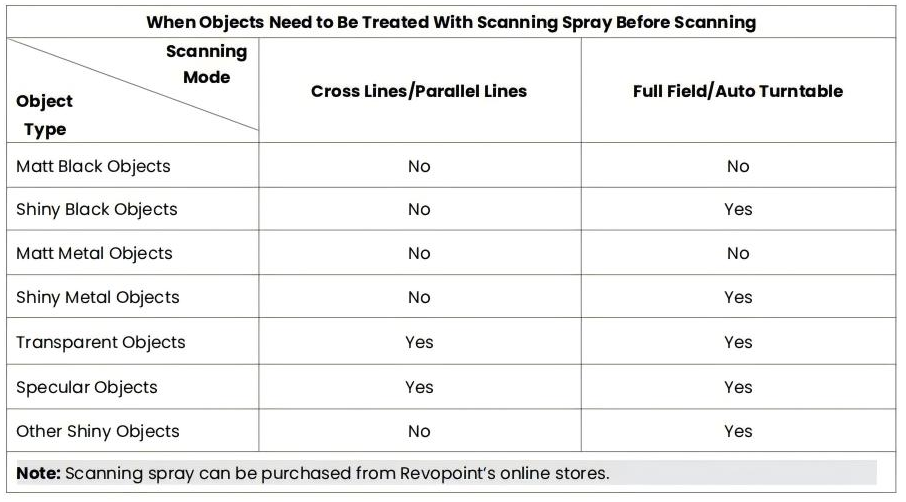
The desk under reveals which modes are finest suited to scanning various kinds of surfaces. We examined all of them, with various levels of success.
MetroX Choices
The MetroX is out there in two kits, the primary being the “Commonplace Version” containing the scanner, tripod, dual-axis turntable, energy provide, and all of the cables, all inside a candy aluminium case.
The second choice (which we reviewed) is the “Superior Version” which is principally the whole lot within the Commonplace Version, plus a Marker Block equipment. The Marker Block equipment incorporates quite a lot of plastic shapes with markers on and magnets on the base. As well as it incorporates for threaded pillars (known as “bar markers”, which might be screwed into the turntable prime to supply some fixing factors for the blocks (or extra stickers) within the z-axis.
You possibly can see these pillars fastened to the turntable within the picture under.
Revopoint Software program
If in case you have any of the opposite Revopoint scanners, you’ll doubtless have a replica of their scanning software program (RevoScan) put in in your pc.
To make use of the MetroX, you will have to obtain the particular model which was developed for the MetroX. It’s referred to as RevoScan MetroX, it’s free, and yow will discover it on the Revopoint software program web page.
Functionally, it’s nearly an identical to the unique RevoScan software program, solely the MetroX model allows the totally different scanning modes within the new scanner. So in case you have gotten used to the pointcloud technology, mesh creation and modifying within the earlier software program, you then gained’t have any issues switching to this new model.
One minor gripe that I do have in regards to the new model, is that it doesn’t have any options for taking measurements from the purpose cloud knowledge. On condition that this new scanner is touted as “metrology-grade”, you’d assume that “measuring stuff” can be an essential function to incorporate. However nope. It ain’t there. If you wish to measure something out of your level cloud or mesh, you’ll have to export it into one thing else.
One other piece of software program of curiosity is the Revo Assistant. Revo Assistant is a smartphone app for IOS and Android, that permits management of the automated turntable. That is fairly helpful to have, as a result of relying on how your turntable is positioned, it could possibly be a little bit difficult to entry the bodily buttons to tilt or change route of the turntable.
Now, with the app put in, it makes life a little bit simpler, offering you don’t thoughts having to disconnect the turntable out of your pc’s BluTooth each time you need to use it.
Anyhoo, with all of the software program put in and the scanner setup, on with the testing!
Now we have divided the testing opinions into two major sections, one for structured mild modes, and one for laser line scanning.
Structured Mild Scanning Modes
Each Full Area and Auto Turntable scanning modes within the Revopoint MetroX make the most of blue structured mild projection know-how. Structured mild must be your mode of selection with the MetroX, when pace and texture matter greater than hardcore accuracy on tough surfaces.
Colour scanning may also be achieved due to the devoted RGB digital camera, though this could solely be utilized in auto turntable mode. It must be famous that the function scan mode can be solely accessible in auto turntable and full subject modes solely. Marker mode may also be used with these modes.
Marker Scan (Auto Turntable mode – shade)
The primary check we did was on a drone propeller. It has some good curved geometry and a few sharp options on the main and trailing edge, so what higher method to begin testing a metrology-grade scanner?
Not eager to cowl the propeller in markers, we opted for marker scan (in shade) utilizing the prevailing markers on the turntable. It scanned advantageous, though merging the 2 sides collectively was difficult, because the merging function requires 30% overlap between scans to work – and on condition that the propeller is so skinny, it was not very best. However this isn’t the fault of the scanner or software program, merely of the geometry.
As we’ll see later, the merging function works advantageous, so long as you could have a scanning merchandise that isn’t so skinny it might’t stand on its sides.

Marker Scan (Auto Turntable mode – shade) Bearing Housing
For the following scanning check, we needed to strive one thing metallic, so opted for a bearing housing that I’m utilizing to make a treadmill for my cat.
I’ve been ready for this half to reach for some time, therefore why our overview was a little bit delayed. I really needed to scan it for correct engineering causes, so I figured I might kill two birds with one stone, and scan it for the overview so I might use the scan knowledge in my CAD work later.
The floor end is matte aluminium, so didn’t require use of a sprig.
Marker Scan (Auto Turntable mode – shade) – A Dried Fig
Subsequent for the colour scans, I scanned a dried fig. It’s not a really technical topic, however I had a field of figs mendacity round and I used to be curious what it could appear like. Once more, I used the markers on the turntable, and the piece of dried fruit scanned advantageous.

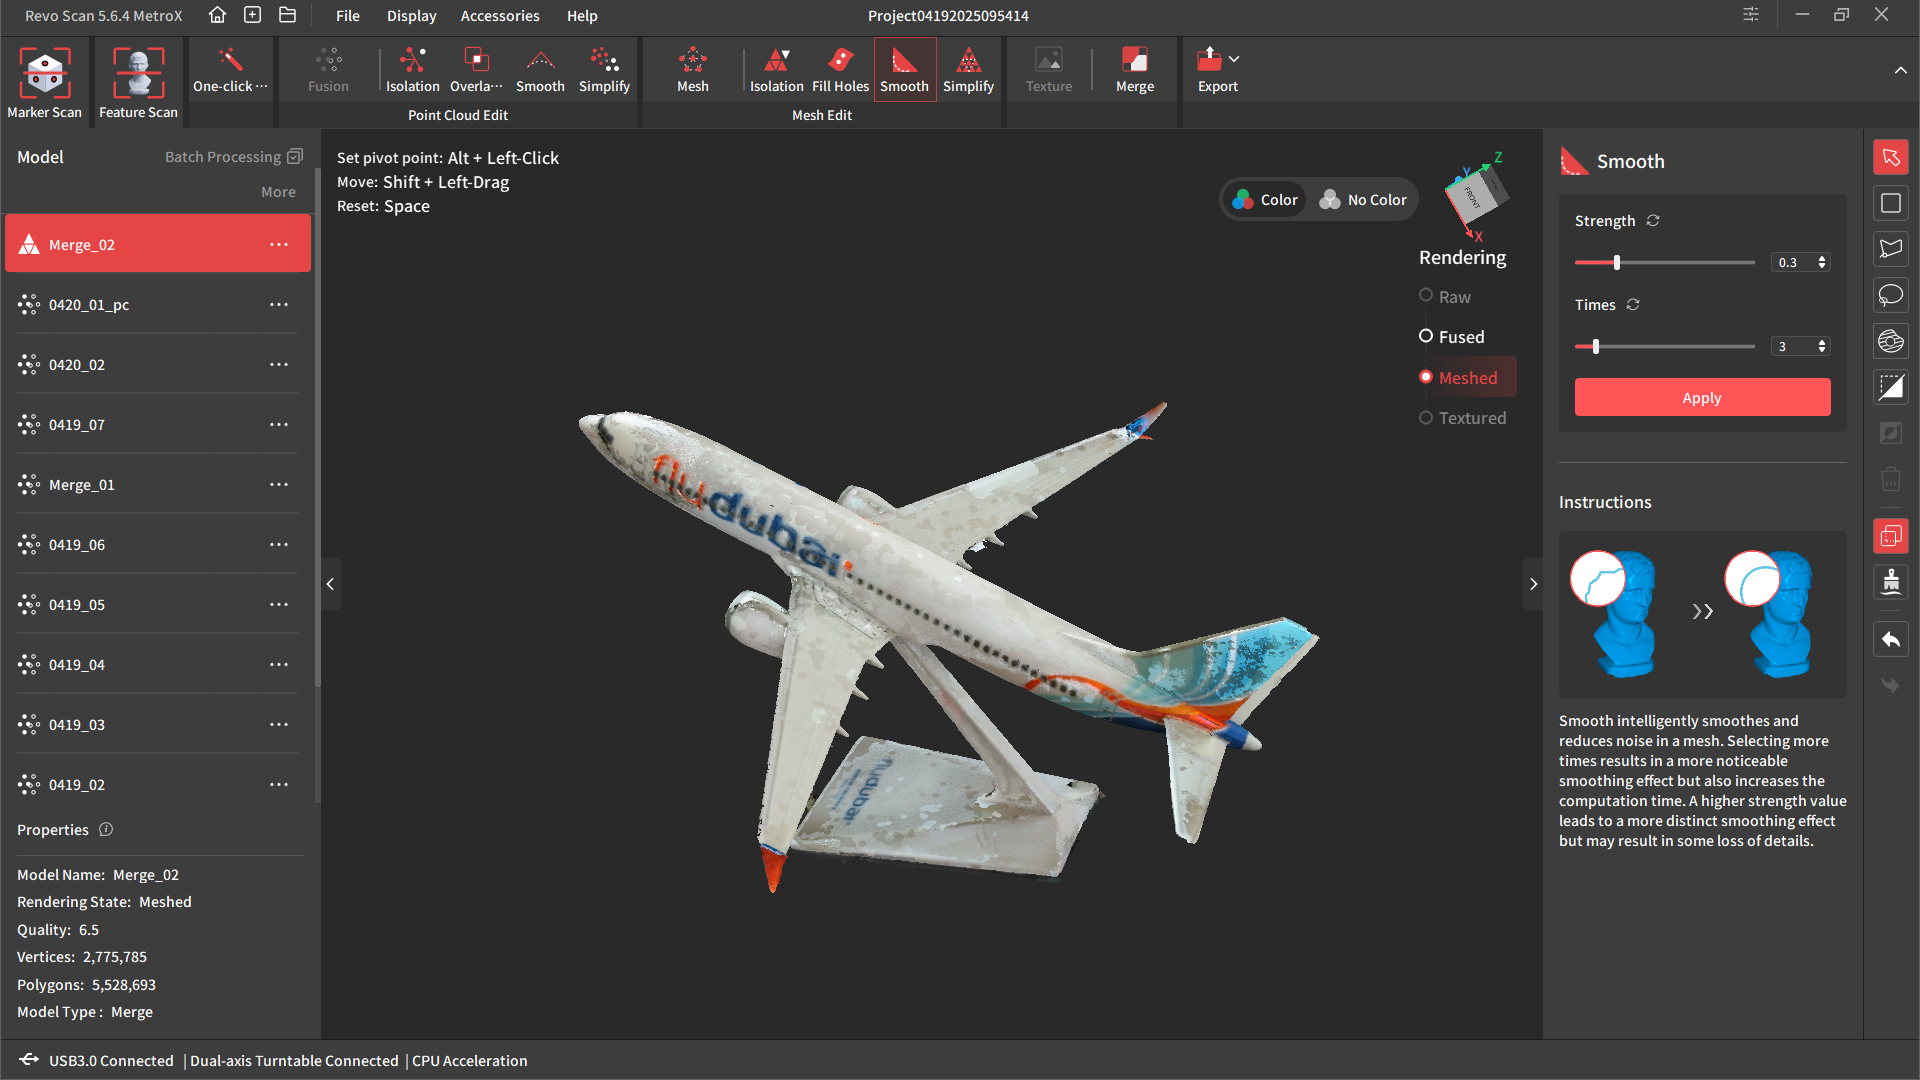
Marker Scan (Auto Turntable mode – shade) – Plane Mannequin
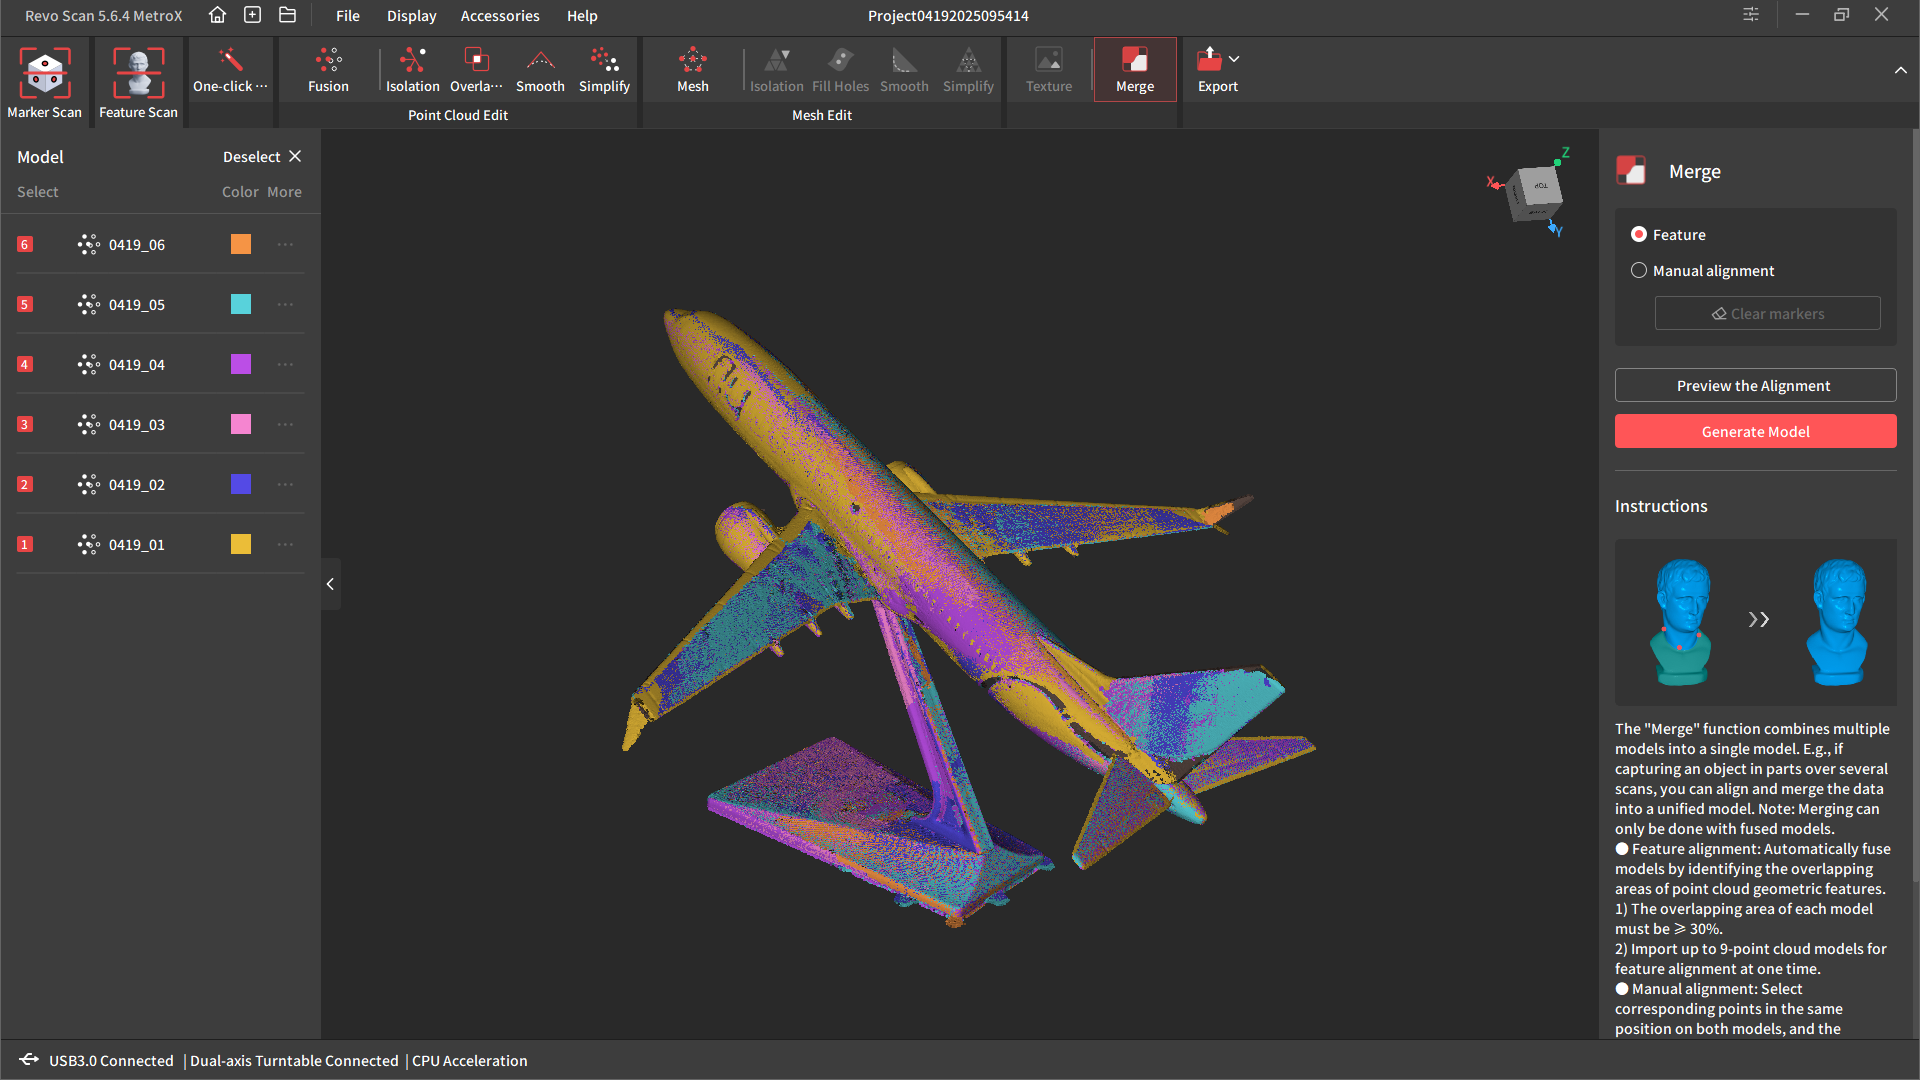
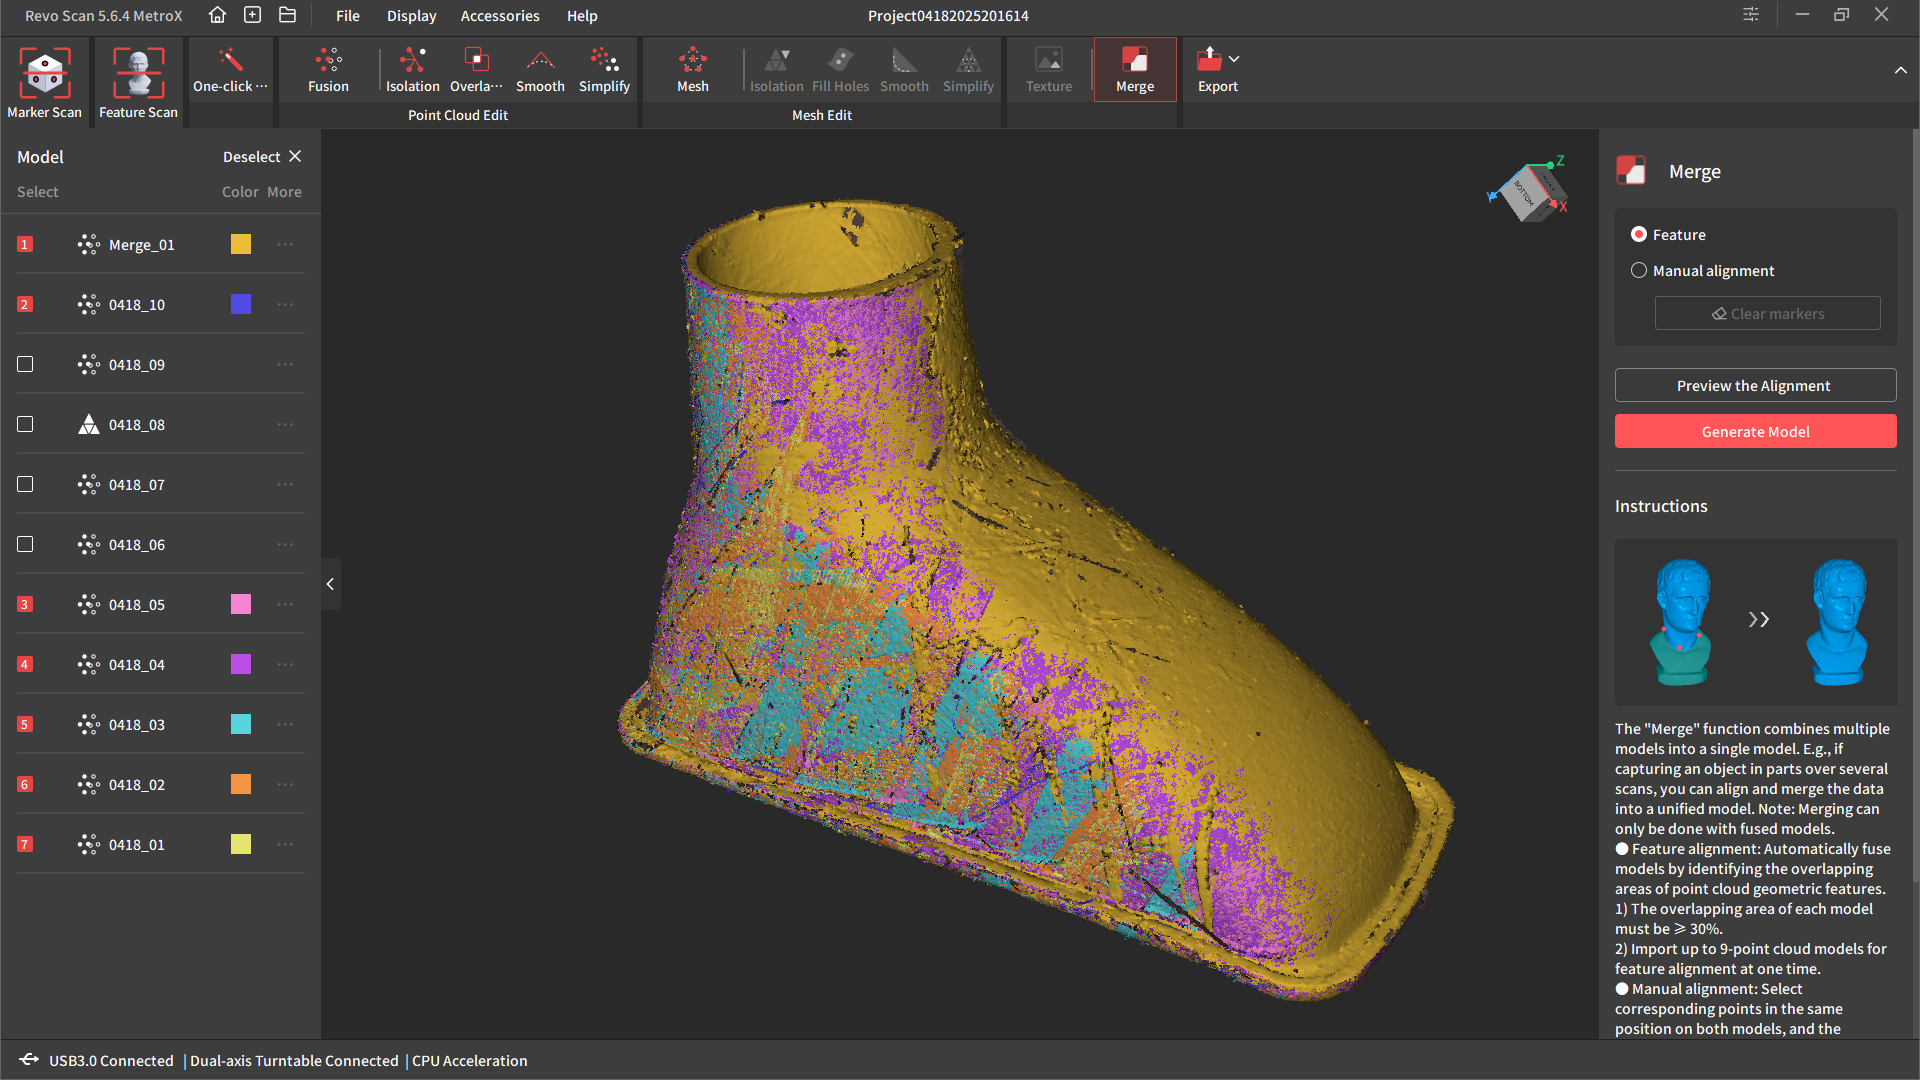
For the ultimate shade mode check, I scanned a mannequin of an plane. This was an fascinating mannequin to scan and I discovered just a few tips from the method which may not be obvious from merely studying the handbook. This required a number of scans from totally different heights earlier than merging the scans within the software program. As you possibly can see within the picture under, the merging course of consisted of 6 totally different scans, and it turned out advantageous. Bear in mind, you want a 30% overlap for merging to work.
The picture under reveals the merged, meshed and textured last consequence. There’s some variation in shade and shading of the assorted scans, largely because of me altering peak between scans, affecting the shadows on the mannequin. For a extremely good shade scan, it’s simpler to seize the item in a single scan from the turntable (with out transferring the scanner). Having constant lighting is essential right here.
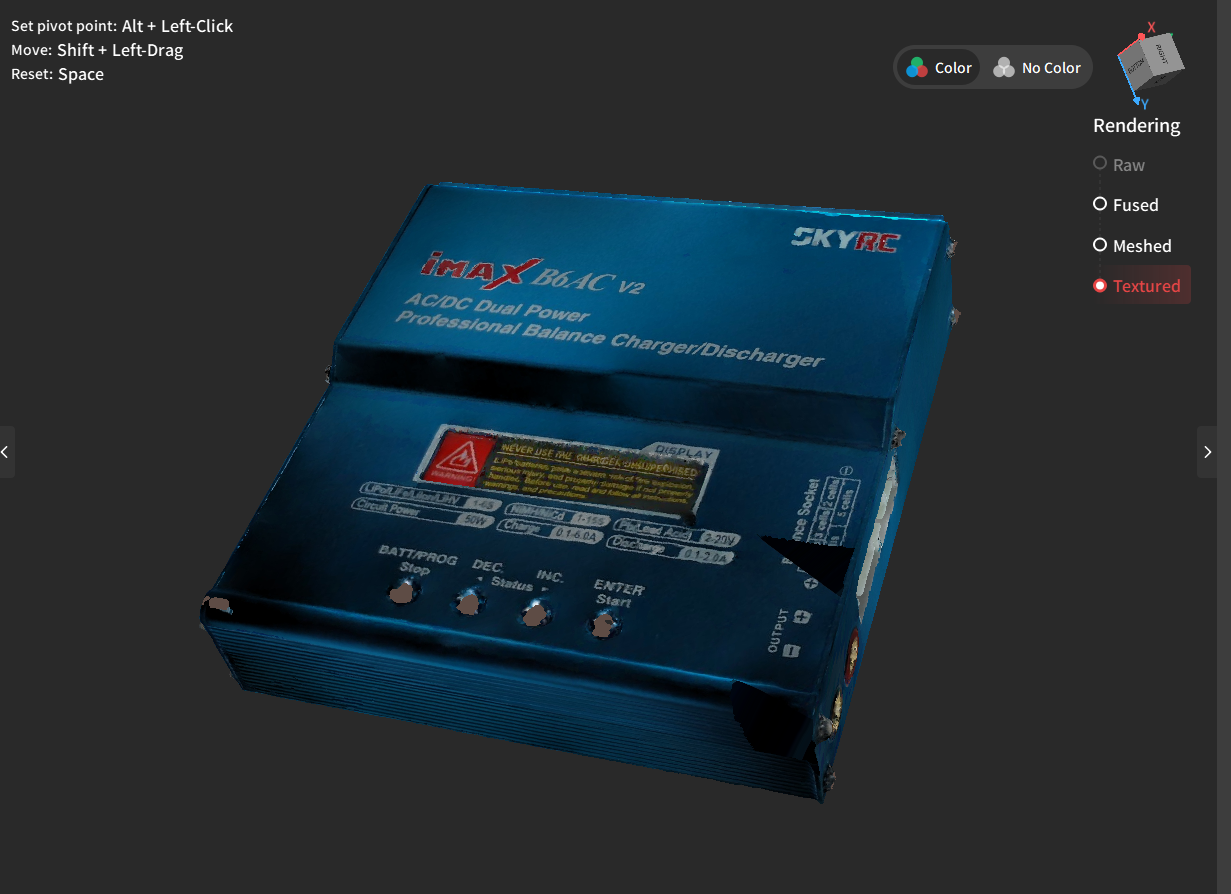
Function Scan (Auto Turntable mode – shade) – Battery Charger
For the following check, I needed to strive the Function Scan mode, which permits scanning of feature-rich topics with out the usage of markers. For this, I used a drone battery charger. The charger had quite a lot of metallic, plastic and glass surfaces, in addition to a spread of darkish/mild colours and different options.
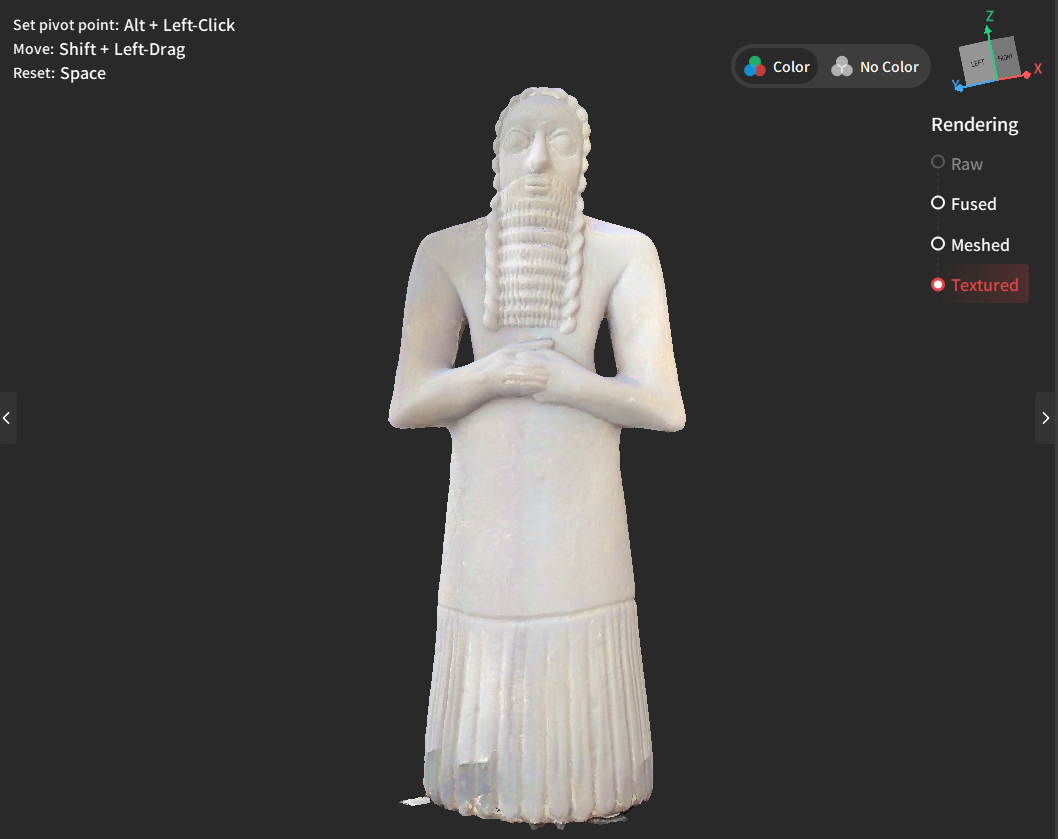
Function Scan (auto turntable mode – shade) – 3D Printed “Ea-Nasir” Statue
For my last function scan check, I used my 3D printed statue of infamous Sumnerian copper service provider “Ea-Nasir”. The scanning of this determine was loads simpler than the battery charger, because it has numerous distinct, not planar, non-repetitive geometry.
Laser Line Scanning Modes
With the 2 laser scanning modes, blue lasers emit extremely centered beams with minimal dispersion, permitting for extra correct floor profiling on sharp edges, advantageous options, and small elements. In contrast to structured mild, which initiatives a complete sample directly, laser scanning captures a number of strains, making it much less delicate to ambient lighting and higher suited to use on darkish, shiny, or extremely textured surfaces.
It additionally tends to penetrate deeper into floor recesses and complicated geometries. Whereas blue structured mild scanning is quicker for full-field seize and extra compact in {hardware} design, blue laser programs usually ship superior decision, decrease noise, and better repeatability, making them the popular selection for industrial inspection and metrology-grade purposes.
So with the structured mild modes effectively and actually put by means of their paces, it was time to check the laser line scanning modes (parallel strains and cross strains).
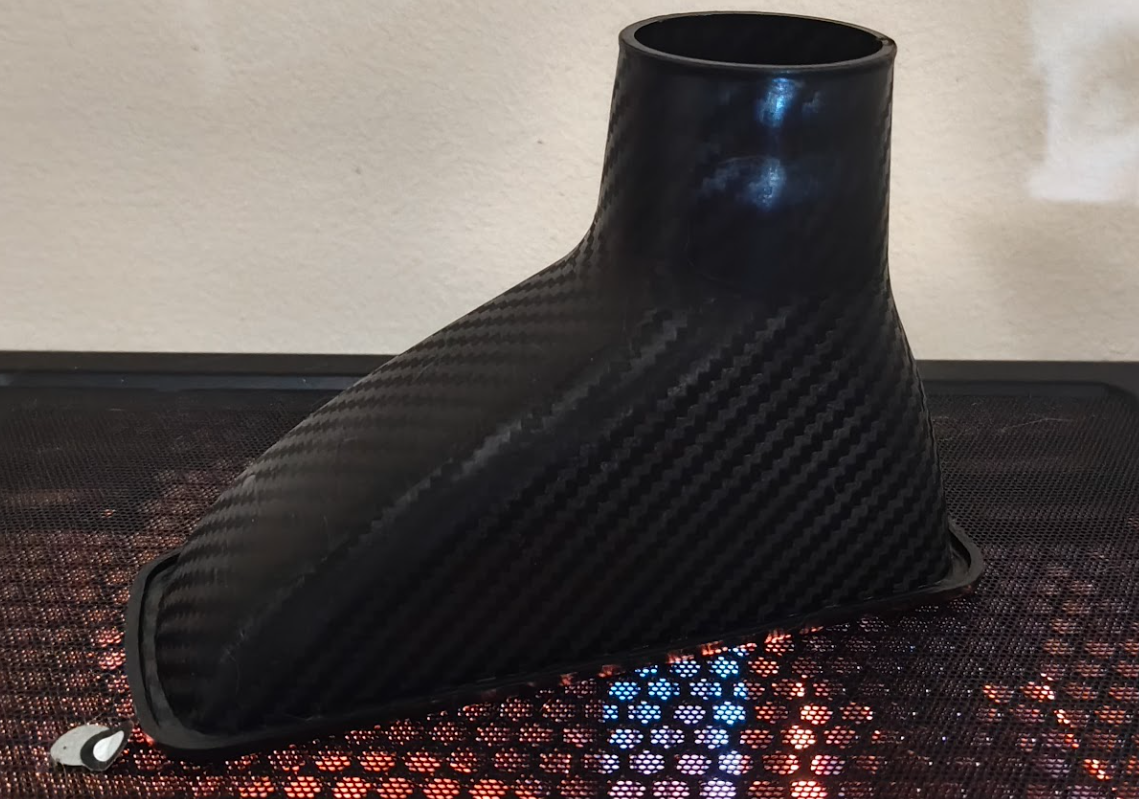
Marker Scan (laser strains) – Air Duct
The primary merchandise to scan with the laser modes was a little bit bit bizarre, as it’s a automotive consumption duct with two floor finishes. It’s designed to resemble carbon fiber, nevertheless it’s really molded that means, with alternating shiny and matte black parts zig-zagging alongside one another.
First I attempted the auto-turntable mode for a shade scan, and as predicted, solely the matte zig zags have been captured within the scan. Non-color full subject scanning yielded the identical outcomes.
So I arrange a cross line laser scan, utilizing the turntable, and the outcomes have been significantly better. The cross strains had some issue reaching contained in the duct, so I paused the scan, and switched to a parallel line laser scan. I unpaused the scan and resumed, and the parallel strains reached just a few of the areas that might not be reached earlier than.
Whereas I used to be not capable of seize the whole internal surfaces of the duct (as a result of geometry of it), I do just like the function of pausing, and switching scan sorts mid-scan. This does (in some instances) permit for reaching tough to scan elements.
After I took just a few scans, I merged them right into a single level cloud, as you possibly can see under.
Marker Scan- Hand Scan (laser strains) – Fireplace Extinguisher
The whole lot usually works OK when utilizing the turntable (when you get used to it), so for our last check, we needed to see how the MetroX carried out on a bigger object, particularly a fireplace extinguisher.
I dutifully coated the fireplace extinguisher with sticky markers, and some of the 3D plastic marker blocks, and began a cross line scan.
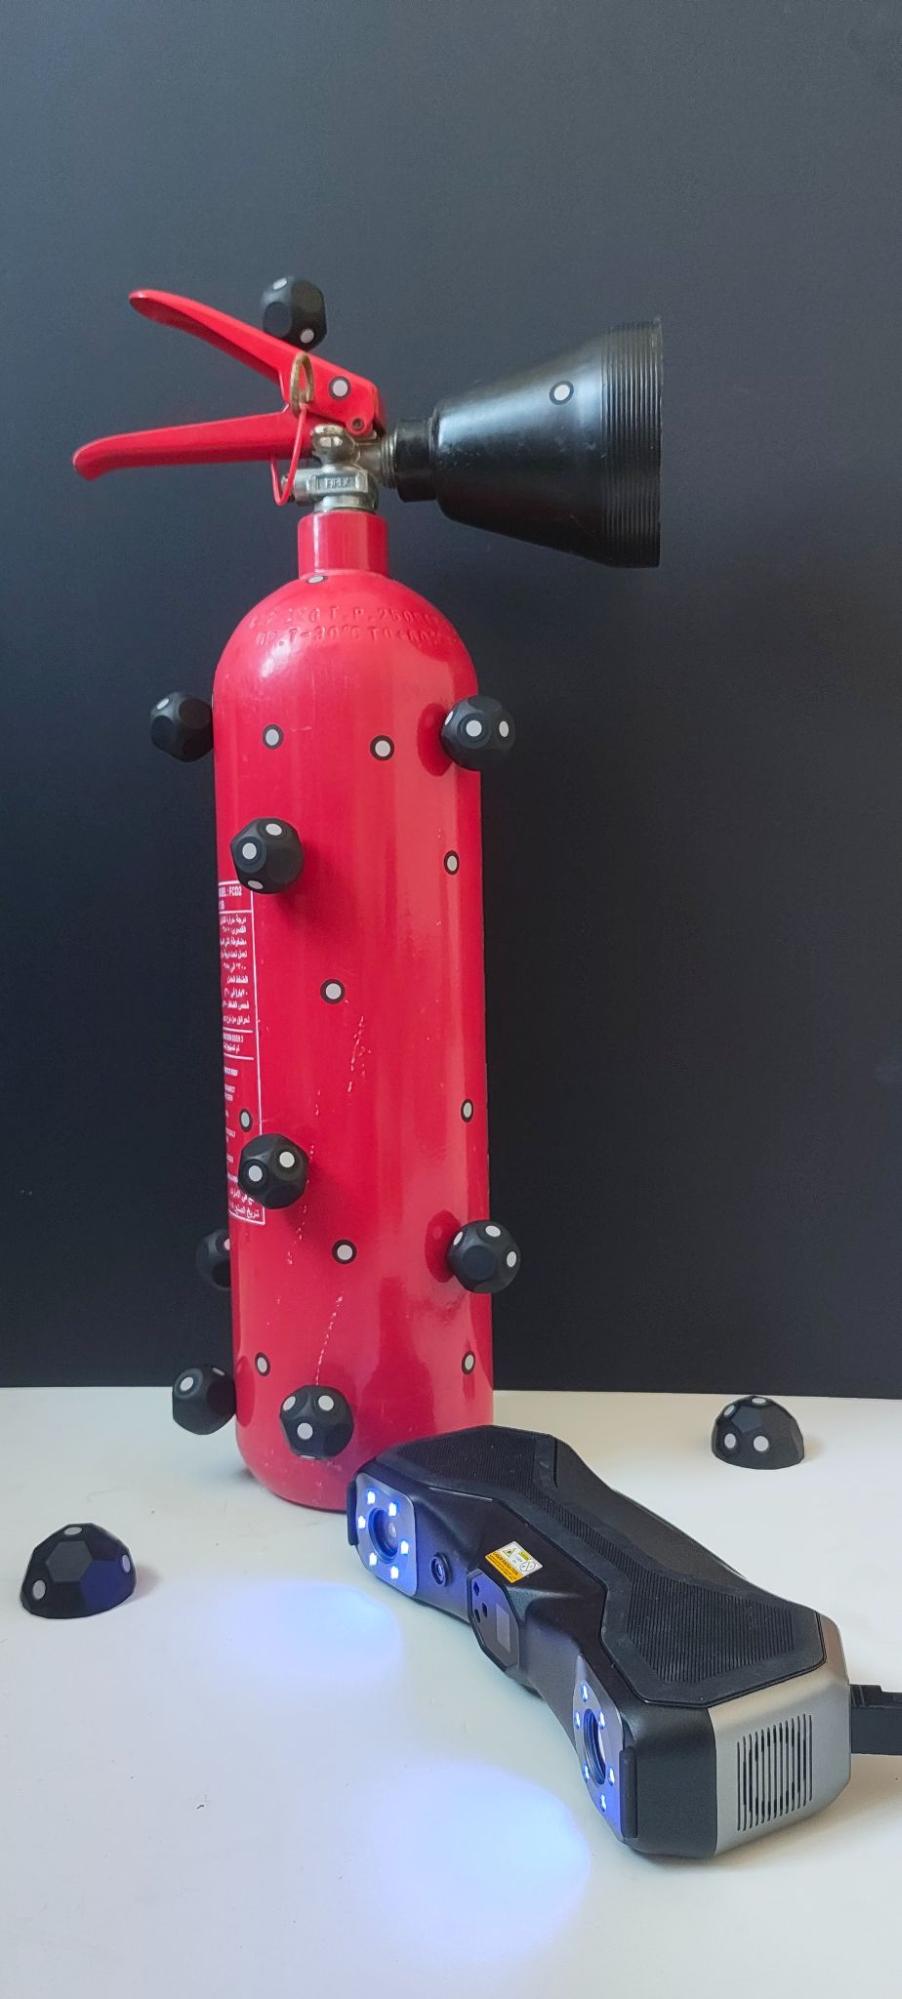
It labored advantageous for essentially the most half, and was capable of seize the entire number of surfaces and supplies, starting from the crimson paint to the black plastic mesh on the nozzle.
The software program demanded that I wanted “extra markers” rather a lot, which was a bit annoying, as a result of as you possibly can see within the picture above, there have been numerous markers on it already. To be honest, the fireplace extinguisher has a curved floor, and the sticky markers work higher on flatter surfaces. So even though it was coated in markers, the scanner had some points with detecting the sticky markers from extra shallow angles because the floor curved round.
The ball-shaped stable markers are higher for such a software, nonetheless, there are solely 10 of the ball-shaped magnetic markers in our equipment, so this is able to not be sufficient to scan the extinguisher with out getting the “extra markers” error often. So I distributed just a few of the opposite stable markers on the ground across the fireplace extinguisher as effectively.
Should you’re going to be scanning one thing massive and curved, you’re going to want extra magnetic markers and possibly numerous sticky markers too. However general, as quickly because the “extra markers” error had vanished, the scan was fairly easy for this topic.
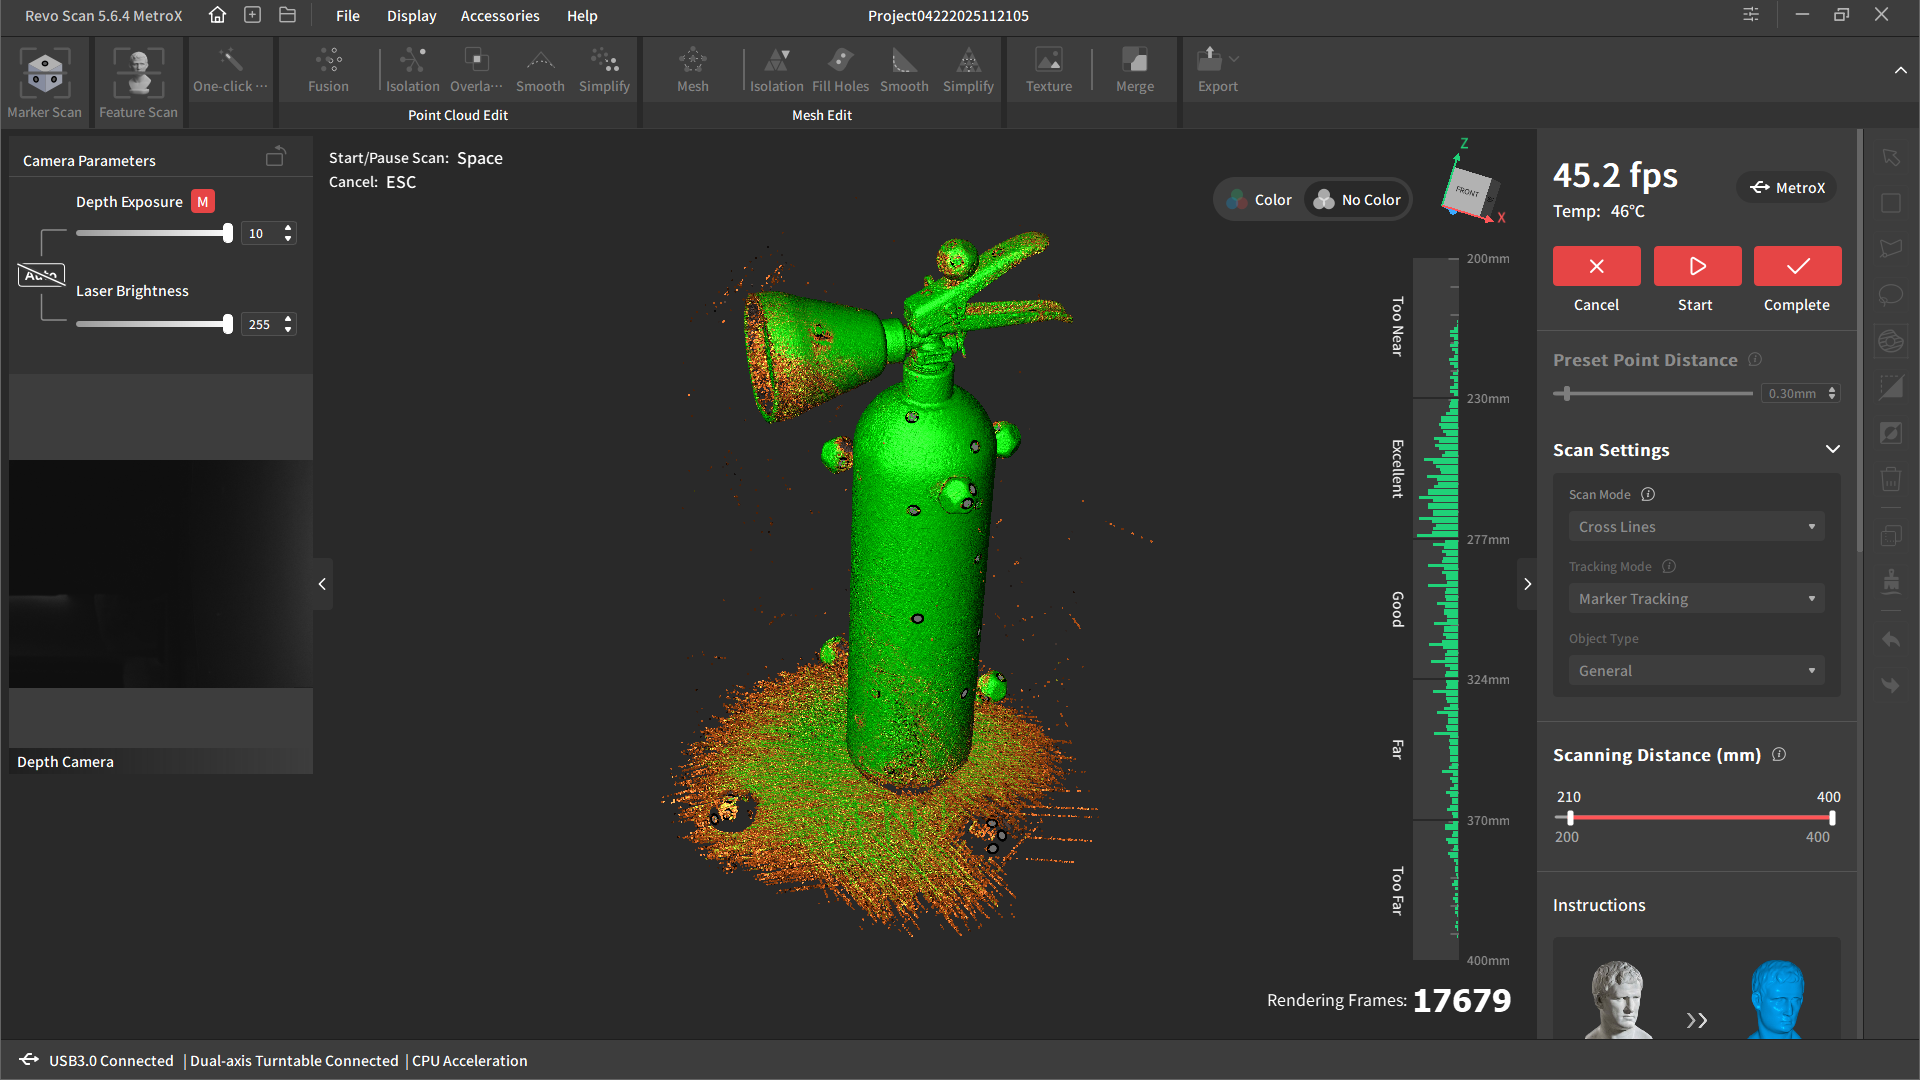
Within the software program, the graphical illustration of the item turns inexperienced in areas the place the scan has been profitable, and orange the place it wants extra scanning, as you possibly can see within the picture under.
Total, the laser scanning modes work fairly effectively, though an extended USB cable would make life a little bit simpler for hand-scanning, particularly for those who’re tethered to a desktop PC and never a laptop computer.
Abstract
As now we have seen within the check sections, the Revopoint MetroX affords two core scanning applied sciences: blue structured mild and blue laser line scanning, every with its personal strengths.
Structured mild is utilized in Full Area and Auto Turntable modes, and when paired with the built-in RGB digital camera, allows correct shade scans (although solely in Auto Turntable mode).
Laser line scanning (with parallel or cross-line patterns) excels on tough surfaces like shiny plastics or curved steel elements, and even permits you to change laser modes mid-scan to achieve difficult areas.
All in all, each programs work effectively as soon as dialed in, however they take a little bit of observe to grasp, particularly with regards to scan merging, marker placement, and navigating geometry-specific challenges.
Suggestions for Utilizing the MetroX
The MetroX might be fairly difficult to work with, however like with most scanners, the outcomes get higher the extra you get used to utilizing it.
Now we have observed just a few issues not talked about within the handbook that may assist make scanning a little bit bit simpler.
- 1) Completely cowl the pillars with markers.
The 4 threaded pillars that should be screwed onto the highest face of the turntable are meant as a floor for attaching the magnetic 3D formed markers. You would possibly discover that even with the pillars coated with the magnetic shapes, you continue to get the “Wants extra markers” error whereas scanning. The answer? Completely cowl the pillars with sticky markers, on each face. As soon as we did this, the prevalence of the “Wants extra markers” error was lowered considerably.
- 2) Be Cautious When Utilizing the 3D Formed Markers Instantly on the Turntable.
The 3D markers have magnets within the backside of them. The turntable has a motor, which generates slight fields which may create a drive within the markers when they’re positioned on the rotating turntable. Consequently, the 3D markers can transfer relative to the rotating turntable. You actually don’t need this. So when utilizing the 3D markers on the turntable, both affix them to the 4 pillars, or attempt to discover a candy spot on the turntable the place they won’t be affected by the fields generated within the turntable.
- 3) Use The Pause Button for Textured Scans
As talked about, there’s a “merge” function that can be utilized to hitch separate scans of an object from totally different angles right into a coherent single mannequin. This works rather well for the blue laser modes and full subject, however when merging separate shade scans, the outcomes generally is a little unpredictable. As a result of the mannequin might have been moved or rotated, the shadows can change between scans. This may end up in a patchy / bizarre texture when merged.
To keep away from this, when making shade scans, as a substitute of creating separate scans, make use of the “pause” button. Enhance the variety of rotations on the auto turntable settings, and after every rotation, merely pause the scan, and regulate the angle / peak of the scanner. On the finish of the scan you should have a extra constant texture.
Options We Would Prefer to See in Future
Having tried the MetroX for these previous couple of months, now we have obtained used to its quirks. However we expect that including these different options (presumably through software program replace) would enhance the person expertise fairly a bit.
- 1) Extra accessible turntable controls.
When utilizing the turntable, you both should navigate into turntable settings, or bodily push the buttons on the turntable to tilt. And you can’t simply change route of the turntable mid-scan.
This might simply be resolved by including fundamental turntable controls for tilt angle, pace, and route on the principle display in Revoscan.
- 2) Depth Digicam Setting Reminiscence
When doing a turntable or full subject scan, the depth digital camera settings are reset to the default setting after every scan. That is extremely annoying, and contributes to the patchy textures talked about within the earlier part. The RGB digital camera settings keep fastened on the user-defined values between scans, so why does the depth digital camera setting return to default when beginning a brand new scan?
- 3) Inspection Options
It is a large one. The MetroX is marketed as an expert metrology-grade scanner. It might be actually nice if we might do precise metrology-stuff (like measuring the space between factors or on the mesh) inside Revoscan.
The present resolution, if you wish to measure something, is to make use of third celebration software program, like Zeiss Examine (previously Gom Examine), or Geomagic Management. This shouldn’t be too tough to implement, and would actually make life loads simpler.
- 4) Colour Scanning Outdoors of Auto-Turntable Mode
Presently, you possibly can solely do shade scans in auto-turntable mode. It might be good to have the ability to do shade scans with out the turntable. We are able to do it with the Revopoint Miraco, so it’s a little bit odd that we can not do it with the MetroX.
Minimal PC Necessities for MetroX
We should always take a second to deal with one thing that has been a priority of potential prospects on-line – the PC {hardware} necessities for utilizing the MetroX. You possibly can see the minimal and really helpful system necessities within the desk under.
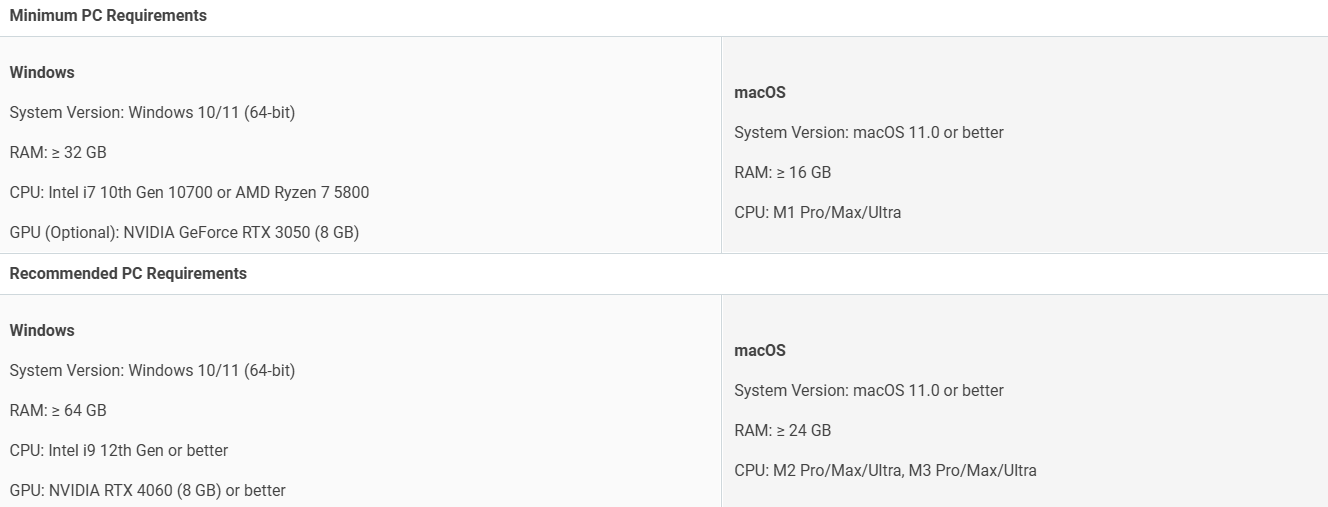
As you possibly can see, the minimal necessities name for an Intel Core i7 tenth technology or higher, with 32GB of RAM and an non-compulsory GPU, minimal RTX3050.
The really helpful necessities are an Intel Core i9 (tenth gen onwards) with 64GB RAM and an RTX 4060 or higher.
Some commenters on-line have been involved that they could should rush out and improve their CPU, RAM, GPU, and even their energy provide unit simply to run the MetroX.
This may not be vital when it comes to the minimal necessities.
For our check, we had 64GB of RAM, no devoted GPU, and we used an Intel Core i5 thirteenth technology (13400), which has 10 cores (6P + 4E) and 16 threads, versus 8 cores and 16 threads for the tenth gen i7.
The Core i5 additionally has a more moderen structure (Raptor Lake) in comparison with the older i7, so it’s higher in effectivity, higher energy/efficiency ratio, and higher at multitasking. The common (non-Ok model) of the tenth gen i7 has a barely increased base clock pace than the i5, however in all different regards, the i5 thirteenth gen is the superior CPU when in comparison with the tenth gen i7.
What does this imply?
It implies that in case you have an i5 thirteenth gen or newer, you already meet (or exceed) the minimal necessities when it comes to CPU. So that you don’t have to rush out and purchase an older i7 in case you have a newer i5.
Our setup labored advantageous for turntable scans in all modes. Our greatest concern was that it’d have an effect on the scanning of bigger objects when doing hand scans, nevertheless it was principally advantageous. There was a little bit stuttering when doing the fireplace extinguisher by hand, particularly when the overall variety of frames elevated considerably.
So our advice is to purpose for a little bit increased than the minimal necessities. A thirteenth gen i5 with 64 GB of RAM and an RTX 3060 (or increased) must be OK.
Clearly in case you have the really helpful necessities of an i9 and the whole lot else that Revopoint lists within the desk, then you should have a noticeably smoother expertise.
The purpose is, you may not want to purchase a brand new CPU in your desktop machine.
Now, for those who’re working a laptop computer setup, then it is a totally different story. It’s not simple to improve a laptop computer CPU / GPU.
Should you personal a laptop computer and it doesn’t meet their minimal necessities (or our personal really helpful minimal necessities), you then’re out of luck and also you’re gonna want a brand new laptop computer. So bear that in thoughts when making a purchase order.
Conclusion: Why MetroX Is a Stable Entry-Degree Metrology Choice
There’s a transparent area of interest that the MetroX fills, and that could be a sub-$1,000 scanner that flirts with the sting {of professional} metrology efficiency. Should you’re in product improvement, small-scale manufacturing, or want dimensional inspection on a price range, this scanner deserves critical consideration.
For context: metrology-grade scanners from manufacturers like Creaform, GOM, or Hexagon usually begin at $20,000 and go effectively past $100,000, relying on accuracy, software program suite, and certification. These programs provide traceable calibration, built-in inspection software program, and are nice for ISO-certified workflows, however the value and studying curve are steep.
MetroX isn’t making an attempt to interchange these programs. What it does provide is one thing shut sufficient for a large swathe of customers who want exact, repeatable 3D knowledge (however who don’t want NIST traceability or enterprise-level overhead).
The power to scan sure shiny elements with out spray, handle multi-angle full scans through markers, and get a steady mesh output all for below $1K is big. The principle limitations are in software program. RevoScan MetroX lacks built-in inspection instruments (for now), that means dimensional checks have to be achieved in third-party software program, as talked about beforehand.
However hardware-wise? MetroX punches effectively above its weight. If Revopoint provides even a fundamental measurement toolkit to the native software program, MetroX might develop into a go-to scanner for small labs, universities, fabrication outlets, and even restore & reverse engineering groups that don’t have tens of hundreds to spend.
For extra data on the Revopoint MetroX, you possibly can click on our affiliate hyperlink under, or head on over to their product web page right here. Don’t overlook to make use of the low cost code “RE3DPT” when buying for an additional saving.
RevoPoint MetroX
The RevoPoint MetroX combines blue-laser strains and full-field scanning, enabling scanning of a large number of various surfaces through its totally different scanning modes.
- – Accuracy: As much as 0.03 mm
- – Body charge: As much as 60fps
- – Work distance: 200 ~ 400 mm
- – Single seize vary: 160 x 70 mm at 200 mm and
320 x 215 mm at 400 mm - – Dimensions: 209 x 88 x 44 mm
- – Seize objects with 7 high-powered parallel blue laser strains
- – No spray wanted to scan shiny or black surfaces
- – Marker blocks assist scan sooner

Should you’ve loved studying in regards to the MetroX, control Revopoint’s subsequent launch: the Trackit 3D Monitoring Scanner shall be out there quickly on Kickstarter. At present they’ve opened Tremendous Early Chook pricing; safe your 35 % low cost and VIP perks by signing up right here.