

For those who’re utilizing EdgeTX, organising management sticks and switches on the Mixes web page is crucial for flying your FPV drone. Whether or not you’re configuring the sticks for primary flight management or organising switches for arming, flight modes, or different features, this information will stroll you thru the method step-by-step.

By the tip of this tutorial, you’ll know the way to assign your management sticks to channels, arrange switches for various actions like arming or flight mode adjustments, and take a look at the setup to verify the whole lot is working appropriately.
Try my different EdgeTX associated posts: https://oscarliang.com/tag/edgetx/
Entry the Mixes Web page
To start, you’ll have to open the Mixes web page in your EdgeTX radio. That is the place you’ll map your management sticks and switches to varied channels that your flight controller makes use of.
- Flip in your EdgeTX radio.
- From the Dwelling display, press the Mannequin button.
- Navigate to the Mixes tab by both urgent the Web page button till you discover it or deciding on it from the menu when you’re on a touchscreen radio.
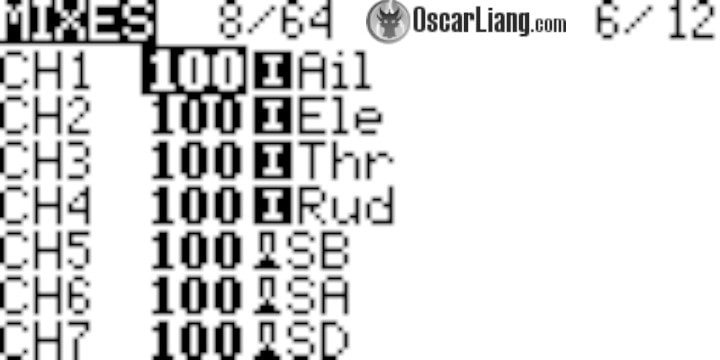
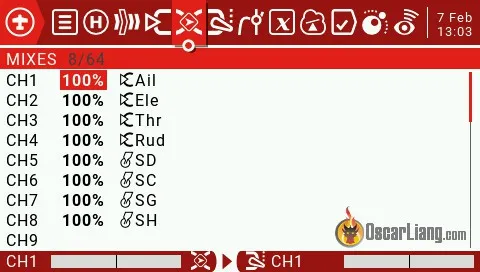
Right here, you’ll discover a checklist of channels (e.g., CH1, CH2, CH3, and so on.). Every channel might be mapped to a particular enter, like a stick or change.
Assign Management Sticks to Channels
For many fashions, the primary 4 channels (CH1 to CH4) are usually assigned to the primary controls: roll, pitch, throttle, and yaw. For instance:
- Channel 1: Roll (Aileron)
- Channel 2: Pitch (Elevator)
- Channel 3: Yaw (Rudder)
- Channel 4: Throttle
Normally, this needs to be mechanically configured for you once you create a brand new mannequin, but when not, you are able to do it your self:
- Channel 1 (Roll):
- Spotlight CH1 utilizing the jog wheel and press to enter the setup.
- Set the Supply to your aileron stick.
- Optionally, you possibly can alter Weight (how a lot of the stick motion is handed by way of to the output) or apply Expo for smoother management.
- Channel 2 (Pitch):
- Spotlight CH2.
- Set the Supply to the elevator stick.
- Channel 3 (Throttle):
- Spotlight CH3.
- Set the Supply to the throttle stick.
- Channel 4 (Yaw):
- Spotlight CH4.
- Set the Supply to the rudder stick.
Setup Switches
Now that your management sticks are configured, it’s time to assign features to your switches. These switches can be utilized for varied duties like arming, altering flight modes, or activating options like a buzzer or GPS rescue.
Setting Up an Arm Swap

In ExpressLRS, it’s really useful to make use of Channel 5 (CH5) for the Arm change. Right here’s the way to set it up:
- Spotlight CH5 within the Mixes web page.
- Press the jog wheel to enter the combination setup.
- Scroll to Supply and flip the change you wish to use for arming (e.g., SD). The change you flip will mechanically seem because the supply, so that you don’t have to manually search by way of an inventory.
- Depart the remaining settings at their default values.

Setting Up a Mode Swap

For configuring flight modes (e.g., Acro Mode, Angle Mode, Horizon Mode), you’ll usually use a 3-position change. Let’s use CH6 for this instance.
- Spotlight CH6 within the Mixes web page.
- Assign a 3-position change (e.g., SC) to manage the completely different flight modes.
How Many Switches Can You Set Up?
Most radios include extra switches than you’ll ever want. Whilst you can assign all of them to the obtainable channels, it’s often not obligatory. For many FPV drone setups, you’ll solely want a number of switches.
The variety of channels obtainable is determined by your radio hyperlink. In ExpressLRS, you possibly can have 8 to 16 channels based mostly on the change mode. The default setup for many FPV drones permits for 12 channels, with 8 channels obtainable for switches after the primary 4 are used for management sticks.
How Many Switches Do You Actually Want?
For many FPV drones, I usually use 3-4 switches:
- Arm change: To arm/disarm the drone.
- Buzzer change: To find the drone when misplaced.
- Flight mode change: To toggle between Acro, Angle, or Horizon modes.
- GPS Rescue Mode change (if relevant): To allow GPS Rescue in case of sign loss.
Check Your Setup
As soon as your sticks and switches are mapped, it’s necessary to check them:
- Join your drone and open the Receiver tab in Betaflight (or your flight controller’s configuration device).
- Transfer the sticks and flip the switches to see if the corresponding channels are responding appropriately. In case your drone must be powered for this step, take away the propellers earlier than connecting the battery for security.
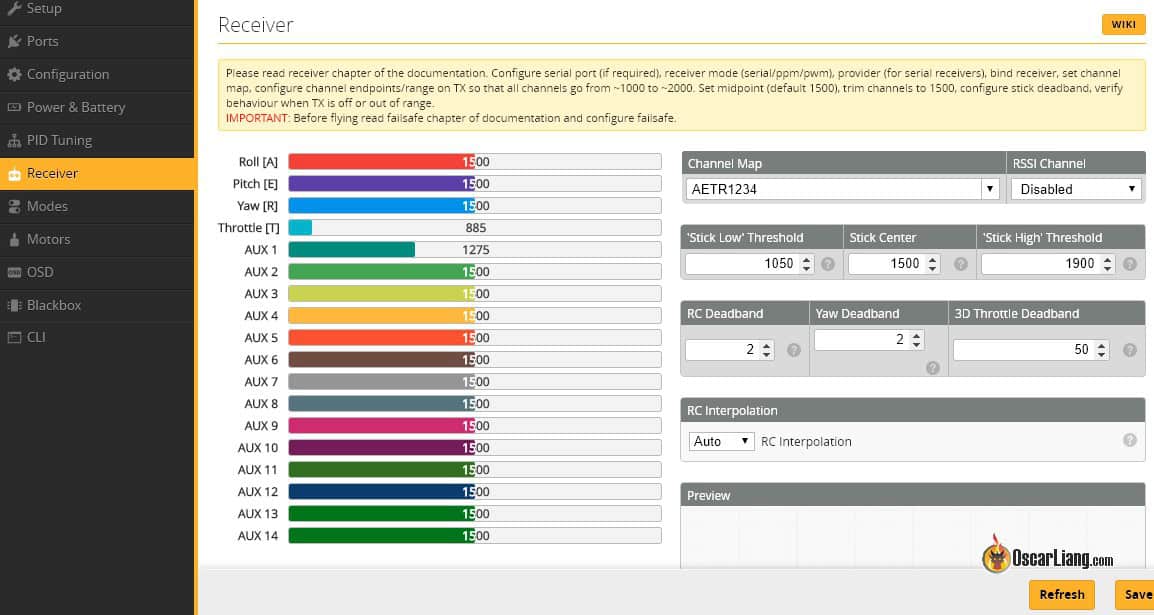
Now you possibly can transfer on to assigning features to these auxiliary channels you simply setup in Betaflight modes
Conclusion
Organising management sticks and switches within the Mixes web page of your EdgeTX radio is a key step in configuring your FPV drone for easy, responsive management. Whether or not you’re assigning management sticks to primary features or configuring switches for arming and flight modes, following these steps will be certain that the whole lot is mapped appropriately and prepared for flight.
Edit Historical past
- Sep 2018 – tutorial created
- Sep 2019 – up to date
- Oct 2024 – up to date for EdgeTX and ExpressLRS