

It is a easy however extraordinarily helpful trick: press a button and your radio tells you the quad’s battery voltage. You may simply set this up on any EdgeTX radio, and it’s particularly helpful for pilots who do not need OSD. I will even present a complicated setup the place your radio routinely alerts you when the drone’s battery voltage will get low. That is supreme in case you develop into too centered on flying to consistently test your voltage.


Stipulations
- Your radio is working EdgeTX
- Your quad helps telemetry (radio hyperlinks similar to ExpressLRS and Crossfire work)
Additional Studying:
Why Use Battery Voltage Voice Callouts?
You need to keep away from over-discharging your LiPo battery, so having the ability to test battery voltage at any time is crucial.
If you’re too busy monitoring the OSD throughout flight—or in case your quad doesn’t have OSD in any respect (for instance, when flying line of sight with out goggles or a display)—audible voltage callouts are extraordinarily useful.
Additional studying: Perceive the significance of monitoring battery voltage and alternative ways to test it: https://oscarliang.com/monitor-measure-battery-voltage-alarm-drone/
Voltage Callout Utilizing a Swap
With the press of a change—ideally a momentary change, although any change will work—your radio tells you the drone’s voltage.
Step 1: Make Certain Telemetry Is Working
Earlier than setting something up, affirm that telemetry is working in your quad. When telemetry is working, the quad will likely be consistently sending knowledge to your radio, together with battery voltage.
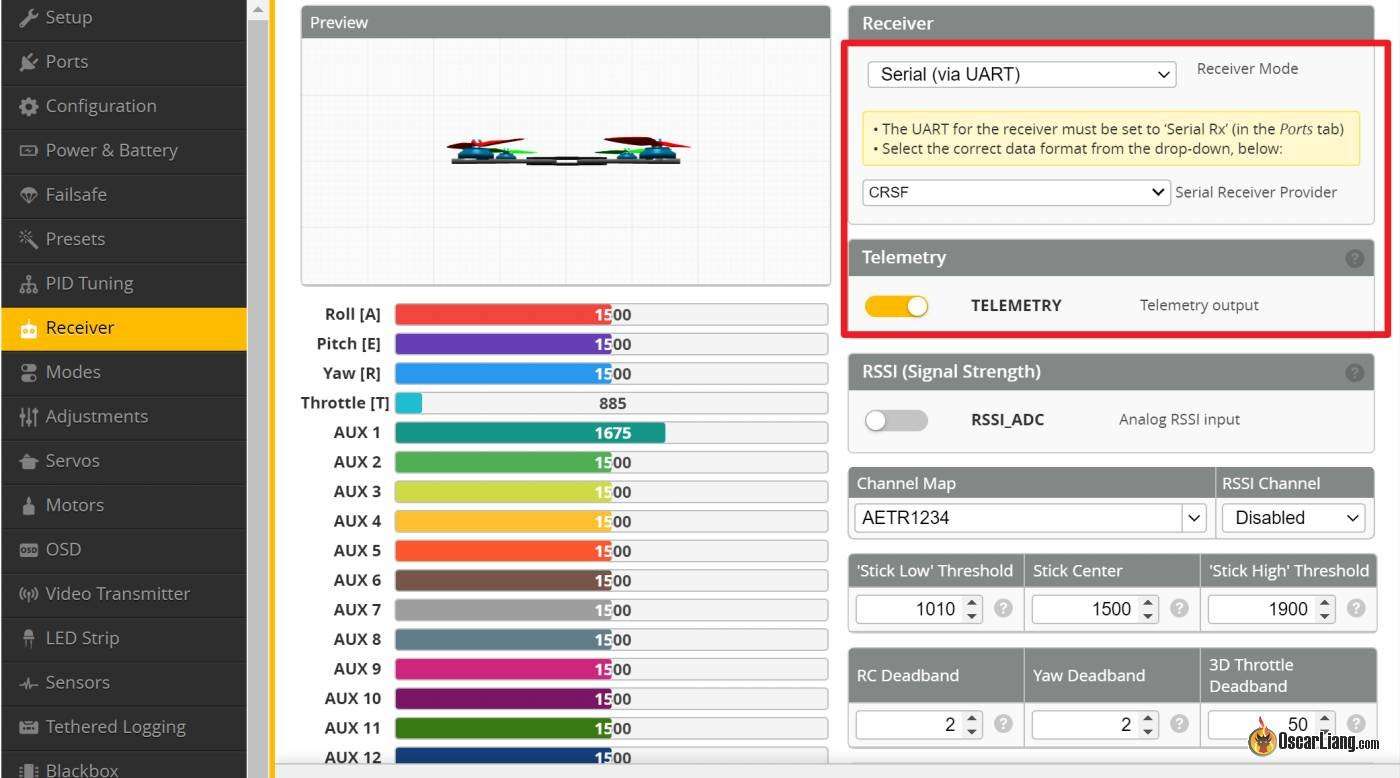
In Betaflight Configurator
- Go to Receiver tab
- Guarantee Telemetry is enabled
- Save and reboot
On the Radio
- Energy in your quad (props off)
- In your radio:
- Open Mannequin Settings (press the MDL button as soon as)
- Navigate to the Telemetry web page (press PAGE)
- Scroll all the way down to Sensors and choose “Uncover new”
- Inside just a few seconds, an inventory of telemetry sensors ought to populate.

What you might be on the lookout for is:
- RxBt (receiver battery voltage)
When a battery is plugged into the drone, this worth ought to replace in actual time (how usually it updates depends upon your telemetry ratio setting in ExpressLRS LUA script).

Step 2: Confirm Battery Voltage Accuracy
Affirm that the RxBt voltage studying is correct utilizing a multimeter or a battery voltage checker (get your voltage checker right here)
If the worth is wrong, chances are you’ll have to calibrate it in Betaflight underneath the Energy & Battery tab. That is uncommon—most flight controllers work appropriately out of the field.

Step 3: Assign a Momentary Swap to Communicate Voltage
Go to Particular Capabilities
- Open Mannequin Settings (press MDL button as soon as)
- Navigate to Particular Capabilities (press PAGE button to get there)
- Choose an empty line and click on Enter button
Configure the Operate
Set the next:
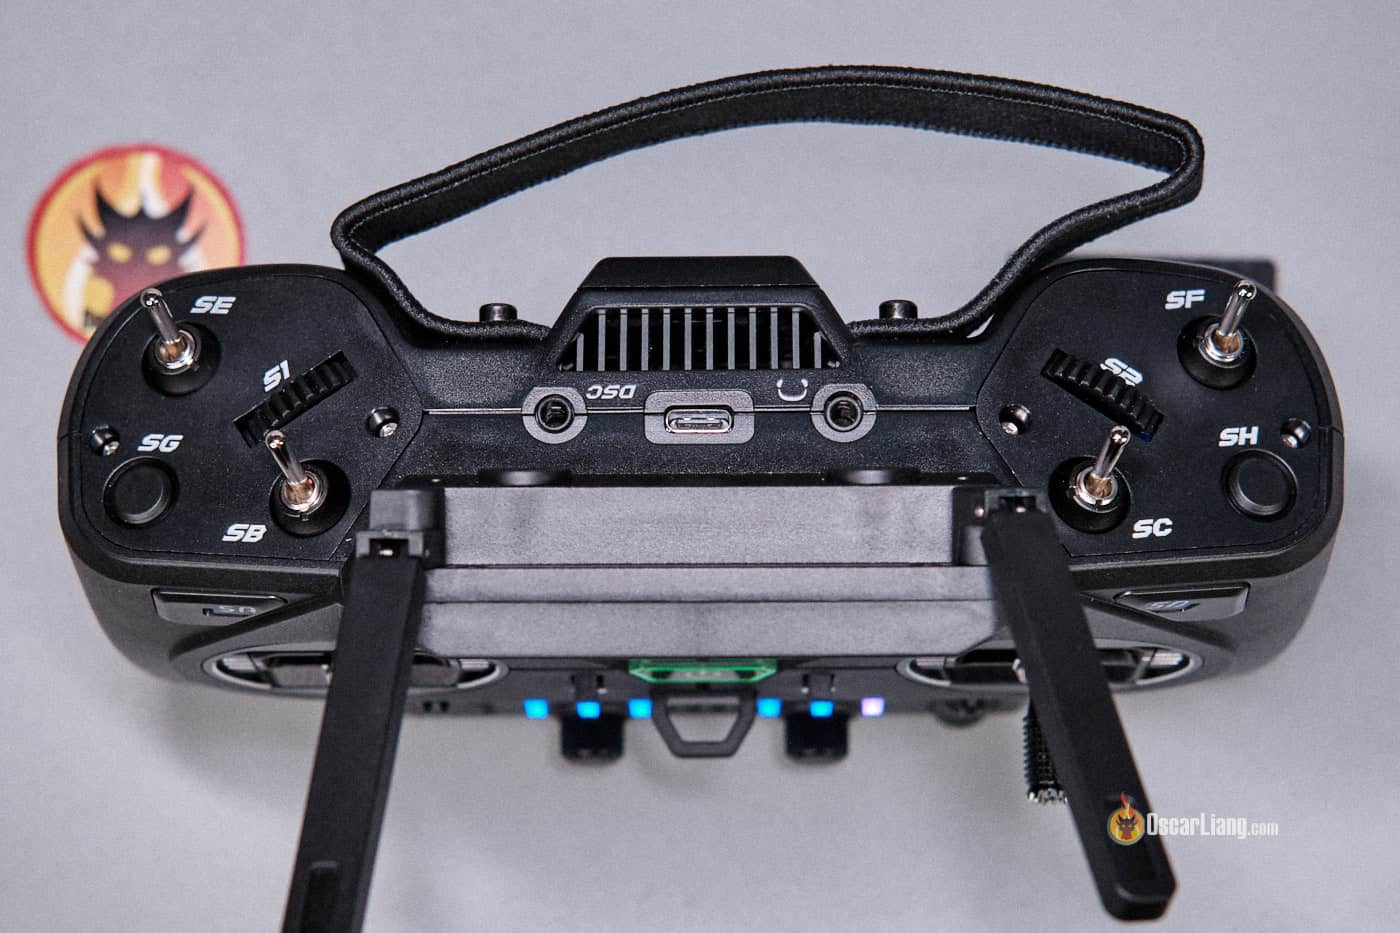
- Swap: Select a unused change (ideally a momentary button, e.g. SH↓ within the GX12)
- Operate: Play Worth
- Parameter: RxBt (You might also see RxBt+ and RxBt-, these are the utmost and minimal worth recorded throughout flight. When you simply need to test the present battery voltage, use RxBt.)
- !-: this selection ensures the worth is performed solely as soon as whereas the change is lively
- Allow: ✔ Checked
That’s it.

Take a look at it
- Press the assigned change
- Your radio ought to say one thing like: “twenty two level 9 volts”.
You now have on-demand battery voltage callout.
Bonus: Reporting Common Cell Voltage
By default, RxBt reviews the overall LiPo voltage. You may optionally configure it to report common cell voltage, which many pilots discover extra intuitive—particularly when flying quads with completely different cell counts, you don’t have to do the calculations in your head.
Within the Betaflight CLI, enter:
set report_cell_voltage = onsave
Superior Setup: Low Voltage Warning
If you wish to be additional protected—particularly in case you get immersed in flying and neglect to test voltage—you may arrange an automated low-voltage warning.
On this instance, the radio will warn you when voltage drops beneath 3.5V per cell. You may alter this threshold as wanted.
Step 1: Setup Logical Swap
- Navigate to Logical Switches in your radio
- Scroll to an empty line (for instance, L01) and press ENTER
- Configure the logical change as follows:
- Operate: a
- V1: RxBt
- V2: 3.5V (you may change it to any voltage you need)
- Delay: 3 seconds (this delay reduces false positives brought on by voltage sag throughout punchouts)
- Operate: a


Essential: Make certain the next CLI command is enabled so RxBt reviews voltage per cell set report_cell_voltage = on
Step 2: Create a Particular Operate
- Go to Particular Capabilities
- Add a brand new line
- Choose the logical change created within the final step (in our instance it’s L01)
Set Operate to Play Observe or Play Worth:
- Select “Play Worth”, and choose RxBt to name out the precise voltage.
- Or, you may select “Play Observe”, and choose “lowbat” to play “low battery” warning. Or you may report one thing distinctive into an audio file and play it.
- Set Repeat Delay: In order for you the alert to repeat, set a repeat delay (e.g., 10 seconds). When you solely need it to alert as soon as, set it to !.
- ✔ Allow it.
Your radio will now routinely provide you with a warning when the battery voltage falls beneath your set threshold. And it’ll repeat the warning each 10 seconds so long as the voltage is beneath that restrict.


Conclusion
Establishing audible battery voltage callouts and low-voltage warnings in your EdgeTX radio considerably improves each security and situational consciousness. It permits you to give attention to flying as a substitute of regularly monitoring battery ranges.
Whether or not you favor guide voltage checks utilizing a change or automated alerts primarily based on voltage thresholds, these setups make sure you by no means miss a low-battery warning once more.