

Roy (aka “The SmithBot”) presents us with a hands-on information to turning your neighborhood, metropolis, state, or favourite Nationwide Park right into a 3D printable topographic map.
Posted on December 18, 2015
by
Roy Smith – Visitor Contributor
A number of months in the past my buddy Barney stated, “Are you able to 3D print Thousand Palms Canyon?”
I knew what he meant: all of the hills and gulleys and panorama options we’re accustomed to. “No,” I stated. “That’s unattainable.” However the thought saved bugging me. Why not? So I did what any of you’d do in the course of a sleepless night time: I went on-line. Huh! Not unattainable, however possibly somewhat bit difficult. Under are the step-by-step directions to create a 3D topographic map.
Writer’s Notice: I’m utilizing Photoshop and 3DS Max on a PC to edit recordsdata and export them to my MakerBot Replicator 2, so this process could be completely different for you when you’re utilizing different software program. I wager it is going to be related sufficient for this data to be helpful, although.
Replace (Might 2016): There was a bit of software program developed to help within the STL map producing device. The hyperlink for the free STL creator is right here: http://jthatch.com/Terrain2STL/. The unique article is beneath and produces the next decision STL, if that’s wanted.
1. Obtain and set up Google Earth.
2. Obtain and set up MicroDEM – a free utility accessible by means of the U.S. Naval Academy web site. Set up includes two steps – obtain and run the installer first, then exchange the executable with the newest model (accessible as a separate obtain).
3. Obtain and set up the srtm4.1 plugin for Google Earth (Notice: clicking on this hyperlink might routinely obtain the srtm4.1 plugin, relying in your browser).
A. Deciding on a topographic area in Google Earth
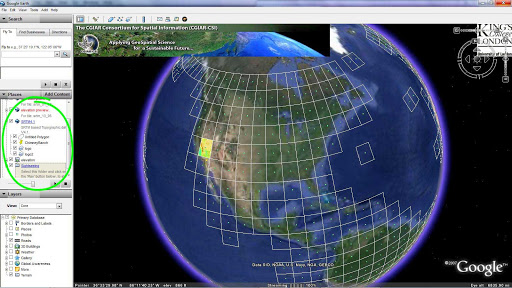
4. In Google Earth, the SRTM4.1 will seem beneath “My Locations” within the navigation on the left. Click on on the small “Elevation” sq., and a grid of containers ought to seem on the globe picture (Picture “A”);
5. Click on on one of many containers that features topography you need to print;
B. Topographic information – obtain choices
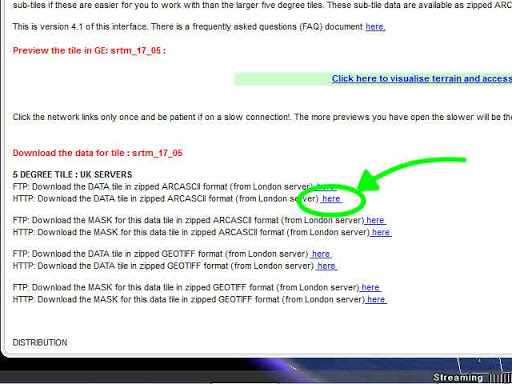
6. A window will seem (You would possibly have to scroll down). Click on on the hyperlink as in Picture “B”;
C. Topographic information – the direct obtain url
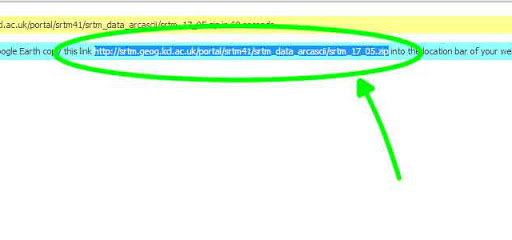
7. The auto-download most likely received’t work, so copy the url as instructed, and paste it into your browser, as proven in Picture “C.” This obtain might take a couple of minutes;
8. Unzip the downloaded archive. The one file you want is the .asc file. Put it someplace yow will discover it simply. Toss the remainder;
9. You might want to use MicroDEM to interpret the altitude information. (Don’t strive utilizing any of the opposite “useful” instruments on the Web to open this sort of file – a few of them are nasty viruses!);
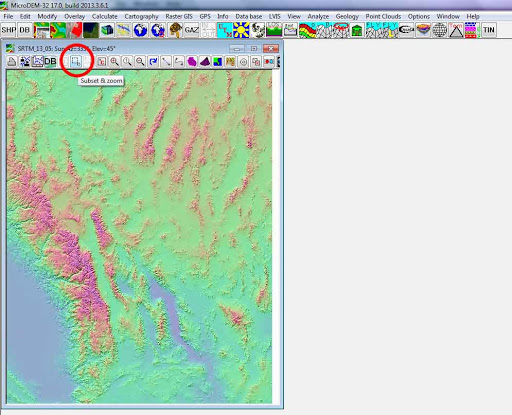
10. In MicroDEM, go to File>Open>Open DEM and find your file;
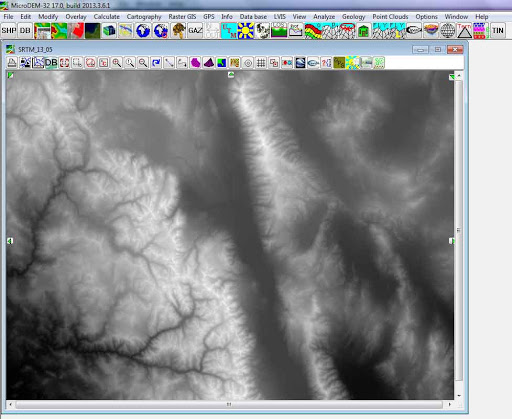
D. Utilizing MicroDEM to preview your topographic information
11. Right here’s the difficult half: You most likely don’t know what you’re taking a look at. No highways, no names of cities, no identifiers of any sort! So that you’ll have to reference back-and-forth with another map to slim down the realm you need to print. When you determine which a part of the map you need to zoom in on, use the “Subset & zoom” device (dotted border) from higher left to decrease proper to zoom in (Picture “D”);
12. Proper-click on the map and select “Legends/marginalia,” and ensure not one of the containers is chosen (remember to take away the gridlines);
E. Exporting topographic information in greyscale
13. Proper-click once more, choose Show parameter>Elevation>Grey scale. That is the picture you’ll use in your 3D program to create a displacement map to be able to print your topographical 3D mannequin (Picture “E”);
14. Choose File>Save picture, and select no matter picture format works finest in your 3D program (I exploit jpeg);
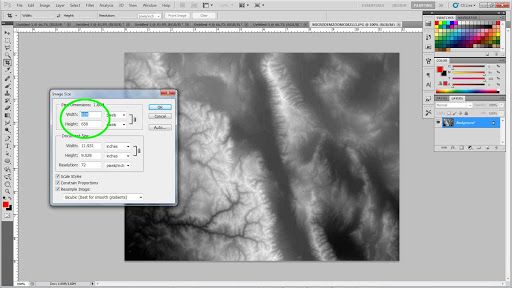
F. Checking the picture dimension in Photoshop
15. Give up out of MicroDEM and open Photoshop or no matter image-editing program you employ. Open the file you simply saved. Test to find out picture dimension, and jot it down. Mine occurred to be 860×650 pixels. Which means, after I create a airplane object in 3DS Max it is going to be, like, 8.6in x 6.5in or 860mm x 650mm or no matter items you favor (Picture “F”). Shut the file;
Editor’s Notice: If you do not have Photoshop there are many different choices for checking the scale of a picture. In Home windows Explorer single-clicking an image file will show the scale within the data panel on the backside of the window.
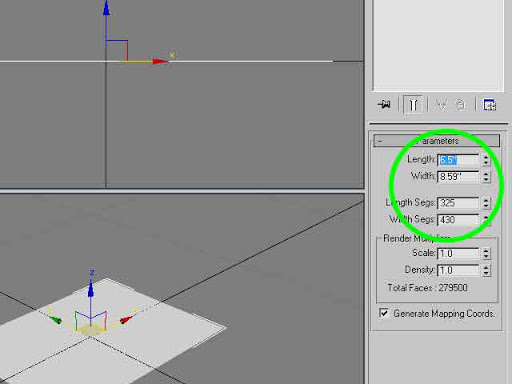
G. Making a airplane in 3D Studio Max
16. Open your 3D program, create a airplane with related dimensions (You would possibly want to modify width for size), and provides that airplane LOTS of segments, like, 430×325. I divided dimensions in half (Picture “G”);
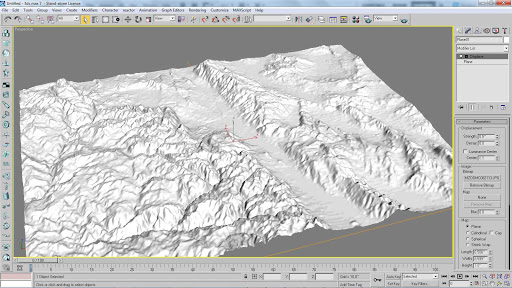
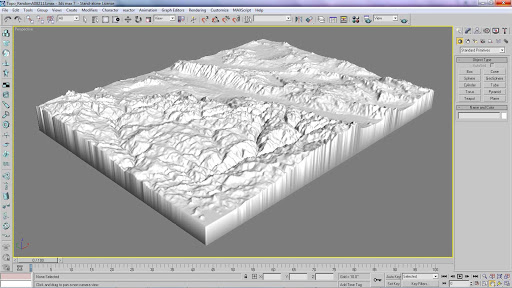
H. Making a displacement map out of your grayscale elevation picture
17. In 3DS Max (or no matter you’re utilizing), choose the airplane, go to the Modifier Record, scroll right down to “Displace,” and add your grayscale map to create the terrain you need. Regulate “energy” to magnify the peak of the mountains nonetheless you favor. Downside is, a airplane has solely two dimensions, so you’ll be able to’t print it with a 3D printer irrespective of what number of mountains it has (Picture “H”);
Editor’s Notice: If you do not have entry to 3D Studio Max, concern not! Utilizing Roy’s directions as a normal guideline we accomplished these steps with Blender (a free 3D enhancing device).
J. Changing your airplane right into a 3D printable object
18. Convert the airplane to an Editable Poly, choose solely the outermost vertices (“choose border” in 3DS Max), and drag all of them down fairly far on the Z axis until they’re away from the whole lot else. Then “Make Planar” on “Z,” which ought to line up all of the vertices you chose to have equal “Z” values. With that border nonetheless chosen, click on on “Cap.” That completes a 3D printable object (Picture “J”);
19. Transfer the underside “cap” up close to to the bottom level of your topography, however not too shut, otherwise you threat breaking your printed map once you pry it off your construct floor on the finish of this course of;
20. Choose your topo map object and export it as a StereoLitho (STL) file;
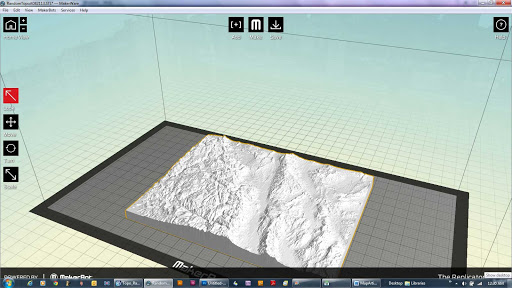
Okay. Topographic map imported into MakerWare
21. Open MakerWare, MatterControl, or no matter you’re utilizing to drive your printer, and add your STL object, scaling it to suit your print mattress comfortably (Picture “Okay”);
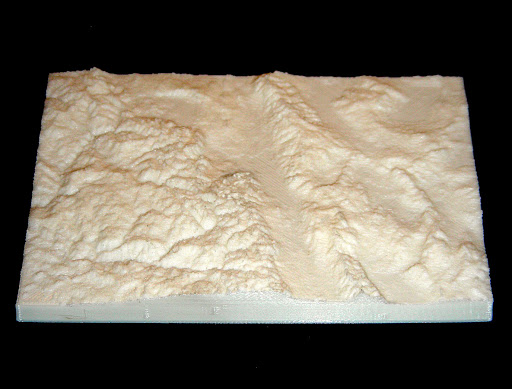
L. The ultimate product – a 3D printed topographic map
22. Print it! This may take a very long time to print. My map took virtually 4 hours, however the element is superb. This printed object is just about 4.75in x 3.5in (Picture “L”).
This will appear to be a protracted, tough course of, but it surely’s really fairly simple when you comply with each step to the letter. Imagine me: It will likely be quite a bit simpler so that you can undergo these steps than it was for me to determine them out.
When you discover any errors on this article, please level them out, and I’ll do my finest to repair them.
Good printing!
Roy Smith
The Smithbot
(Replace 2019)
At MatterHackers, we’re all the time on the lookout for enjoyable and attention-grabbing new tasks that we will incorporate 3D printing and digital fabrication into. I had remembered seeing this older MatterHackers article by Roy Smith, but it surely was made clear that this technique wouldn’t permit for the options that make areas recognizable: buildings! With that, I got down to devise and doc a course of.
Methodology 1: 3D Map, no Topography
I used to be capable of finding a few completely different strategies, each free and paid for that labored okay, however one of the best I may discover for my functions was utilizing a collection of various applications to transform information from Google Maps. I wished to start out off with one thing that was a recognizable panorama or held some significance for MatterHackers, so I’ll use New York Metropolis, particularly the realm across the Empire State Constructing and a few portion of Downtown Los Angeles.
- Go to opensteetmap.org and discover the situation that you simply need to 3D print. This may make the most of the info inside Google Maps to create 3D fashions of the realm seen within the viewport.
- Click on Export to export a .osm file.
- Obtain and set up OSM2World from osm2world.org
- As soon as put in, open OSM2World and import the map.osm file you exported already. After a minute or so, you need to see a 3D mannequin of your metropolis.
- From OSM2World, you’ll be able to export an Obj file, which some slicers can’t work together with and can want conversion. At this level you wouldn’t need to print it both; this mannequin will want fairly a little bit of cleanup.
- Open up Netfabb and import the Obj file. You might want to delete a few of the artifacts from the surroundings that couldn’t be translated correctly and make the completed mesh printable.
- Utilizing the airplane reduce sliders, take away the options that reach previous the a part of your metropolis that you simply need to maintain, just like the highways and jagged edges the place the map ends.
- Choose the town part that you simply need to maintain and open up the restore device
- Use the floor choice device to pick out the land beneath all of the buildings
- Click on the “Extrude Surfaces” device and ensure the “3D-Extrude” tab is chosen and “Easy” and “Thickening” choices are chosen as properly.
- Change “Shift” to 100mm (optimistic or damaging, whichever approach extrudes it away from the buildings). Then click on apply.
- Now that the land has thickness, click on “Run Restore Script” and “Prolonged Restore.” Netfabb will try to merge all of the shells into one mannequin, somewhat than one with many particular person components.
- When you’re fortunate, you’ve gotten one shell and the whole lot appears to be like proper, nonetheless, odds are your mannequin wants somewhat extra repairing.
- Click on the left facet of the field subsequent to the Z Reduce Aircraft slider, this may disguise something beneath the reduce airplane.
- Take a look at the mannequin from the underside and verify to see when you can see any blue triangles. This may imply you’ve gotten buildings that aren’t connected but, or your constructing has overhangs on it that want eradicating.
- Use the “Choose Shells” device to pick out the largely completed mannequin, then right-click and conceal triangle. This may make it simpler to see the opposite shells that aren’t linked
- Manually choose the underside surfaces of every of those shells, then extrude them down far sufficient to stay into the land.
- Do one other Prolonged Restore to merge it with the remainder of the mannequin and apply the restore if all of it appears to be like good (I decide to not take away the previous half in case I want to return for restore.
- Use the Z airplane reduce to chop off the underside of the land and make it utterly flat and when you want, use the extruded surfaces device once more to thicken the bottom).
That covers Methodology 1. There’s quite a bit that goes into it, however ultimately, you should have a reasonably detailed and actually enjoyable mannequin that you may print and modify as you want.
Methodology 2: 3D Map with Topography.
The info that’s gathered by Google Maps doesn’t embody any type of topographical information. It is aware of that there are buildings, the place they’re, the place the roads are, what number of lanes, however San Francisco’s panorama (a notoriously hilly metropolis) would look precisely the identical as Houston (one of many flattest cities within the US). Conveniently, there’s a web site that may convert the info from Google Maps, NASA, and the US Geological Survey to create a way more correct cityscape with included topography.
- Go to CADmapper.com
- Zoom out and in, drag the corners of the choice field, and pan the viewport to alter your collection of map you’d wish to obtain. The free model limits you to at least one sq. kilometer, however you’ll be able to choose between 1 and 100 sq. kilometers for $6 to $65.
- Export utilizing SketchUp 2015+, choose to incorporate 3D Buildings, and set false top to twenty meters, verify the field for Topography, and Highway Geometry is as much as you (mesh surfaces will will let you extrude the roads however to make them printable will take much more work to make them prepared for that).
- Click on “Create File” and CadMapper will start merging all the info it must create a workable 3D mannequin.
- When it’s accomplished, obtain the completed file and open it up utilizing SketchUp 2015 or newer.
- Underneath the “Window>Default Tray” Toolbar, make sure that “Layers” is chosen so you’ll be able to see and choose the layers throughout the map.
- You’ll be able to select to maintain all of the layers, which would require extra cleanup and tuning to get proper, or you’ll be able to maintain the principle ones to get it printable. Buildings and Topography are the vital ones.
- When you’ve deleted the layers you don’t need, set up the STL Import & Export Extension, and export the map as an STL.
- With the exported STL, you’ll be able to then import this into NetFabb and start modifying the mesh utilizing the Restore device.
- Use the floor choice device to pick out the land beneath all of the buildings
- Click on the “Extrude Surfaces” device and ensure the “3D-Extrude” tab is chosen and “Easy” and “Thickening” choices are chosen as properly.
- Change “Shift” to 100mm (optimistic or damaging, whichever approach extrudes it away from the buildings). Then click on apply.
- At this level, when you selected to maintain the roads, you’ll have to undergo by hand and restore every of them, give them thickness, and ensure there aren’t overlapping triangles; a easy Prolonged Restore is just not going to chop it right here.
- Now that the land has thickness, click on “Run Restore Script” and “Prolonged Restore.” Netfabb will try to merge all of the shells into one mannequin, somewhat than one with many particular person components.
- When you’re fortunate, you’ve gotten one shell and the whole lot appears to be like proper, nonetheless odds are your mannequin wants somewhat extra repairing.
- Click on the left facet of the field subsequent to the Z Reduce Aircraft slider, this may disguise something beneath the reduce airplane.
- Take a look at the mannequin from the underside and verify to see when you can see any blue triangles. This may imply you’ve gotten buildings that aren’t connected but, or your constructing has overhangs on it that want eradicating.
- Do one other Prolonged Restore to merge it with the remainder of the mannequin and apply the restore if all of it appears to be like good (I decide to not take away the previous half in case I want to return for restore.
- Use the Z airplane reduce to chop off the underside of the land and make it utterly flat and when you want, use the extruded surfaces device once more to thicken the bottom).
Methodology 2 is fairly simple and may give some attention-grabbing depths to your topographical maps and makes for nice HexTiles of a few of our favourite places!