

Are you interested by twin extrusion? Is your printer in want of an improve? Concerned with sensible functions of some new specialty filaments? All the above?
Learn on and take a look at our newest undertaking!
Posted on December 18, 2015
by
MatterHackers
We get to check numerous actually cool filaments and check out a bunch of various printers at MatterHackers. Over the previous yr, the variety of out there filaments has skyrocketed as has the variety of out there printers and printer choices. Sadly, the quantity of accessible details about all of those choices leaves a lot to be desired.
On high of questions on varied filaments, we get numerous questions on twin extrusion.
Do I want twin extrusion? What sorts of issues can I print with twin extrusion? Is twin extrusion higher than single?
We love sensible functions of 3D printing, so we thought it could be good to highlight 2 newer filaments in addition to twin extrusion printing by designing and printing upgrades for an older printer.
We have now an previous KitTaz (Taz 3), by Lulzbot, from 2013/2014 that has seen fairly a little bit of use. The plastic linear bearings developed a little bit of play, and it wanted an overhaul.
Supplies
The IGUS tribo-filament was designed to print bearings and different components that require low friction or low abrasion properties. When you’ve ever used IGUS parts for different initiatives, you realize they make prime quality parts, and their filament isn’t any exception. It prints simply, cleanly, and has remarkably low friction for a 3D printed half.
Since IGUS makes a speciality of bearings, linear rails, and different associated {hardware}, we figured it made sense to make use of IGUS filament to print replacements. It’s additionally an ideal method to highlight their filament to point out what it could possibly do.
We wanted to switch the next:
- 4 single linear bearings (SLB) for heated mattress (Y axis)
- 1 single linear bearing for X carriage
- 1 double linear bearing (DLB) for X carriage
- 2 double linear bearings for Z axis mounts
I shortly mocked up a bearing that matched the inventory SLB and printed it out of the Tribo filament to test match and performance.

It got here out fairly effectively for a primary print. The middle gap was slightly sloppy so there was a little bit of play, however it confirmed that this materials would work to be used as a bearing. There have been just a few issues we observed whereas trying on the printed SLB.
The Tribo glides on the graceful rods very easily and quietly, however it will get soiled shortly and it doesn’t appear as sturdy/sturdy because the ABS that the inventory components had been printed in. The soiled half is only a beauty challenge and never an enormous deal, however we wished our Taz to nonetheless look good after the upgrades. The sturdiness is clearly a difficulty. We don’t need these printed substitute components to interrupt anytime quickly. Additionally, the Tribo filament is on the costly facet of filaments. For the reason that solely half we want the Tribo for is the half contacting the graceful rods, we are able to print the housings out of one other materials.
The inventory Taz items had been printed in ABS. Whereas ABS is a flexible and helpful filament, it tends to warp, and that’s not preferrred when printing issues like bearings with tight tolerances. We determined to make use of PETG for the outer housings. PETG is simple to print, has just about no warp, and is about as sturdy, if not stronger, than ABS. It additionally has a pleasant shiny floor end. There are just a few totally different PETG filament choices out there – MatterHackers PETG and MadeSolid PET+ are the 2 we print with most frequently for practical components. Printing temps might very barely, however 240-260C with a heated mattress at 50-60C is acceptable the vary. For this undertaking, we used the MadeSolid PET+ in opaque black with the intention to match the unique printed components.
Twin Extrusion
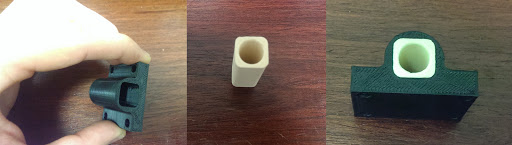
The inventory SLB has a printed housing, after which a bearing is slid in or pressed into the housing. With twin extrusion we are able to simply mannequin the outer housing and interior bearing and print it out at one time with two totally different supplies.
There are alternative ways to mannequin components for twin extrusion, however 2 separate STLs are required. I take advantage of Solidworks for many of my modeling. The simplest means I’ve discovered for components like that is to mannequin the half in a single half file, however to not merge the entire strong our bodies in order that I can save them as particular person STL recordsdata. By modeling the components in a single file as separate strong our bodies, each components are aligned in the identical Cartesian area which permits for straightforward alignment of the STLs in MatterControl.
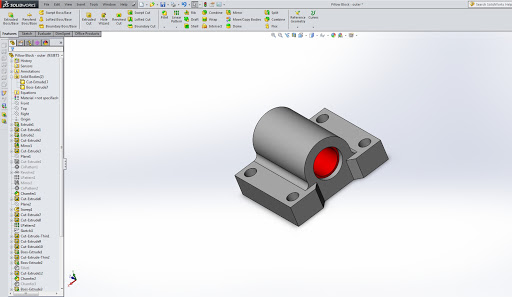
The gray portion will likely be printed in PETG. The purple sleeve will likely be printed within the IGUS tribo-filament.
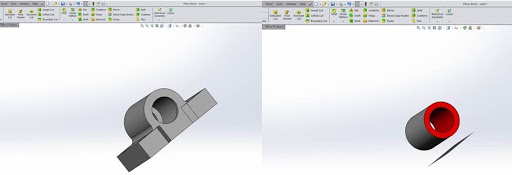
As a result of the our bodies weren’t merged I can conceal one or the opposite and export the seen half as an STL.
Subsequent, I convey the STLs into MatterControl. I like to only drag one of many components into the queue, after which drag the opposite half immediately into the 3D View window.

When utilizing twin extrusion, the colour of the components within the 3D View panel signifies the extruder that will likely be used to print every half. As proven, each of those components can be printed in the identical materials by Extruder 1.
For this setup, PETG is Extruder 1 and the IGUS filament is Extruder 2. We would like the sleeve printed in IGUS, so we choose the bearing sleeve, then choose the Materials drop down bar on the proper facet of MatterControl.
We then choose the suitable extruder.
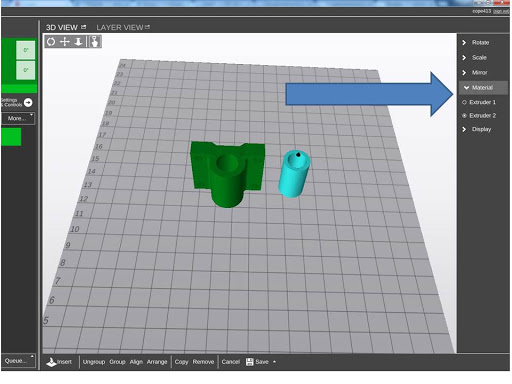
The colour of the half within the 3D View will change to point that the components are printed with totally different extruders.
Now, we have to align the components. Since we modeled them collectively, all we have to do is choose “Align”

Now the sleeve is correctly aligned contained in the housing. Save our modifications and we’re virtually able to print.
From our take a look at printing with the IGUS filament, we found that it has pretty low viscosity when at printing temp, so it’s liable to a good bit of oozing. When twin extruding, oozing is usually a difficulty with the extruder not at the moment in use. There are just a few methods to fight this. For the bearing print, we’re going to make use of a Wipe Tower.
Wipe Tower is simply seen within the Superior view mode. It’s below Settings > Basic > A number of Extruders.
The wipe tower is a strong block of filament printed off to the facet of the printed half that enables every extruder to prime and wipe earlier than starting the subsequent layer. We simply have to specify the dimensions of the tower. Getting into 10mm within the setting will make the wipe tower 10mm x 10mm and it’ll print as tall because the printed half. The wipe tower doesn’t present up within the 3D view, however we are able to have a look at it within the Layer View window.

The wipe tower will alternate between extruder 1 & 2 which helps each prime the nozzles in addition to get rid of some stringing/oozing from the precise printed half. On this picture, the black traces are extruder 1 and the teal traces are extruder 2.
The MakeIt Professional was used to print. We used coarse high quality settings – .3mm layer top – primarily to get the half printed shortly to check – they usually nonetheless got here out effectively on the primary attempt.

There are just a few areas the place the Tribo filament bled into the PETG and vice versa. However this was fairly minimal and shouldn’t have any impact on the perform of the half. The printed model is kind of a bit smaller in measurement and weight than the inventory model with the pressed-in bearing. Whereas this doesn’t actually have an effect on the efficiency in any vital means, we’re at all times a fan of constructing issues extra compact and environment friendly.
As you’ll be able to see within the video under, the bearing works nice. The printed bearing can also be fairly a bit quieter than the inventory bearing.
We’d name {that a} success! We needed to alter the scale a bit to get the precise match we had been on the lookout for – as little play as doable whereas permitting free motion alongside the graceful rod – however the finish outcomes had been glorious.
We’re not accomplished, although. Whereas we’re very proud of the twin extrusion outcomes, we additionally wished to point out how you should utilize 2 supplies on a component with out utilizing a twin extrusion 3D printer.
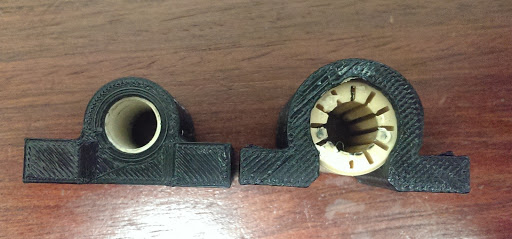
We modified the mannequin a bit in order that we are able to print the outer housing and the interior sleeve individually, and press them collectively.
Whereas it requires 2 separate print jobs, it has just a few advantages over printing in a single piece.
First, the prints are a lot cleaner. As a result of we’re simply utilizing 1 nozzle, oozing/stringing isn’t a difficulty. Second, it took us just a few iterations with the twin extrusion to get the interior diameter of the bearing to suit completely. The primary ones had a little bit of play and the twond model was slightly tight. It’s a lot faster and simpler to print the interior sleeve, take a look at the match, after which alter accordingly than it’s to must print the entire bearing meeting.
Lastly, and most necessary to us for this undertaking, printing them individually makes the components modular and extra simply replaceable. If the interior sleeve begins to develop some play, we are able to simply print a brand new sleeve and substitute it quite than having to print a complete new bearing meeting.
We printed out all of the bearings and put in them on the machine.

X carriage – double linear bearing on high rail, single on backside rail

Y-axis single bearings mounted to the mattress plate

Z-axis double bearing
We’re very proud of the outcomes. The printer strikes smoother, has much less play, and is noticeably quieter with the brand new bearings put in. The IGUS filament works superbly as linear bearing materials, and the PETG is robust, sturdy, and has a clear, shiny floor end. It’s an incredible mixture.
We’ve made our designs – each the twin and single extrusion variations – out there for obtain. They are going to work on any Taz 3/KitTaz, Taz 4, or Taz 5. The Taz 5 doesn’t use the identical Z-axis bearings, however the X and Y axis bearings are the identical. Print ‘em out, improve your machine, and ship us photos!
Together with the bearing upgrades, we additionally upgraded the electronics to an Azteeg X3 Professional with a Viki2 LCD show, and added the Kraken quad scorching finish, by E3D. Search for all these particulars and a few quad extrusion craziness within the subsequent function article.
Thanks for studying. Questions and feedback are at all times welcome and, as at all times,
Completely happy Printing!