

Eager about utilizing MatterControl’s 7 and 13 level print leveling? Though, this technique is simple to make use of, there could be some {hardware} or firmware settings you may want to repair first. This is how!
Posted on December 18, 2015
by
Taylor Landry
MatterControl not too long ago launched 7 and 13 level software program print leveling. These are nice choices for delta 3D printers, in addition to Cartesian printers with massive print beds.
Although very straightforward to configure and use, there are some {hardware} and/or firmware settings wanted to ensure that MatterControl’s software program leveling to operate correctly.
There are two primary configurations for 3D printers because it pertains to endstops and leveling – Z Minimal and Z Most. You probably have not been in a position to obtain correct leveling with MatterControl, we’ll cowl the options for each varieties.
To be able to get good leveling outcomes – no matter what sort of printer you have got – the nozzle of your sizzling finish should have the ability to pinch a chunk of paper (or feeler gauge) towards the mattress. You probably have a machine with a Z Minimal endstop setup – the place the Z endstop triggers on the mattress, Z=0 – it’s attainable that one space of the mattress could also be under Z=0. Since most Z-Min setups don’t bodily permit motion previous Z=0, this is not going to will let you get good software program leveling outcomes with out some changes. You probably have a Z-Max setup, you possible have firmware endstops enabled that additionally stop you from contacting the mattress. Fortuitously, each of those points are simply resolvable.
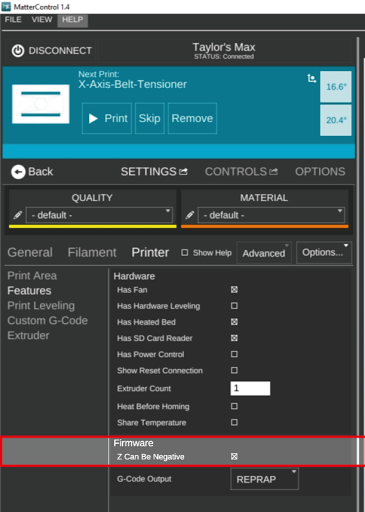
Most Delta printers use a Z Most endstop configuration. This implies the Z axis properties to the highest of the construct envelope, to not the mattress. To stop harm to the print mattress, there are sometimes software program endstops enabled within the firmware. These most frequently are set to not permit the machine to maneuver under Z=0, however it’s additionally frequent for them to be set to a really small damaging Z worth.
MatterControl, by default, doesn’t will let you go under Z=0, however you possibly can change this setting.
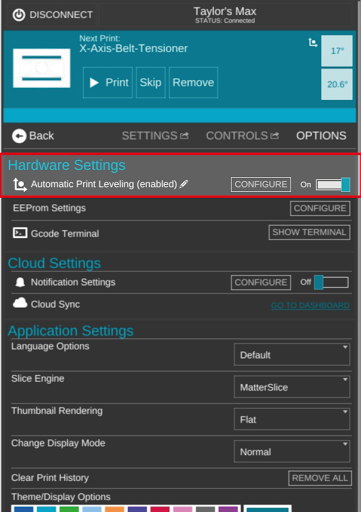
Upon getting allowed Z to be damaging, configure the auto leveling by means of MatterControl. Upon completion, click on the pencil icon subsequent to the Automated Print Leveling.
This may open a window displaying the entire sampled positions.
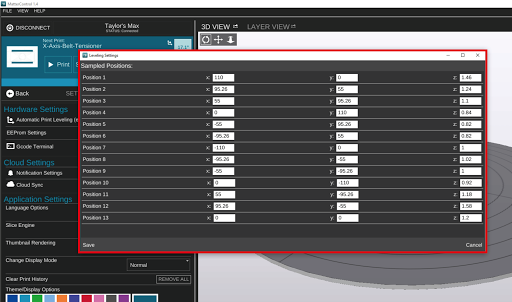
What we’re on the lookout for are any damaging Z values. If any of the positions have a damaging Z worth, it’s possible the firmware will stop correct print leveling.
For those who do have some damaging Z values, it’s straightforward to resolve. First, discover the bottom damaging Z worth. Let’s suppose the bottom worth you have got is -1.46. We’d then want to extend all of the Z values not less than 1.46mm with a view to get them out of damaging vary. So long as we shift all of the Z values the identical quantity, our software program leveling will nonetheless work correctly.
On this case, including 2mm to all Z values will get the whole lot into the optimistic vary, and will likely be a lot faster than including 1.46mm to every worth. You need to use the Up/Down arrows in your keyboard to shortly add/subtract 1mm. So, we’d click on on each Z worth – not simply the damaging values – and improve it by 2 mm.
As soon as that is finished, click on Save within the backside left nook of the window.
We’re not fairly finished but. The very last thing we have to do is alter our Z peak to account for the 2mm we simply added.
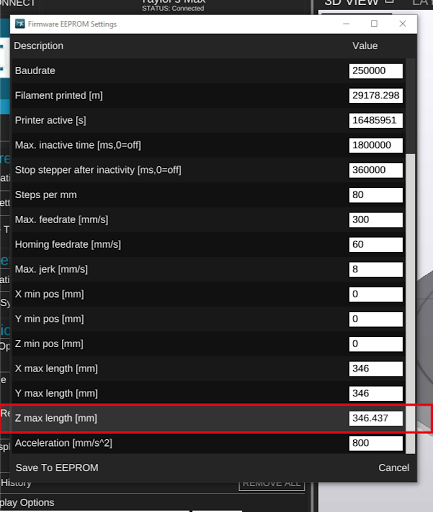
Most firmware on Deltas have the Z peak within the EEPROM.
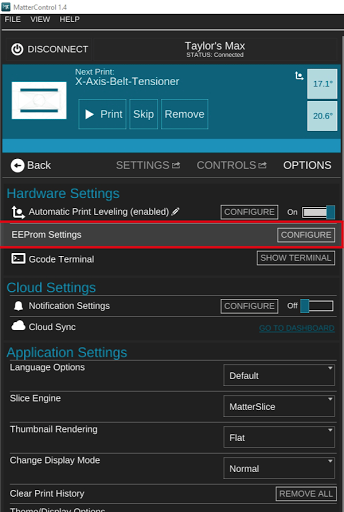
You’ll be able to entry EEPROM beneath the Choices tab. Find the Z peak area. On this machine, it’s referred to as Z Max Size.
Enhance this worth the identical quantity you elevated the Auto Leveling numbers. Click on Save to EEPROM within the backside left nook. And we’re able to print!
This could resolve any points you’re having with a Z-Max type machine and MatterControl Automated Print Leveling.
Obtained a Z-Min setup?
It’s not frequent for Z-Min type machines to have points with the auto leveling, however there are 2 choices to resolve this concern.
1) Run Software program Print Leveling. For those who attain an space on the mattress that you’re unable to maneuver Z decrease to appropriately pinch a chunk of paper towards the mattress, alter the peak of your mattress till it reaches the nozzle. If you should transfer the mattress throughout the configuration course of, you will have to run it once more as soon as accomplished as different sampled positions may have been affected by the mattress motion.
2) Regulate your Z endstop to permit the nozzle to maneuver decrease. Warning: That is solely really useful on machines that residence the Z axis with the nozzle positioned off to the aspect of the mattress. Doing this might permit your nozzle to smash into the glass when the machine properties initially of the configuration course of.
If you’ll be able to correctly transfer the Z axis to pinch a chunk of paper towards the mattress at all the factors within the leveling course of, the software program print leveling offers you a wonderfully stage print, whatever the bodily flatness of your print floor.