

Need to print in multi-color however solely have one extruder? Concern not! With only a easy trick utilizing MatterControl, you’ll be able to print with all the colours of the rainbow.
Posted on January 19, 2016
by
Erica Derrico
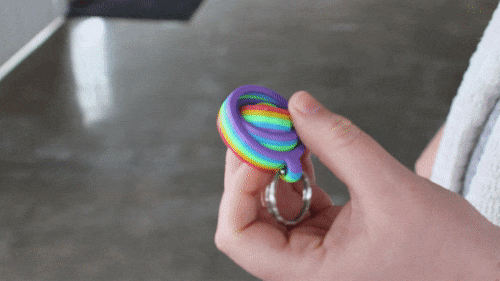
Once I first began working at MatterHackers all of my mates have been so intrigued by the idea of 3D printing, I’d typically get the query, “What does one thing 3D printed seem like?”. So I made a decision to make myself a key chain I may placed on my automobile keys; one thing I may simply seize out of my bag when individuals requested me. The difficulty was, I’m a really colourful particular person. I didn’t need my key chain to be only a single colour, I wished it to be 5 colours. However, I used to be solely a novice, and the printer I used to be utilizing solely had one extruder.
With a little bit little bit of chatter with the tech crew, they knowledgeable me that with the ability of MatterControl, and a few work on my finish, I may have my colourful key chain.
Girls and gents, I did it! And with these easy directions, you’ll be able to too!
Getting began with Multi-color printing:
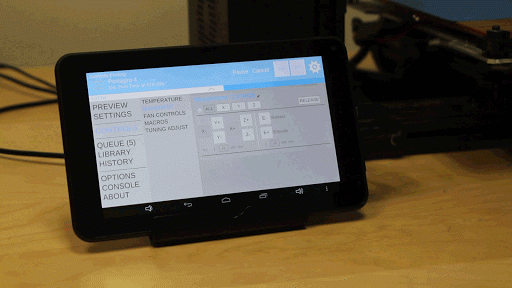
Step 1- Open up MatterControl and think about the file you want to print. As soon as, you might be viewing your file, you’ll need to go to Layer View.
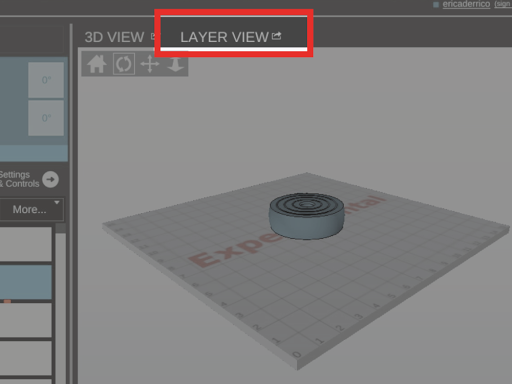
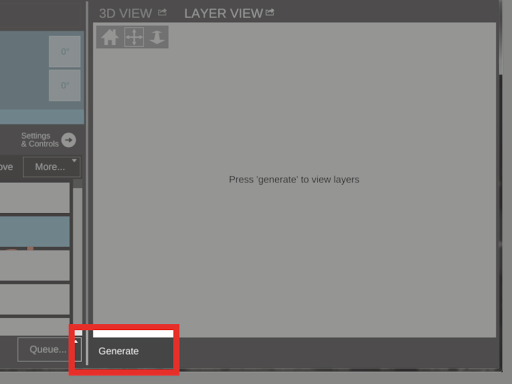
Choose Layer View, you may be prompted to generate the layers on your file. Hit ‘Generate’ and wait on your layers to load.
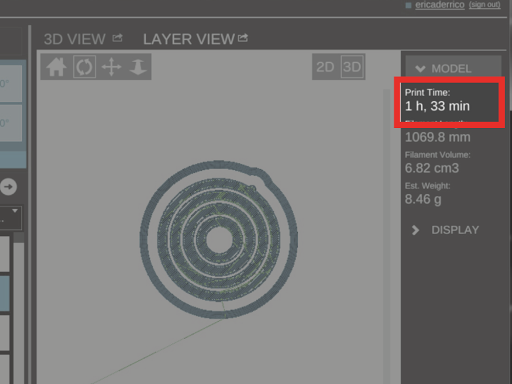
Step 2- As soon as your layers have generated. You’ll discover MatterControl reveals you your print time. This is essential as a result of you’ll must take your print time and divide it by the quantity of colours you may be utilizing; granted you need the colours to be evenly distributed.
My file right here, goes to take 93 minutes to print. For this demo, we’re going to use three colours. So which means, every colour will print for about 31 minutes. What you may wish to do is use some type of timer that may provide you with a warning each 31 minutes. My selection is the helpful dandy timer that’s on my telephone and it really works nice.
Step 3– Prep your print house, have all the colours you wish to use close by and know the order you wish to print them in. Upon getting your first colour loaded, hit print!
Step 4- You’ll want to start out your timer. However do not begin your timer proper while you hit print! You’ll wish to wait till you printer truly begins extruding, then you’ll begin your timer.

Printing Begins
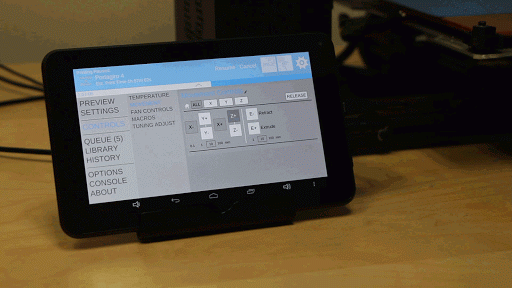
Step 5- So that you wait however, as soon as you might be at about one minute left you may must do some prep. Choose ‘Settings & Controls’ in MatterControl. It’s key to have this up earlier than the next step.
Step 6- When your timer lastly goes off, you’ll choose the ‘Pause’ button.
When your print has paused you’ll then go to your Motion Controls and choose ‘Z+’ between 2-3 instances. You wish to be sure there may be not a number of time in between pausing your print and transferring your nozzle up. In any other case, you nozzle may soften your print in that one space.
Swap the filament:
Step 7– It’s at the moment you’ll change your filament. Launch the extruder’s chilly finish leven and take away the present colour fully. Load your new colour. Make sure there aren’t any clogs and push the filament by means of the new finish till you see the colour change out the nozzle.

New colour feeding by means of
Step 8- With the second colour swapped in, choose the ‘Resume Print’ button.
When you hit print you’ll restart your timer as soon as extra and look ahead to it to be up. You’ll undergo steps 4-8 for every colour till you might be completed!
Now you’ll be able to have your personal colourful key chain or no matter you select to print!
I used the LulzBot Mini 3D printer to create my keychain, however you should use any single extrusion 3D printer so long as you might be utilizing MatterControl – obtain it without cost right here. Since this text has been written, I’ve had success with multi-color 3D printing on many alternative machines, together with Monoprice 3D printers, Ultimakers, and extra!
Completely happy Printing!