

As organizations scale their observability and analytics capabilities throughout a number of AWS Areas and environments, sustaining constant dashboards turns into more and more advanced. Groups typically spend hours manually recreating dashboards, creating workspaces, linking information sources, and validating configurations throughout deployments—a repetitive and error-prone course of that slows down operational visibility.
The subsequent era OpenSearch UI in Amazon OpenSearch Service introduces a unified, managed analytics expertise that decouples from particular person OpenSearch domains and OpenSearch collections. It supplies workspaces, devoted group areas with collaborator administration and a tailor-made surroundings for observability, search, and safety analytics use instances. Every workspace can hook up with a number of information sources, together with OpenSearch Service domains, Amazon OpenSearch Serverless collections, and exterior sources resembling Amazon Easy Storage Service (Amazon S3). OpenSearch UI additionally helps entry with AWS IAM Id Middle, AWS Id and Entry Administration (IAM), Id supplier (IdP)-initiated single sign-on (SAML utilizing IAM federation), and AI-powered insights.)-initiated single sign-on (SAML utilizing IAM federation),and AI-powered insights.
On this submit, you’ll discover ways to use the AWS Cloud Growth Package (AWS CDK) to deploy an OpenSearch UI software and combine it with an AWS Lambda perform that mechanically creates workspaces and dashboards utilizing the OpenSearch Dashboards Saved Objects APIs. Utilizing this automation implies that environments launch with ready-to-use analytics which might be standardized, version-controlled, and constant throughout deployments. which might be standardized, version-controlled, and constant throughout deployments.
Particularly, you’ll discover ways to:
- Deploy an OpenSearch UI software utilizing AWS CDK that in flip makes use of AWS CloudFormation
- Mechanically create workspaces and dashboards utilizing a Lambda based mostly customized useful resource
- Generate and ingest pattern information for instant visualization
- Construct visualizations programmatically utilizing the OpenSearch Dashboards Saved Objects API
- Authenticate API requests utilizing AWS Signature Model 4
All of the code samples on this submit can be found on this AWS Samples repository.
Answer overview
The next structure demonstrates find out how to automate OpenSearch UI workspace and dashboard creation utilizing AWS CDK, AWS Lambda, and the OpenSearch UI APIs.
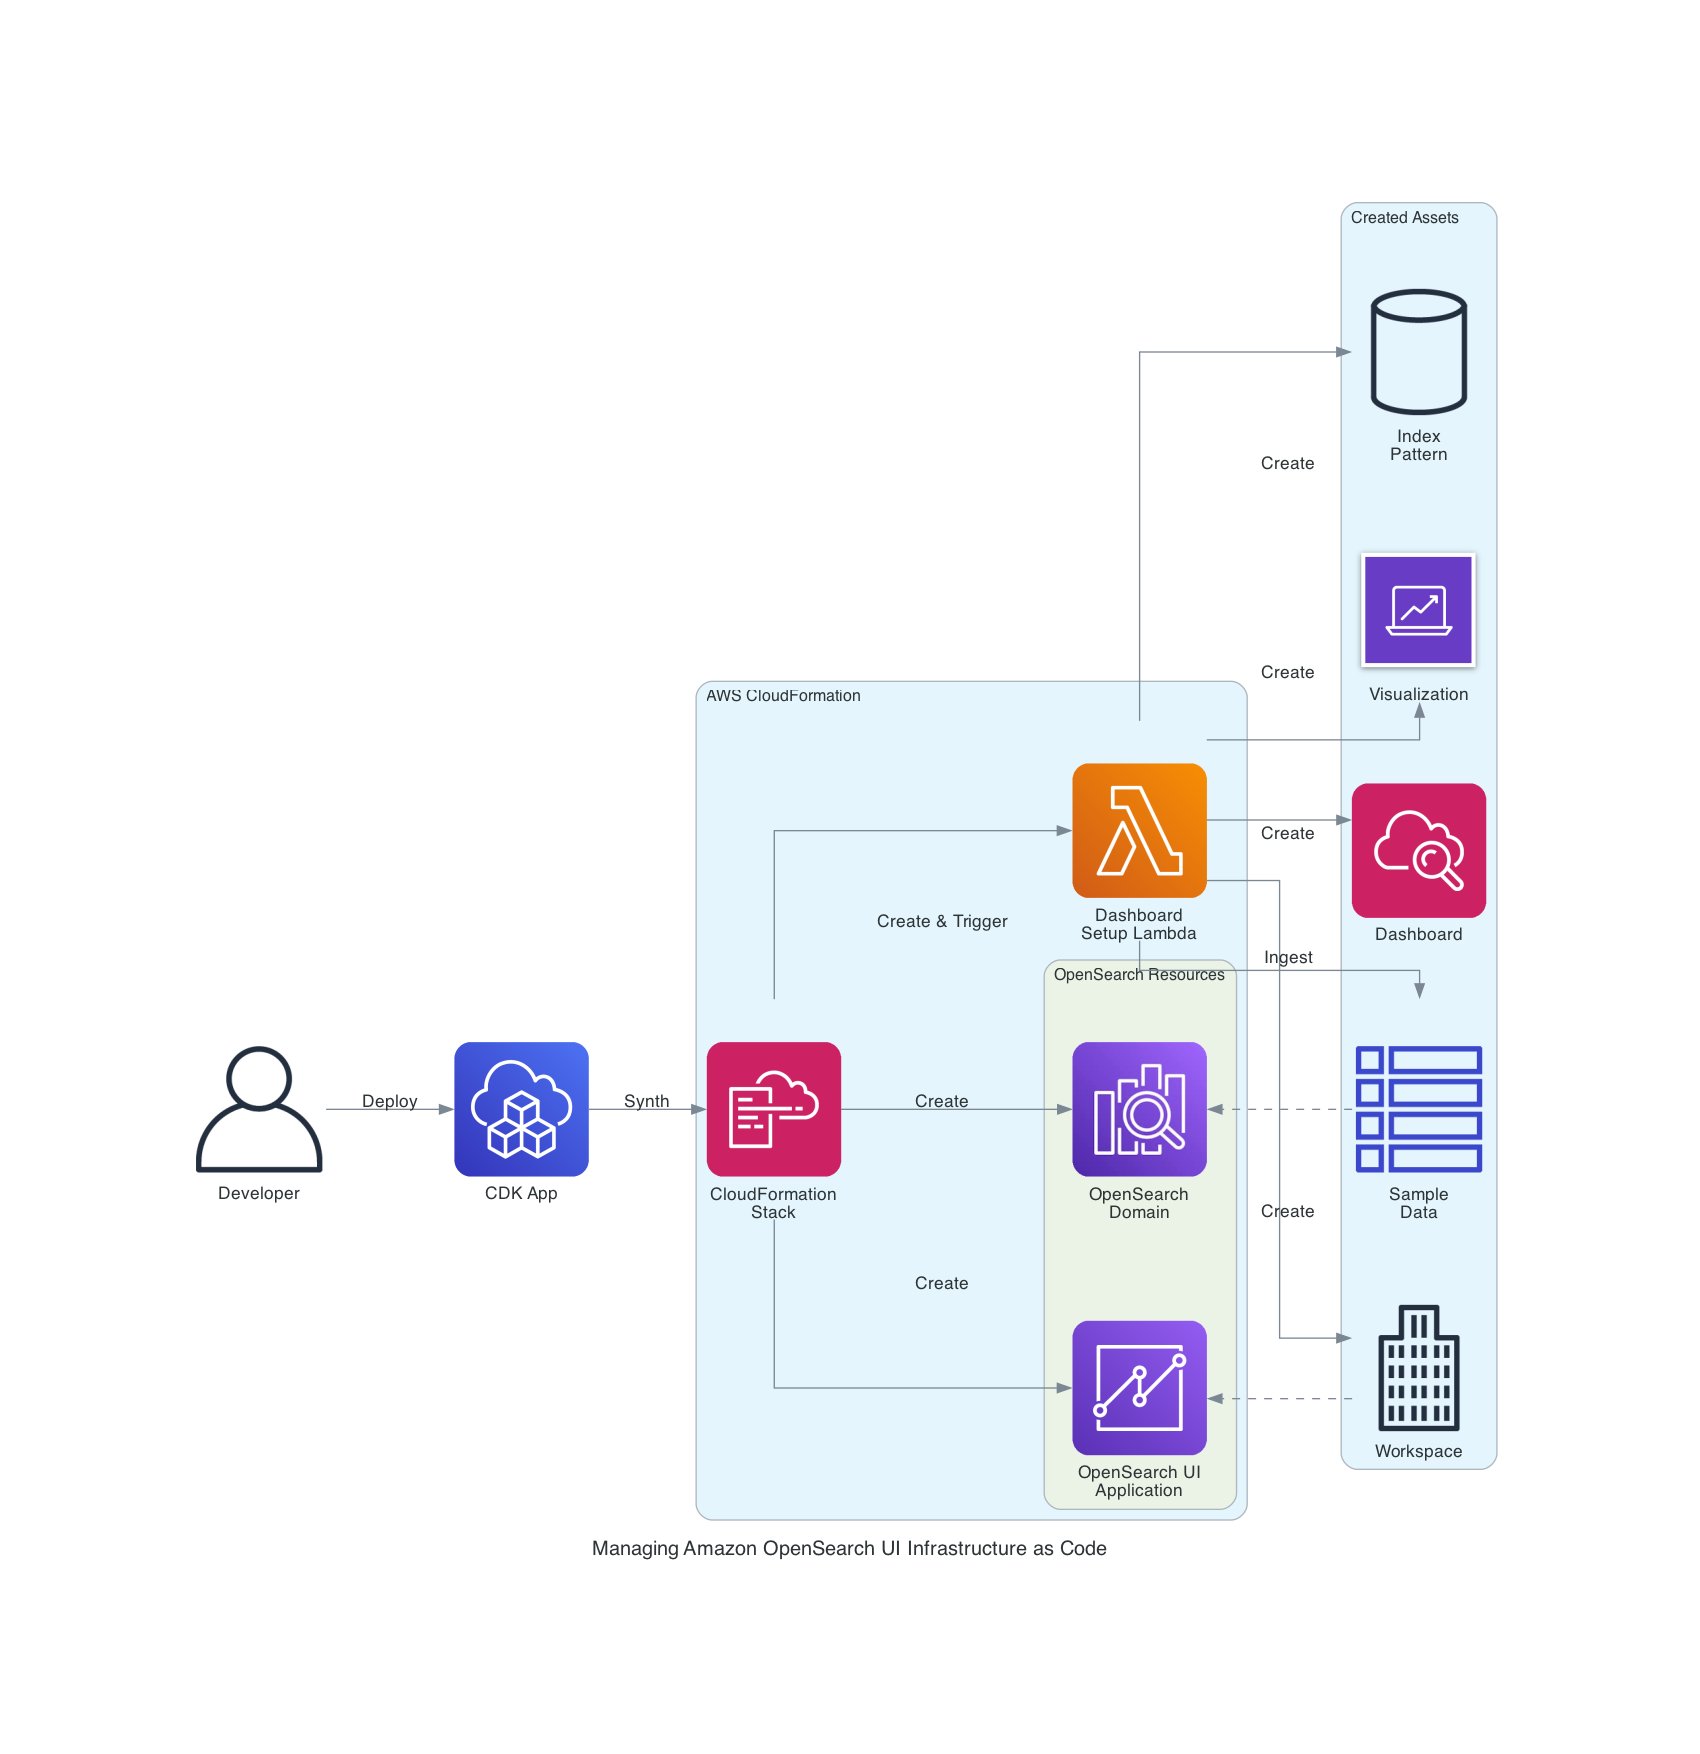
The workflow flows from left to proper:
- Deploy stack – Developer runs
cdk deployto launch the infrastructure and create the CloudFormation stack. - Create area – CloudFormation creates the OpenSearch area (which serves as the information supply)
- Create OpenSearch UI app – CloudFormation creates the OpenSearch UI software
- Set off Lambda – CloudFormation invokes the Lambda perform as a customized useful resource
- Generate and ingest information – Lambda generates pattern metrics and ingests them into the area
- Create workspaces and belongings utilizing saved object API – Lambda creates the workspace, index sample, visualization (pie chart), and dashboard utilizing OpenSearch UI API calls
The result’s a totally configured OpenSearch UI with pattern information and a ready-to-use dashboard automated via infrastructure as code (IaC). The identical workflow will also be built-in into present infrastructure for OpenSearch UI functions to mechanically create or replace dashboards throughout future deployments, sustaining consistency throughout environments. consistency throughout environments.
Stipulations
To carry out the answer, you want the next stipulations:
- An AWS consumer or position with enough permissions – You’ll want permissions to create and handle AWS assets resembling OpenSearch Service domains, OpenSearch UI functions, Lambda features, IAM roles and insurance policies, digital personal cloud (VPC) networking elements (subnets and safety teams), and CloudFormation stacks. For testing or proof-of-concept deployments, we advocate utilizing an administrative position. For manufacturing, comply with the precept of least privilege.
- Set up improvement instruments:
- Bootstrap CDK – This can be a one-time setup per account or Area:
This creates the required S3 bucket and IAM roles for AWS CDK deployments in your account.
Get the pattern code
Clone the pattern implementation from GitHub:
The repository accommodates:
This pattern demonstrates find out how to deploy an OpenSearch UI software, create a workspace, ingest pattern information, and mechanically generate visualizations and dashboards utilizing IaC.
After cloning the repository, you’ll be able to deploy the stack to mechanically create your first OpenSearch workspace and dashboard with pattern information.
Understanding the answer
Earlier than deploying, let’s look at how the answer works. The next steps clarify the structure and automation logic that can execute mechanically if you deploy the AWS CDK stack. The subsequent part accommodates the precise deployment instructions you’ll run.
Provision OpenSearch UI assets
The AWS CDK integrates seamlessly with AWS CloudFormation. This implies you’ll be able to outline your OpenSearch assets and automation workflows as IaC. On this resolution, AWS CDK provisions the OpenSearch area, OpenSearch UI software, and a Lambda based mostly customized useful resource that performs the automation logic.
When deploying OpenSearch UI automation, the order of useful resource creation is vital to accurately resolve dependencies. The really useful order is as follows:
- Create the Lambda execution position – Required for entry to AppConfigs and APIs
- Create the OpenSearch area – Serves as the first information supply
- Create the OpenSearch UI software – References the Lambda position in its AppConfigs
- Create the Lambda perform – Defines the automation logic
- Create the customized useful resource – Triggers the Lambda automation throughout stack deployment
The next code snippet (from cdk/lib/dashboard-stack.ts) reveals the important thing infrastructure definitions:
These are some vital implementation notes:
- The Lambda position should be created earlier than the OpenSearch UI software so its Amazon Useful resource Title (ARN) may be referenced in
dashboardAdmin.teams - The Lambda position contains each
opensearch:ApplicationAccessAll(for OpenSearch UI API entry) andes:ESHttp*permissions (for ingesting information into the OpenSearch area) - The customized useful resource allows the automation perform to run throughout deployment, passing each OpenSearch UI and OpenSearch area endpoints as parameters
Authenticate with OpenSearch UI APIs
When programmatically interacting with the OpenSearch UI (Dashboards) APIs, correct authentication is required so your Lambda perform or automation script can securely entry the APIs. The OpenSearch UI makes use of AWS Signature Model 4 (SigV4) authentication—just like the OpenSearch area APIs—however with a couple of vital distinctions.
When signing OpenSearch UI API requests, the service title should be opensearch, not es. This can be a frequent supply of confusion: the OpenSearch area endpoint nonetheless makes use of the legacy service title es, however the OpenSearch UI endpoints require opensearch. Utilizing the incorrect service title will trigger your requests to fail authentication, even when the credentials are legitimate.
For POST, PUT, or DELETE requests, embody the next headers to fulfill the OpenSearch UI API safety necessities:
| Header | Description | |
| 1 | Content material-Kind | Set to software/json for JSON payloads |
| 2 | osd-xsrf | Required for state-changing operations (set to true) |
| 3 | x-amz-content-sha256 | SHA-256 hash of the request physique to make sure information integrity |
The SigV4 signing course of mechanically computes this physique hash when utilizing the botocore AWSRequest object, sustaining request integrity and stopping tampering throughout transmission.
The next code snippet (from lambda/sigv4_signer.py) demonstrates find out how to signal and ship a request to the OpenSearch UI API:
This utility perform indicators the request utilizing the proper service title (opensearch), attaches the required headers, and sends it securely to the OpenSearch UI endpoint.
Create workspace and dashboard with pattern information
The Lambda perform (lambda/dashboard_automation.py) automates your complete means of provisioning a workspace, producing pattern information, and creating visualizations and dashboards via the OpenSearch UI APIs. Go to the next lists of APIs:
Observe these steps:
- Find or create a workspace. Every dashboard within the OpenSearch UI should exist inside a workspace. The perform first checks whether or not a workspace already exists and creates one if vital. The workspace associates a number of information sources (for instance, an OpenSearch area or OpenSearch Serverless assortment):
This logic allows repeated deployments to stay idempotent; the Lambda perform reuses present workspaces moderately than creating duplicates.
- Generate and ingest pattern information. To make the dashboards significant upon first launch, the Lambda perform generates a small dataset simulating HTTP request metrics and ingests it into the OpenSearch area utilizing the Bulk API:
The perform then ingests this information into the area:
This allows every deployment to incorporate pattern analytics information that instantly populates the dashboard upon first login.
- Create a visualization. After the index sample is accessible, the Lambda perform creates a pie chart visualization that reveals HTTP standing code distribution:
This visualization will later be embedded inside a dashboard panel.
- Create the dashboard. Lastly, the Lambda perform creates a dashboard that references the visualization created within the earlier step:
This completes the dashboard creation course of, offering customers with an interactive visualization of software metrics as quickly as they entry the workspace.
The total implementation, together with logging, error dealing with, and helper utilities, is accessible within the AWS Samples GitHub repository.
Deploy the infrastructure with AWS CDK
With the AWS CDK stack and Lambda automation in place, you’re able to deploy the total resolution and confirm that your OpenSearch UI dashboard is created mechanically.
Deploy the stack
From the foundation listing of the cloned repository, navigate to the AWS CDK folder and deploy the stack utilizing your IAM consumer ARN from the Stipulations part:
The deployment course of usually takes 20–25 minutes as a result of AWS CDK provisions the OpenSearch area, OpenSearch UI software, Lambda perform, and customized useful resource that runs the automation.
Confirm the deployment
After the deployment completes:
- Open the OpenSearch UI endpoint displayed within the AWS CDK output.
- Register utilizing your IAM credentials.
- Swap to the newly created
workspace-demoworkspace. - Open the Software Metrics dashboard.
- View the pie chart visualization that shows the distribution of HTTP standing codes from the pattern information.

The dashboard mechanically shows a pie chart visualization populated with artificial software metrics, demonstrating how the Saved Objects API can be utilized to bootstrap significant analytics dashboards instantly after deployment.
Enhancement 1: Simplify dashboard creation with Saved Object Import API
As your OpenSearch Dashboards evolve, managing advanced dependencies between index patterns, visualizations, and dashboards can grow to be more and more troublesome. Every dashboard typically references a number of saved objects, and manually recreating or syncing them throughout environments may be time-consuming and error inclined.
To simplify this course of, we advocate utilizing the Saved Objects Import/Export API. You should utilize this API to bundle complete dashboards, together with their dependent objects, right into a single transferable artifact. Through the use of this method, you’ll be able to model, migrate, and deploy dashboards throughout environments as a part of your CI/CD workflow, sustaining consistency and lowering operational overhead.
Export your dashboard
You’ll be able to export dashboards immediately from the OpenSearch UI or use saved object export API:
- Open Stack Administration after which Saved Objects
- Choose the dashboard and associated objects (for instance, visualizations and index patterns)
- Select Export
- Save the exported file as
dashboard.ndjson
This file accommodates saved objects serialized in newline-delimited JSON (NDJSON) format, prepared for versioning or deployment automation.
Import dashboards programmatically
You’ll be able to programmatically import the NDJSON file right into a goal workspace utilizing the Saved Objects import API:
Through the use of this method, you’ll be able to deal with dashboards as deployable belongings, precisely like software code. You’ll be able to retailer your exported dashboards in supply management, combine them into your AWS CDK or CloudFormation pipelines, and mechanically deploy them to a number of environments with confidence.
Enhancement 2: Improved safety configurations
In some instances, you may need to enhance the safety configuration of your OpenSearch UI software, otherwise you could be coping with OpenSearch domains which were deployed with extra safety configurations. On this part, we talk about how one can enhance the safety configuration of your OpenSearch UI software and nonetheless obtain IaC with AWS CDK. Extra particularly, we clarify how one can arrange your OpenSearch UI software when your OpenSearch area is in a VPC and when fine-grained entry management is enabled.
When the OpenSearch Area resides inside a VPC, extra configurations will probably be wanted to correctly join together with your dashboard.
Allow communication between Lambda features used to ingest information and the OpenSearch area within the VPC
When the OpenSearch Service area resides in a VPC, the Lambda features that ingest information into the area should be capable to talk with it. Probably the most easy means of doing that is to permit the Lambda perform to be executed throughout the identical VPC as your OpenSearch Service area and provides it the identical safety group. An instance is supplied within the GitHub repository.
- Enable HTTPS communications from purchasers making an attempt to speak together with your OpenSearch Service area. On this instance, the consumer will probably be utilizing the identical safety group used within the OpenSearch Service area:
- Add this managed coverage to the position assumed by the Lambda perform to permit it entry to the VPC:
- Specify the VPC and the safety group your Lambda perform will probably be utilizing. On this case, the VPC is similar one utilized by your OpenSearch Service area:
Authorize OpenSearch UI service for VPC endpoint entry
For the OpenSearch Service area to be accessible to your dashboard, VPC endpoint entry should be enabled. This may be achieved through the use of a customized useful resource, as proven within the following configuration:
Allow fine-grained entry management
Whenever you use fine-grained entry management together with an OpenSearch UI, you might have extra management over which operations are allowed for every consumer. This may be particularly helpful if you need to restrict your customers’ actions past the admin, learn, or write permissions that include OpenSearch UI. Distinctive roles may be created and mapped to a number of customers to attain exact management over who can entry what performance.
Within the earlier sections, the identical Lambda was used to make requests to each the OpenSearch Service area and the OpenSearch UI. Nevertheless, in conditions the place the principle position isn’t the identical between the OpenSearch Service area and the OpenSearch UI, we advocate making a Lambda perform for every position. Once more, when deploying OpenSearch UI automation, the order of useful resource creation is vital to accurately resolve dependencies. As illustrated beforehand, the really useful order is as follows:
- Create the dashboard Lambda execution position – Required for entry to AppConfigs and APIs
- Create the OpenSearch area primary position – Required for area creation and APIs
- Create the OpenSearch area – Serves as the first information supply
- Create the OpenSearch area Lambda perform – Defines the automation logic for the OpenSearch area
- Create the OpenSearch area customized assets – Triggers the Lambda automation throughout stack deployment
- Create the OpenSearch UI software – References the Lambda position in its AppConfigs
- Create the OpenSearch UI Lambda perform – Defines the automation logic for the OpenSearch UI
- Create the OpenSearch UI customized useful resource – Triggers the Lambda automation throughout stack deployment
When creating the OpenSearch Service area, specify the fine-grained entry management parameter, as follows:
The Lambda perform chargeable for speaking with the OpenSearch Service area ought to have the required permissions to jot down to it. The next is a configuration instance the place the Lambda perform assumes the area’s primary position:
Then, add the customized assets to create the roles and position mappings, as wanted:
Create extra roles within the OpenSearch Service area (Elective)
If you wish to grant particular permissions to some customers, we advocate creating roles for them. This may be achieved by making the next requests to the OpenSearch Service area endpoint.
For extra details about the roles endpoint, evaluate the Create position within the OpenSearch documentation.
Create position mappings within the OpenSearch area in your dashboard customers (Elective)
Customers may be mapped to a number of roles to regulate their entry to the OpenSearch Service area, which will probably be mirrored within the OpenSearch UI dashboard linked to the area.
For extra details about the rolesmapping endpoint, evaluate the Create position mapping within the OpenSearch documentation.
These are some vital implementation notes:
- By default, the OpenSearch Area will create a job mapping for its primary consumer, beneath
all_accessandsecurity_manager. For those who modify these mappings, we advocate conserving the principle consumer within the record to forestall unintentional lack of entry. - When fine-grained entry management is used, if a consumer opens the OpenSearch UI with out being mapped to a job within the OpenSearch Area, they are going to be unable to visualise or modify the information situated within the OpenSearch Area, even when they’re a part of the OpenSearch UI’s admin group. Because of this, we advocate creating customized assets so as to add the suitable position mappings. OpenSearch UI admins will nonetheless be capable to make modifications to the OpenSearch UI dashboards.
- When programmatically interacting with the OpenSearch Area APIs, correct authentication is required so your Lambda perform or automation script can securely entry the APIs. The OpenSearch Area makes use of SigV4 authentication. When signing the OpenSearch Area API requests, the service title should be
es.
Value concerns
This resolution makes use of a number of AWS companies, every with its personal price element:
- Amazon OpenSearch Service – That is the principle price driver. Fees are based mostly on occasion sort, variety of nodes, and Amazon Elastic Block Retailer (Amazon EBS) storage. For testing, you need to use a smaller occasion (for instance,
t3.small.search) or delete the area after use to attenuate price.) or delete the area after use to attenuate price. - AWS Lambda – The automation perform runs solely throughout deployment and incurs minimal prices for a couple of brief invocations.
- AWS CDK and CloudFormation – Create non permanent IAM roles and Amazon S3 deployment belongings with negligible price.
For pricing particulars, discuss with Amazon OpenSearch Service Pricing.
Clear Up
To keep away from incurring ongoing prices, clear up the assets created by this resolution if you’ve accomplished your testing.Open your challenge listing and destroy the AWS CDK stack:
This command removes the assets provisioned by the AWS CDK stack, together with:
- The Amazon OpenSearch Service area
- The OpenSearch UI software
- The AWS Lambda perform and customized useful resource
- IAM roles and insurance policies related to the deployment
By cleansing up, you cease the associated prices and preserve a tidy, cost-efficient AWS surroundings.
Extra assets
Conclusion
By integrating the Saved Objects API with the next-generation Amazon OpenSearch UI, you’ll be able to programmatically create complete analytics experiences—together with workspaces, pattern information, visualizations, and dashboards—immediately out of your IaC.
This method brings the ability of IaC to your analytics layer. Utilizing AWS CDK and AWS Lambda, you’ll be able to model, deploy, and replace dashboards constantly throughout environments, lowering handbook setup whereas enhancing reliability and governance. With this automation in place, your groups can give attention to insights moderately than setup—delivering observability-as-code that scales together with your group.
In regards to the authors