

In case your obsession with 3D printing is simply starting, take a look at these simple steps to a profitable first print. Seasoned vet? By no means hurts to brush up!
Up to date on September 6, 2023
by
Alec Richter
You probably did it! You have seen your pal’s 3D printer or actually favored the 3D printer you noticed at work or faculty, so you obtain your personal… now what? You are in luck because of this useful information to stroll you thru the steps of establishing your printer, the fundamentals of utilizing it, what to do together with your prints, or the place to even get fashions within the first place!
Making a Mannequin for 3D Printing
There are many 3D modeling applications that exist for 3D printing; some have a steep studying curve, and others are really easy that elementary faculties usually use it. Relying in your prior expertise with 3D modeling, listed below are some choices:
Introductory 3D Modeling Packages
These are the applications to make use of for those who’ve by no means performed any 3D modeling earlier than:
- Sketchup: Free and simple to make use of, however the 3D fashions it creates often wants repairs to turn out to be 3D printable.
- Tinkercad: Free, simple to make use of (designed with youngsters in thoughts), restricted to combining fundamental shapes like packing containers, spheres, and cones. You’ll be able to be taught extra about the best way to use Tinkercad right here.
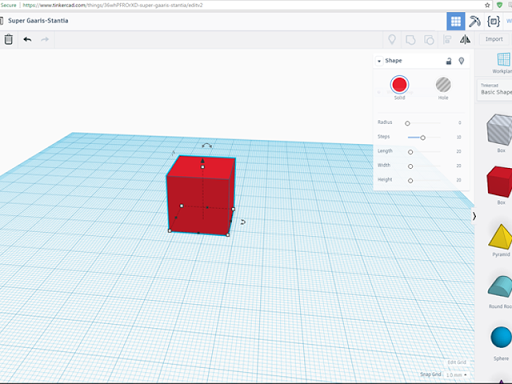
Instance of TinkerCAD’s interface
Intermediate 3D Modeling Packages
These are used for a mess of functions, from mechanical fixtures to natural film props, these are versatile applications:
- Fusion 360: Used to mannequin very geometric components like engine blocks, fixtures, mounts, and even 3D printer components. It will also be used for natural fashions, like helmets and different props. It is free for startups [with a revenue less than $100,000 per year], hobbyists, and fanatics, however you will want a subscription license in any other case.
- Meshmixer: A free, digital clay modeling program, just like Zbrush.
- Onshape: Like Fusion360, however most just like Solidworks. It is free, however all recordsdata are public until you pay for a subscription to allow personal file internet hosting.
- Blender: With a steep studying curve, this mesh modeling program is mostly used for modeling for video video games or rendering. There are various tutorials, and it’s free. Study extra about Blender right here.
Instance of Blender’s interface
Superior 3D Modeling Packages
These applications are good for individuals with in depth information of 3D modeling, or for these feeling daring and are prepared to totally decide to the artwork of 3D design.
- Solidworks: For geometric modeling, that is the highest of the road product; it is function wealthy, simple to make use of, and has it is personal “Data Base” to search out the solutions to all of your Solidworks questions. It is $4,000 to $8,000 with a yearly renewal charge.
- 3DS Max: For mesh modeling, that is the very best of the very best – used throughout many industries, thus it comes at a steep worth – $185/month or a $3,675 one-time charge.
- Zbrush: For sculpt-modeling, that is within the top-tier. Primarily, it is digital clay sculpting – each mannequin begins as a ball, and particulars are made by pulling materials out from it, pushing in, or carving away. A few of the most complicated film props and costumes are designed on this and can be generally present in recreation improvement. Pretty reasonably priced at a $795 one-time buy.
Instance of SolidWork’s interface
3D Mannequin Restore and Modification Instruments
- Netfabb: This free, strong software program is most helpful in slicing fashions too massive to suit in your print mattress, merely drag the “slice aircraft” and determine the place you need your cuts, then export every separated chunk into its personal 3D mannequin file. It has many different options to restore or modify the mannequin to enhance the 3D printing course of.
- Meshlab: One other free restore software that’s nice for bringing down the polygon depend of a mannequin. Some fashions are so huge that the majority slicing software program cannot deal with it, even on a robust laptop.
If you happen to’re nonetheless unsure which 3D modeling software program will probably be finest for you, take a look at a extra in-depth article right here.

NetFabb will detect and allow you to restore damaged STLs
Downloading a 3D Mannequin for 3D Printing
Perhaps you are not fairly able to mannequin but, and that is okay! There are various completely different web sites referred to as “file repositories” that exist simply to gather 3D fashions particularly for 3D printing.
- MatterHackers Design Retailer: We host a wide range of 3D fashions, some for useful functions, others purely for enjoyable. You’ll be able to test it out right here.
- Thingiverse: The large one. Thingiverse has an enormous assortment of fashions. Nonetheless, there is no restriction to the fashions uploaded when it comes to printability. So, until you see another person has printed it, your mileage could differ. Generally, most fashions are printable.
- MyMiniFactory: Every mannequin has to have an hooked up picture of a efficiently printed mannequin, so each mannequin will really work.
- Yeggi3d: This searches a wide range of different file repositories, however would not at all times work in addition to looking out every web site individually.
- Cults3D: One other file repository to flick through.
- Pinshape: Often runs contests for fashions referring to incapacity help. Some fashions should not free and on the market.
- CGTrader: Largely paid for under fashions, however extremely detailed and usually professionally modeled.
The MatterHackers Digital Design Retailer – discover superior recordsdata to print!
Instruments of the Commerce
We now have a tremendous useful article on the varied instruments you have to to start out 3D printing. If you happen to do not feel snug getting all these instruments firstly and need to construct up your toolbox, not less than be sure to have a PVA (not PHP) glue stick, Aqua Internet hairspray (model is restricted), a spatula to take away your prints, blue painter’s tape, and a pair of pliers to scrub off assist.
Obtain Slicing Software program
Slicing is the time period used for the method that takes your 3D design (probably an .stl file) and transcribes it into the “language” that the printer can perceive (gcode). Slicing mainly takes your 3D digital mannequin and turns it right into a ton of actually tiny layers. There are various slicing softwares that exist, some paid for, others free, however MatterHackers has an superior slicer referred to as MatterControl. MatterControl has printer profiles, so yow will discover your make and mannequin and robotically have all the mandatory settings stuffed in. Plus, you’ll be able to retailer all your .stl recordsdata within the cloud, and even share them with your pals. Oh, did we point out that it’s utterly free to obtain?
Instance of MatterControl’s user-friendly interface.
Optimizing Your Settings
In MatterControl, there are lots of settings you’ll be able to change, from how briskly you print, to how scorching your printer is, and every little thing in between. To begin off, you will not want to vary many settings, actually, “Fundamental” settings are all you have to as you first discover ways to 3D print. These are the settings you’ll first see:
Materials:
- This setting dictates how scorching your printer’s nozzle and mattress are relying on the fabric. PLA 3D filament, a newbie materials, prints with the nozzle at 200°C and the mattress at 60°C (if the printer has a heated mattress), whereas ABS 3D filament, a extra superior materials, prints with a 240°C nozzle and as much as 110°C for the heated mattress. Ensuring your printer is on the proper temperature is crucial for a profitable print, and altering your materials choice is a straightforward setting to vary.
Layer Top:
- That is the place you will get ultra-fine decision in your prints, or actually fast and soiled, first draft prints. The decrease this quantity, the finer every layer of plastic that laid down will probably be. Generally, we backside out at 0.10mm with a 0.40mm nozzle; any decrease and it is laborious to even discover a distinction for a dramatic improve in print time. If you happen to simply have to see how an element feels in your palms or the way it matches as a mannequin illustration, 0.30mm layer top is nice; it is so much faster at this top and element are much less pronounced, however for those who simply want to check how your mannequin works then it is a perfect setting.
- Relying in your printer’s scorching finish, you could possibly change your nozzle to one thing with a bigger or smaller diameter gap. For any nozzle, it’s best to by no means print at a layer top higher than 75% of the nozzle’s diameter; e.g. a 0.40mm nozzle maxes out at 0.3mm layers, however a 0.80mm nozzle can go as much as 0.60mm layers.
- The explanation for that is that layers higher than 75% battle to get the right adhesion per layer.
Fill Density:
- Fill Density determines how strong or hole your half is. 0% infill makes your half utterly hole, conversely, 100% makes your half utterly strong. Any proportion in between may have MatterControl robotically generate a sample inside to fill in and supply power.
- For purely beauty prints, I exploit 10% infill, however anyplace from 0% to fifteen% might work effectively.
- For prints that must be robust however not rock strong, I like 25%. “Commonplace” in MatterControl is 30%, so anyplace round there’s good. Props and issues which are dealt with are effectively suited to this infill setting
- For fixtures and printer components, 50% to 80% ought to be used. This gives components with sufficient rigidity however simply sufficient flexibility to not break as simply beneath strain.
Create Raft:
- Rafts are designed to offer higher adhesion to the mattress. Though it’s mostly used for ABS filament, it may be generated for any materials. A raft is precisely what it feels like; a number of sacrificial layers to offer the mannequin a considerable amount of floor space to stick to the mattress.
- It was extra generally used, however with developments in slicing engines, they’re virtually out of date aside from excessive circumstances, like a mannequin the place barely any of it touches the construct plate and nearly all of the primary layer is assist materials. Brims are the brand new normal.
Generate Help Materials:
- Activates or off scaffolding to assist your 3D print. An important factor to examine earlier than printing is whether or not your mannequin has what’s referred to as “overhangs.” These are sections of the mannequin which are at an angle higher than 45 levels from the mattress. Producing assist materials for fashions like that is important for fulfillment.
- For instance, a dice has no overhangs, however an the other way up “L” has a big overhang that wants assist printed beneath it, in any other case, it’ll droop and print very poorly, if in any respect. In essence, every layer is stacked on high of the earlier, and if it is too far over the sting of the final it will fall over the sting.

These are the “Fundamental” settings which are out there in MatterControl. Begin with this and work your approach as much as “Commonplace” once you’re prepared.
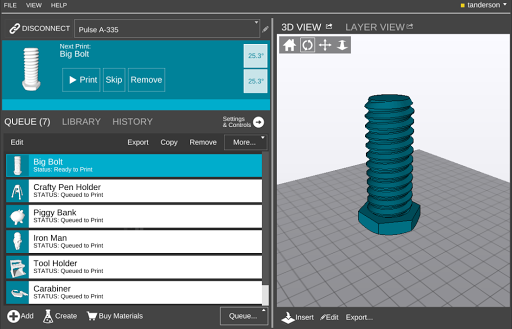
Producing Gcode
Gcode is the code language that the majority 3D printers run on. It is what tells them the place to maneuver, how briskly to maneuver there, and the way scorching to be. There are some 3D printers that run on completely different languages (some printers are proprietary, others simply unusual), however normally, Gcode is what your printer will perceive.
To generate the Gcode you want, you might have two choices: you’ll be able to “Export” within the backside proper once you’re within the “3D View,” or you’ll be able to go to “Layer View” and click on “Generate.” “Generate” will utterly slice your mannequin, however it’ll solely reserve it within the backend of MatterControl, which is useful for those who aren’t fairly certain if the settings on your print aren’t proper but and do not need to replenish your SD card. “Export” will slice your mannequin and reserve it to a location of your selecting.
As soon as the Gcode has been generated, for those who go to “Layer View” you’ll be able to view what every layer will appear like with both one layer at a time or in 3D and see the layer you might be on and all of the earlier layers.
Beginning Your Print
So, you might have your Gcode, however earlier than you get printing, let’s first run by means of a “pre-flight guidelines” to be sure to’re good to go.
1. Ensure that your mattress is degree. Relying in your printer there are lots of other ways to degree your mattress. Some use inductive sensors and probe the mattress, some have a swap that faucets across the mattress, others must be performed manually. If it is a manually leveled printer, you might have two choices: flip the thumb screws beneath the mattress to lift and decrease every nook till the entire mattress is degree to the nozzle, or use MatterControl’s mattress leveling software program to exactly align your mattress, even when it is ridiculously skewed. If you wish to strive baby-stepping to degree your mattress, learn our Function Highlight we now have on the tactic. Comply with the instructions offered together with your 3D printer.
Instance of child stepping
2. Add your mattress adhesive (if mandatory). Some supplies want mattress adhesives, others do not, and a few want very particular adhesives as effectively. There are a lot too many filaments to go over all of them, however we now have the Filament Comparability Information which matches over all the very best mattress adhesion supplies.
3. Load your filament. Some printers are bowden, which implies the extruder motor just isn’t on the print head, different printers are direct drive, which the extruder motor straight on the print head and strikes with it. Every technique masses barely in another way, so observe the directions offered by the printer producer. In both case, be certain that the nozzle is scorching once you change filament, and that the colour popping out the nozzle is similar because the one you place in; be certain that earlier filament is correctly purged.
4. Load your SD card or plug your printer into your laptop. They every have their execs and cons; printing straight out of your slicing software program means you’ll be able to baby-step your print if the mattress wasn’t as degree as you want, but when your laptop goes to sleep or restarts from an replace, you’ll lose the print. With an SD card, you surrender the advantageous tuning controls you’d get from MatterControl, however liberate your laptop.
When every little thing has been checked off, you are able to get printing! Wait – listed below are some fast suggestions although, do not stroll away simply but.
- Ensure that the primary layer goes down rather well. If it is smearing, you are too shut, for those who can simply see the place one line was laid down subsequent to the opposite, you are too far. You must discover that “goldilocks spot.”
- Watch the primary couple layers. The primary layer could also be advantageous, however the subsequent layer could have points. Stick round for a short while to verify every little thing goes easily.
- Do not sit there for the entire print. Inspect it usually, and be close by, however you need not monitor it. At our expertise degree, as soon as we have examined printers with brief prints we are able to monitor whereas we’re within the workplace, we’ll run weekend-long prints on them with out fear. For now, despite the fact that it could be tempting, (and I’ve undoubtedly been mesmerized by my printers) do not sit there and watch its each transfer, as soon as it is began and going effectively, pat your self on the again, seize a chilly one (beer, soda, water, no matter), and relax. Welcome to 3D printing.
We hope that this text has helped you achieve getting an awesome first print. If you’re nonetheless having some bother, be happy to remark under or electronic mail assist@matterhackers.com.